

Google Drive is so widespread that it shows up in almost every workday. If you are just getting started, this article walks you through the basics like uploading files and creating folders, then the most important part: the 3 types of Google Drive sharing you should be able to tell apart, and finally how to buy more storage. I have updated the sharing section to match the current Google Drive Share dialog (10/2026), since the 2019 interface no longer exists.
Sign in to Google Drive
To start using Google Drive, you need a Google (Gmail) account. If you don’t have one yet, create a Gmail account first. Once you have it, sign in to Google Drive at drive.google.com.
The first time you open Google Drive, a few introduction pop-ups will appear; just close them. The screenshot below is from when I first wrote this article. The current interface has slightly different colors and layout, but the main buttons are in similar places.

Upload files to Google Drive
To upload files to Google Drive, click the New button (plus sign) in the upper left corner of the Google Drive page.

You have 2 options to upload to Google Drive:
- File upload: you pick individual files to upload.
- Folder upload: you pick a folder, and every file inside it is uploaded to Google Drive.

Besides uploading files from your computer, you can also create files that Google Drive supports natively, such as Google Docs, Google Sheets, Google Forms, and more.

After uploading a file, you can rename it, delete it, or do other actions by right-clicking on it.

Create a folder in Google Drive
To create a folder in Google Drive, click New and then select Folder.
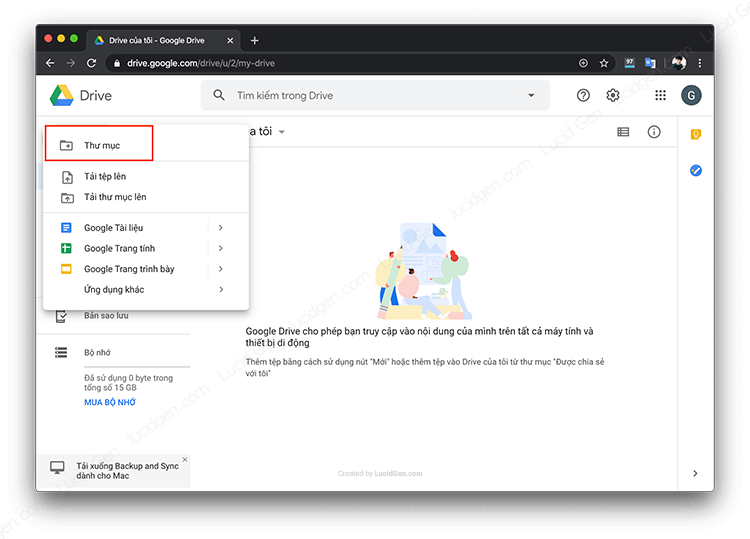
Give the folder a name, then click Create.
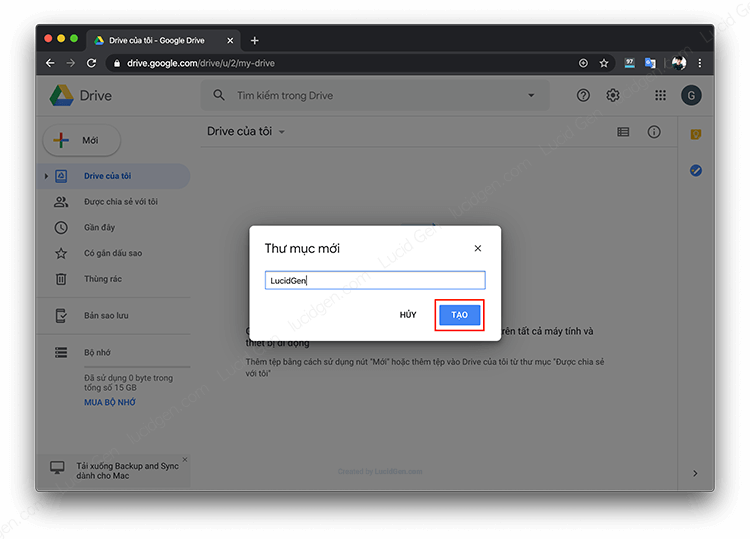
Move files into a Google Drive folder
Now that you have files and folders, the next step is organizing them. There are 2 ways to move files on Google Drive.
Method 1: click and hold the file you want to move, then drag and drop it into the destination folder.

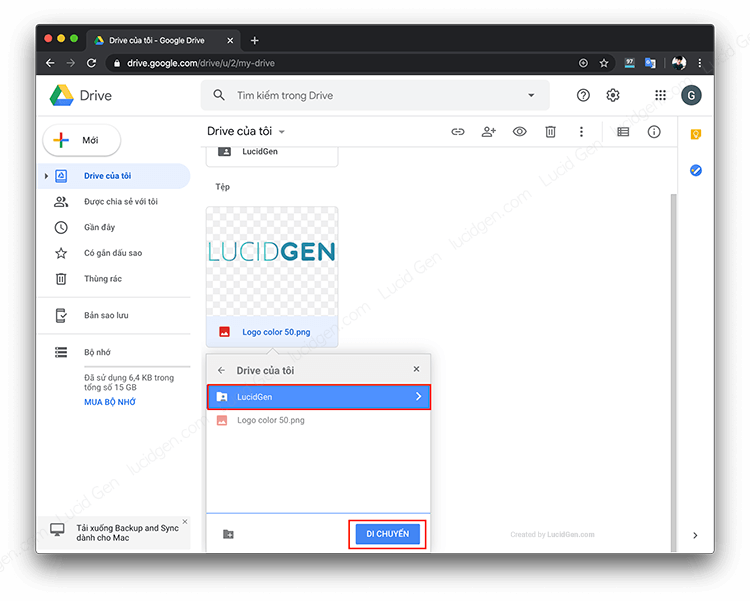
Method 2: right-click the file and select Organize > Move (the old interface called it Move to). A small window lets you pick the destination folder; after selecting it, click Move to finish.
Share files on Google Drive
Sharing is the part new users most need to understand; everything else is fairly easy. Before getting into the 3 sharing types, it helps to know that the current Google Drive Share dialog has 2 main parts:
- Add people box: where you enter the email addresses of specific people, with a role selector next to it.
- General access: decides who can open the file with the link. The default is Restricted (only people you added can open it), and you can switch it to Anyone with the link. Depending on your account type, you may also see Public, which means anyone can find the file on Google search.
Whichever way you share, you will pick one of these 3 roles:
- Viewer: can view and download the file, but cannot comment or edit.
- Commenter: can view, download, and leave comments, but cannot change the content.
- Editor: can view, comment, edit, and share the file with others.
Combining those two parts, here are the 3 types of Google Drive sharing used most often at work:
- Share so that anyone with the link can view.
- Share with specific people (by email) as Viewer, Commenter, or Editor.
- Share so that anyone with the link can edit.
All 3 start the same way: right-click the file or folder you want to share, then select Share to open the Share dialog. The screenshot below shows the right-click menu in the old interface; Share is still in this menu today.
Type 1: Anyone with the link can view
Use this when you want to send a document to many people without knowing each person’s email. Anyone who opens the link can see the file but cannot edit it.
Step 1: Open the Share dialog. Right-click the file and select Share.
Step 2: Turn on link access. Under General access, click Restricted and change it to Anyone with the link.
Step 3: Choose the role. In the role selector on the right, choose Viewer.
Step 4: Get the link. Click Copy link, paste it wherever you need, then click Done.
Note: People can open the file without signing in to a Google account. So avoid this type for sensitive files like payroll or customer lists, because once the link is forwarded around, anyone can see it.
Type 2: Share with specific people by email
This is the safest type, and the one I recommend when working with colleagues or clients. Only the people whose emails you add can open the file; others who get the link still cannot see it.
Step 1: Open the Share dialog. Right-click the file or folder and select Share.
Step 2: Add people. Enter the email addresses of the people you want to share with; you can add several at once.
Step 3: Choose the role. Pick Viewer, Commenter, or Editor depending on how much access they need.
Step 4: Send. Keep Notify people checked if you want them to get an email, add a message if you like, then click Send.
Keep General access set to Restricted for this type to make sense. If it is set to Anyone with the link, people you did not add can still open the file if they have the link.
After sharing, you can still change access by reopening the Share dialog and clicking the role selector next to the person’s name. From there you can change their role, remove access, or transfer ownership to them if needed (for example, when handing over work before leaving a job).
Type 3: Anyone with the link can edit
This is handy when many people need to fill in the same file, such as a class sign-up sheet or a team tracker, and you don’t have everyone’s email.
Step 1: Open the Share dialog. Right-click the file and select Share.
Step 2: Turn on link access. Under General access, change Restricted to Anyone with the link.
Step 3: Grant edit access. In the role selector on the right, choose Editor.
Step 4: Get the link. Click Copy link, send it to everyone, then click Done.
Warning: With this type, anyone who has the link can change or delete the content, even without signing in. Only use it for non-critical files, and switch back to Restricted once you have collected what you need. If something gets edited by mistake, you can go to File > Version history in Google Docs or Sheets to restore an earlier version.
For more detail, see Google’s official guide to sharing files from Google Drive.
Add shared files to My Drive with shortcuts
Google Drive used to have an “Add to My Drive” option for putting files that others shared with you into your own Drive. Since 2020, Google has replaced it with shortcuts, which is why many people thought the feature was gone. A shortcut is just a pointer to the original file; it does not create a copy and does not use your storage.
Method 1: Go to Shared with me, right-click the file or folder, select Organize > Add shortcut, choose where to put it, then click Add shortcut.
Method 2: In Google Chrome, select the file and press Ctrl + C, open the destination folder, then press Ctrl + Shift + V to paste a shortcut.
Recover deleted files on Google Drive
If you accidentally delete a file or folder on Google Drive, don’t worry; it stays in the Trash. Right-click it there to restore it or delete it forever. Keep in mind that Google automatically deletes items in the Trash after 30 days, so the sooner you notice, the better.

Sync Google Drive on computer & phone
File syncing between devices and the web is a core feature of cloud storage like Google Drive. If you are a designer or often work on 2 computers, you will find it useful.
Download Google Drive on your computer
The old Backup and Sync app has been replaced by Google Drive for desktop. Download it from google.com/drive/download, install it, and sign in with your Gmail account.
After installing, a Google Drive drive or folder appears on your computer. Files you put there are uploaded to Google Drive automatically, and files uploaded on the web show up on your computer too. In the settings there are 2 modes:
- Stream files: files stay in the cloud and are only downloaded when you open them, so they take almost no disk space.
- Mirror files: a full copy is downloaded to your computer, so files open quickly and work offline, but they use disk space.
I find syncing helpful but also a bit annoying, especially on a small drive. If your computer is low on space, Stream files is the lighter choice.
Download Google Drive on your phone
Google Drive on a phone does not sync files down like on a computer; it is mainly for viewing and managing files on the go. To get it, open your app store and search for Google Drive, or use the buttons below.
Check and buy more Google Drive storage
By default, Google gives you 15GB of free storage. Note that these 15GB are shared across Google Drive, Gmail, and Google Photos, not just Google Drive.
Look at the bottom left corner of Google Drive to check how much storage you have used. To buy more, click the get more storage button right below the storage bar, and Google will take you to the Google One plans page.

Google One offers several storage plans, and prices and plan names change fairly often, so I won’t list them here. Check the latest prices on the Google One plans page. My advice: if you are not sure how much you need, start with a small monthly plan, since you can upgrade at any time.
To pay, your Google account needs a payment method. You can add one during checkout, or go to pay.google.com and click Add payment method.

Enter your card details and click save.
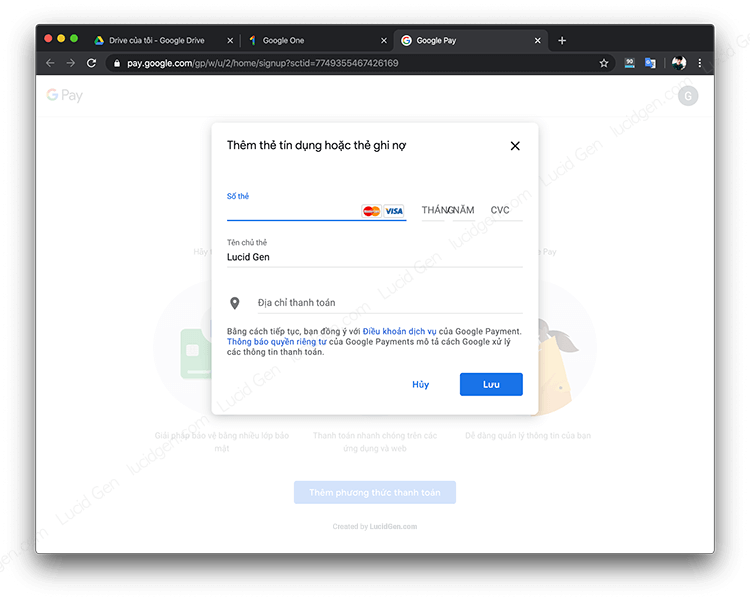
Once the payment method is added, go back to the Google One page to buy storage.
Conclusion
The basic operations in Google Drive are easy; the part worth remembering is the 3 sharing types. I recommend making Type 2 your default (share by email and keep General access set to Restricted) and only turning on “Anyone with the link” when you really need it, because once a link is out, it is hard to control who is looking at the file.
If your Google Drive looks different from what is described here, leave a comment below so I can update the article. Good luck mastering Google Drive!


