
To increase the security of your Instagram account or social network accounts in general, enabling Two factor authentication is the most effective way at the present time. Even if someone finds out the password to your Instagram account, they won’t be able to log in. So let’s learn with Lucid Gen how to enable Two factor authentication Instagram in this article.
How does the Two factor authentication feature on Instagram work?
The Two factor authentication feature on Instagram will require you to provide an authentication society every time you log in to your account. This authentication code will be sent to your phone via SMS, WhatsApp, and Google Authenticator. Therefore, only the owner of that phone can log in to the Instagram account.
Enable Two factor authentication Instagram
To quickly enable Two factor authentication on Instagram, you need to do the following steps:
Step 1: Access the Two factor authentication settings section. Go to Settings > Security > Two factor authentication.
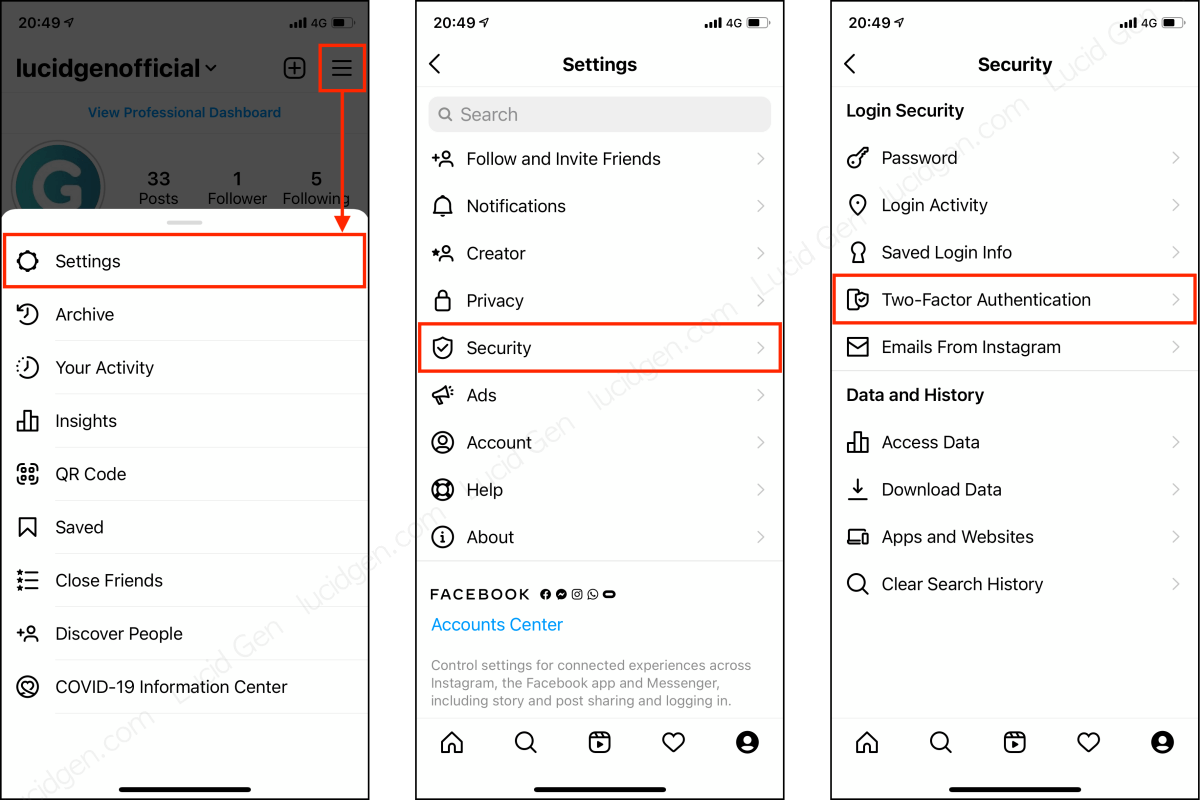
Step 2: Start and choose Two factor authentication method. There are 3 methods: WhatsApp, Authentication app, and Text message.

Instagram Two factor authentication with Google Authenticator
The advantage of this method is that you can still receive the authentication code when you are offline. Learn how to use Google Authenticator and get it on the App Store or Google Play. Next, follow these steps.
Step 1: Enable Authentication by application > click the Next button > select Yes when Google Authenticator asks for confirmation.

Step 2: Touch and hold the authentication code in Google Authenticator to copy and paste it into Instagram. Then click the Next button to go to the final step.

Step 3: If you change to a new phone (or lose your phone), copy these backup codes and store them in a secret place. Then you click the Done button to complete.

Instagram Two factor authentication using SMS
Even if you have enabled Two factor authentication using Google Authenticator or WhatsApp, you should still enable Two factor authentication for Instagram using SMS as a backup.
Step 1: You turn on the authentication method as Text Message. Then wait within 1 minute, and you will receive a text message sent to the phone number saved in your account information. Please enter the verification code and click the Next button.

Step 2: Copy and save these backup codes if you cannot receive the authentication message when logging in.

Instagram Two factor authentication using WhatsApp
If you’re using WhatsApp with a phone number saved in your Instagram account’s personal information, you can use WhatsApp authentication.
Step 1: You enable Two factor authentication on Instagram using WhatsApp.
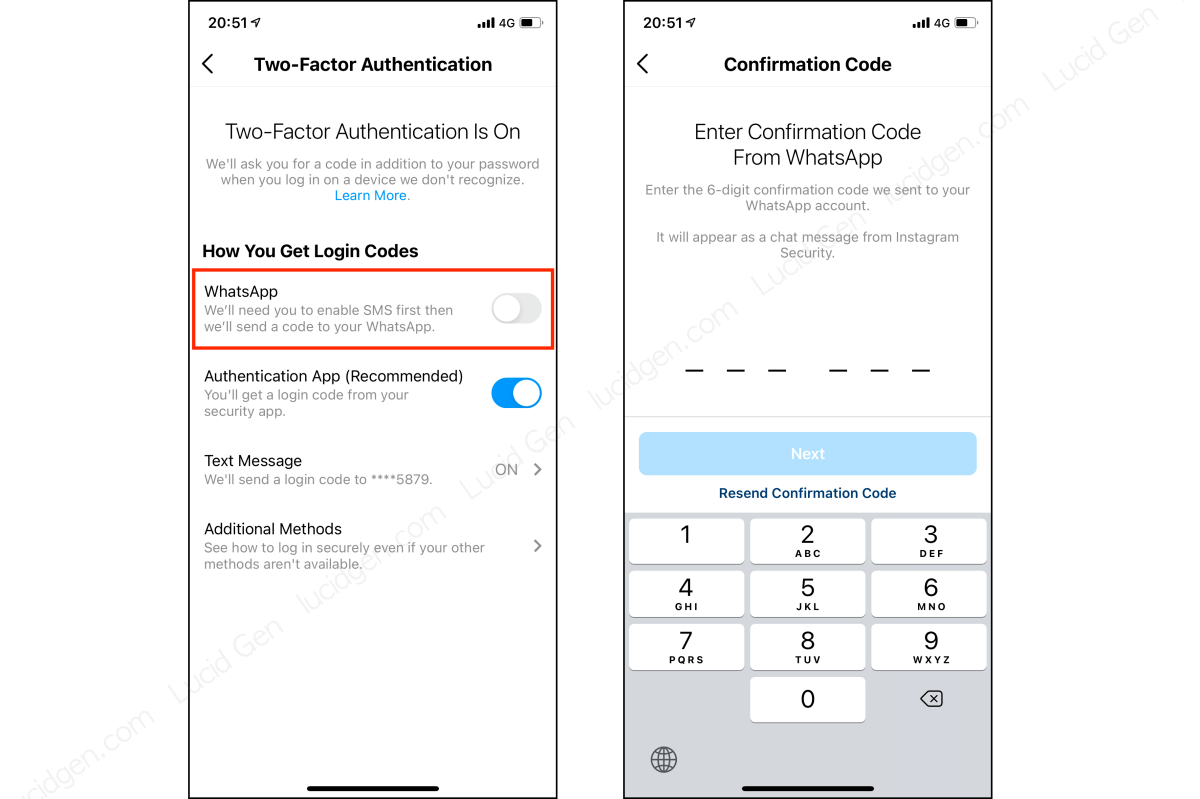
Step 2: You will receive a message with a verification code in WhatsApp, paste this verification code into Instagram to complete. This method requires no backup code.

How to turn off Two factor authentication Instagram
Fashion, beauty, cosmetics shops or businesses that use Instagram often have to share accounts with employees to post and advise customers. Sometimes this Two factor authentication feature also causes trouble for managers.
To turn off Two factor authentication on Instagram, go to Settings > Security > Two factor authentication.

Turn off the authentication methods you want and select Disable or Uninstall.

What do you do if you don’t receive the Instagram verification code?
If you can’t log in to Instagram because you can’t receive the authentication code, use the methods below to log in if you’re the account owner.
- Use backup authentication codes.
That’s why Lucid Gen prompts you to copy and save backup codes when you enable 2-factor authentication. If you have them saved, find them and use them for authentication when logging into Instagram. - Use the login link.
Use the reset Instagram password method to receive an Instagram login link by SMS or email saved in your Instagram account information. Just click this link, and Instagram will automatically log in.
Note when logging into Instagram
- Be careful when saving to trusted devices.
Trusted devices will not be asked for the authentication code again the next time they log in. If you are signing in using your device then select “Trust”. If you borrow someone else’s device, select “No”. - Protect phone numbers saved in Instagram account information.
Only the phone number saved in the account will receive the authentication code via text message. If you use a new phone number, don’t forget to update it to your Instagram account. - Add at least 2 authentication methods.
Each authentication method has bad cases, so add at least 2 authentication methods to prevent them.
Conclusion
Instagram and any social network have the Two factor authentication feature. To ensure the safety of your social network ecosystem, you should enable Two factor verification for them. If you find this article useful or need any support, please feel free to leave a comment below the article.


I lost my authenticator code and can’t access my Instagram account.
I feel sorry for you.