
Lucid Gen has about 200 attacks per day when looking through Wordfence’s report. However, I am completely secure under the protection of Wordfence because I am using the Premium version with full advanced security features. If you are looking for a security plugin for WordPress, then don’t miss this article. I will guide you to use Wordfence Security Premium in detail.
What is Wordfence Security?
Wordfence is a product of Defiant – the world leader in WordPress security. This plugin features firewall and malware scanning for WordPress websites.
Wordfence keeps up to date with the latest firewall rules, malware signatures, and malicious IP addresses needed to keep your website safe.
In addition, this plugin also integrates 2FA (2-Step Verification) and a set of other extra features. Wordfence is the most comprehensive WordPress security solution available today.
Features of Wordfence Premium
Free version features
- Firewall – Firewall
- Web Application Firewall – Web application firewall: a feature that helps protect your website against attacks and hackers from outside. Keep it short, but its use is the most important.
- Brute Force Protection – Protect your website against the classic attack that tries millions of different usernames and passwords to detect your login information.
- Block – Block IP: you can add any IP to your website block list, you can also add rules to automatically block.
- Rate Limiting – Limiting access and stealing content: this feature has 2 good points. The first is to block crawlers (crawling bots) to prevent your website from being scanned and stolen content. The second is to prevent bandwidth or DDOS attacks, such as bad guys accessing your website continuously in a short time, consuming resources and slowing down your website, causing users to have a bad experience on your website. friend.
- Scan – Scan for malware: scans all files on your website for malware, backdoors, shells and known malware on Wordfence data.
- Tool – Other supporting tools
- Live traffic – See real-time traffic: you can see which country the most recent visits come from, be it users or bots. However, we only need to focus on the access blocked by Wordfence. Like Lucid Gen blocks about 50 IPs every day.
- Whois Lookup – Check IP or domain information: this feature is easily available on many networks, ignore.
- Import/Export Options – Import and export Wordfence settings: if you have many websites that need to use Wordfence, you just need to configure it properly and then export that setting to another website, saving you the trouble of starting over.
- Login Security – Secure login
- 2-step verification: a very necessary feature these days, I have introduced in the article how to enable two- factor WordPress security.
- reCAPTCHA: helps determine if the user is a robot, does not allow continuous login attempts, also works against Brute Force mentioned above.
Premium version features
- Premium of the firewall
- Real-time Firewall Rules – Add firewall rules yourself: Wordfence’s firewall uses firewall rules to identify and block malicious access to your site, protecting you from WordPress attacks and latest security holes.
- Real-time IP Blocklist – Self-blocking IP according to Wordfence’s blacklist: block IPs that frequently attack WordPress websites, help protect websites and increase website performance (meaning less resources for bad guys).
- Country Blocking – Block IP by country: the feature is according to Lucid Gen which is the best of Wordfence Security Premium features. Block countries around the world from accessing your login page or your entire website. I block all countries (except Vietnam) from accessing the login page, which is great.
- Premium of malware scanning
- Real-time Malware Signatures: automatically detects malware on your website in real time, just like computer virus scanners, detects malicious software and blocks it immediately.
- Spamvertising Checks: check if your website is “Spamvertis” (a term that says advertising bad content through spam).
- Spam Check: check if your website IP is generating spam.
- Blocklist Check: check if your website is on the domain block list.
How to use Wordfence Security Premium
Now Lucid Gen will guide you through the most prominent (essential) features of Wordfence. I did not mention other miscellaneous settings in this article because it is not so important; when you have time, you can research more and customize according to your wishes.
After activating the plugin, you will receive this message, enter your admin email, select NO not to receive Wordfence newsletters, tick to agree to the terms and then click Continue.

When entering the Dashboard, click No thanks in the message asking if you want to update the new version automatically. The update method must be manual, as instructed above.

Turn on the firewall and configure website protection
Turn on the firewall
Method 1: The first time you use Wordfence, you will see the message “To make your site as secure as possible, take a moment to optimize the Wordfence Web Application Firewall”, please click the CLICK HERE TO CONFIGURE button. Then, you click the DOWNLOAD and CONTINUE buttons to finish.
Method 2: You click Firewall on the left menu, on the right, you go to All Firewall Options and then click the OPTIMIZE THE WORDFENCE FIREWALL button. Then, you click the DOWNLOAD and CONTINUE buttons to finish.

You have already turned on the firewall. But when using, Wordfence will leave Web Application Firewall Status in Learning mode, and you just let it finish learning, then it will automatically jump to Enable and Protecting.

Configure Brute Force Protection
- Lock out after how many login failures: Block IP after many failed login attempts, this item I will leave 1-2 times because we are real admins, there is no reason to log in wrong many times.
- Lock out after how many forgot password attempts: Block IP after many times sending password reset request, I also leave this item 1-2 times .
- Count failures over what time period: The total number of counts is calculated over a period of time, I leave 1 day to be more strict (choose the largest).
- Amount of time a user is locked out: How long will the user be blocked from IP, I choose 2 months (choose the maximum).
- Immediately lock out invalid usernames: Block IP immediately if anyone logs in with these usernames, enter the names that everyone can think of, remember not to enter your username.
- The remaining options: these items are not important, you turn them all on.

Configure Rate Limiting
- How should we treat Google’s crawlers: How do you handle the content crawlers (bots that scan Google’s content) content, you choose Verified Google crawlers will not be rate-limited , let’s just say Google scans freely to get indexed quickly. Other bots, we will handle with the options below.
- If anyone’s requests exceed: if the user or bot exceeds the number of hits, I choose 120 per minute then block it (120 pages per minute then block IP).
- If a crawler’s page views exceed: if the bot exceeds the number of pageviews that exist, I choose 120 per minute then block it .
- If a crawler’s pages not found (404s) exceed: if the bot exceeds the number of hits the non-existent page, I choose 60 per minute then block it .
- If a human’s page views exceed: if the user exceeds the number of visits the page exists, I choose 120 per minute then block i t.
- If a human’s pages not found (404s) exceed: if the user exceeds the number of visits the page does not exist, I choose 60 per minute then block it .
- How long is an IP address blocked when it breaks a rule: How long will the IP be blocked, I choose 1 month (maximum level).

Secure login page
If you follow this guide from Lucid Gen, you will ensure that the bad guys can’t attack Brute Force. Because they didn’t have time to access the login page, the IP was blocked. If you can access the login page, there is a reCAPTCHA, so you can’t detect the password and add 2-step verification. They probably won’t be able to get in by the time they get down the hole.

Block countries
If you live in a country, only that country can access the login page; the rest of the countries are blocked. For example, if you are in Vietnam, you will do it like this.
You click Blocking on the left menu, on the right, you choose Country, check Login Form ( Login page), click Pick from the list (choose from the list). Then, click the Block all button above, scroll down to find Vietnam to leave and then click the Update block button.

Block by URL
Bad guys abroad are no longer a problem, but what about bad guys in your own country. Just do it this way, you won’t have to worry anymore.
The logic of this section: bad guys often try to access your login page with easy-to-think default URLs like wp-login.php, login, admin, dang-nhap, dangnhap, etc. Then you will change the page URL login to a URL that no one else has come up with, only you know. Then, you set up Wordfence to automatically block bad guys who try to access easy-to-guess URLs like the one above. When they are blocked, they can’t try again; every time they insist they have to change their IP, they will give up <UNK>_<UNK> when it is difficult like this, they will give up ^_^.
Step 1: You install the WPS Hide Login plugin to change the login URL.
Let’s change it to a funny URL that no one can think of. For example, URL-nobody-suspected is the URL no one really thought of ^_^.

Step 2: You go to All Options in the left menu to find the Advanced Firewall Options section. Paste the URLs that the bad guys can guess into the Immediately block IPs that access these URLs section.
Danh sách này là ví dụ cho bạn nhé
/wp-login.php
/wp-login
/dang-nhap
/dangnhap
/login
/admin
Turn on 2-step verification for login
I recommend turning on 2-factor security for any accounts that are important to you on the Internet. In the past, this feature was in Wordfence Security Premium; later, the author added it to the regular version.
Click Login Security in the left menu, then uses Google Authenticator to add a 2-step verification code to your device.

Enable reCAPTCHA login
Having reCAPTCHA will make it difficult for bad guys to detect your password; if you have configured Brute Force Protection as strict as you, you can skip it because currently, the reCAPTCHA feature is not compatible with sites. Use Woocommerce.
Step 1: To use the reCAPTCHA feature, visit the Google reCAPTCHA page to create an account. Choose reCAPTCHA v3.

You will use this Site key and Secret key to fill in Wordfence.

Step 2: You go to Login Options on Wordfence’s menu; on the right, you select the Settings tab, scroll down to the section Enable reCAPTCHA on the login and user registration pages (Enable reCAPTCHA for login and registration pages ), then check the box and Paste the key in and Save.

Scan system malware
In this section, when used, you will ask Wordfence to scan or schedule to scan automatically. Wordfence will list it below when there is a problem, and you follow that to fix the error. However, you don’t need to fix every problem, and you can ignore it for your own reasons.
In this part, you only need to configure a bit. Click Scan Options and Scheduling.

Go to the detailed settings page, configure it like this guide:
- Scan Scheduling: since we are using Wordfence Security Premium, you have the right to schedule the scan as you like. I will let Wordfence scan late at night so as not to affect performance during hours of heavy traffic.
- Basic Scan Type Options: you choose the highest level is High Sensitivity .
- Performance Options: you tick Use low resource scanning to scan slowly without rushing to keep good performance for the website.

Use other tools
The features in the Tools section are not important, but they will help you a little in some cases.
View and install Live traffic
How to use: sad to see the game, see if he intentionally attacks the web many times, then clicks the block button.
Setting:
- Traffic logging mode: access log mode, you should select SECURITY ONLY so that Wordfence only logs for blocked dangerous access. If you leave all traffic on, it will greatly reduce website performance and we do not need to record normal visits.
- Amount of Live Traffic data to store (number of rows): the lower the number of log lines, the lower it will consume your server resources.
- Maximum days to keep Live Traffic data (minimum: 1): the number of days to keep the log, I leave it for 7 days, you can leave more depending on your purpose.
- Other options: doesn’t matter, leave as is.

Using Whois Lookup
You paste the IP or domain website in to check the information. Just like any other Whois site.

Export and import Wordfence settings for another website
This feature is quite handy when managing multiple WordPress websites. You need to configure the most standard for a website and then export its installation code to import into another website.

Configure email notifications
Make sure your website has SMTP to send an email. You configure yourself only to receive important alerts, and monthly aggregate reports will be available. This will save your email.

Note when using Wordfence Premium
Any plugin, when using it, will sometimes have this problem. I found the 2 most common problems when using Wordfence are errors when migrating hosting and accidentally getting blocked from your website.
Error handling when migrating hosting
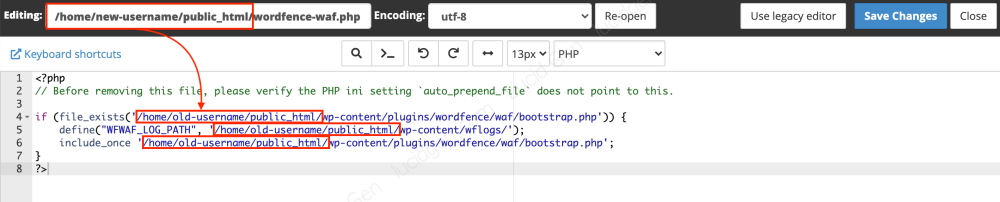
You open the File Manager on the hosting to update the new /home/username/public_html/ path for the following files:
- .htaccess
- .user.ini
- wordfence-waf.php

For example, if I edit the file wordfence-waf.php, the way to see the new path and replace the old path will be to copy the above and paste it below.
What to do when you are blocked by Wordfence
- Method 1: You enter the administrator email in the blocked message and send a request to open the IP address block. Then you check your email and follow the instructions to unblock your IP address.
- Method 2: You can turn on 4G to change the IP address and log in again.
- Method 3: You use File Manager on your hosting to change the Wordfence folder name (public_html/wp-content/plugins/wordfence) , the plugin will automatically deactivate, after you log in, you can rename the folder the Wordfence item again and re-enable it.
Epilogue
With this guide to using Wordfence Security Premium, I believe that your website will be absolutely secure. If you do not use plugins of unknown origin, there is nothing to worry about the security of your WordPress website anymore.
Have you used Wordfence yet? Leave a comment below to let me know and support you!


