

Turning on Facebook two-factor authentication early helps you avoid trouble with your Facebook account later. Many people lose their accounts simply because they never turned on two-factor authentication, or turned it off. Here’s an easy example: all it takes is being a little “too trusting” and logging in to Facebook on a strange page that promises free gifts or prizes, and your account is in trouble. There are also countless other ways your Facebook password can get exposed. So let’s learn how to turn on Facebook two-factor authentication with Lucid Gen today.
Note: The screenshots in this article show the 2021 interface, when these options lived under Settings > Security and Login. Meta has since moved Facebook and Instagram security settings into Accounts Center, so I’ve updated the paths in each section (10/2026). The authentication methods and the setup steps inside are still much the same.
What is Facebook two-factor authentication?
Facebook two-factor authentication is an effective way to protect your Facebook account when you log in. Even if someone enters your Facebook password correctly, they still can’t log in because they don’t have your two-factor authentication code.
The two-factor authentication code isn’t fixed. It changes to a new code every 30 seconds. So only the person who set up two-factor authentication gets the correct code when they need it.
How to turn on Facebook two-factor authentication
There are actually 4 ways to turn on Facebook two-factor authentication, but I’ll only cover the 3 most popular ones. Lucid Gen recommends turning on at least 2 methods so one can back up the other, especially the first 2 below.
- Authentication with the Google Authenticator app: As long as you have your phone, you’ll get the two-factor authentication code even when you’re offline, and you don’t have to worry about Facebook failing to send the code by text message. Both Lucid Gen and Facebook encourage this method.
- Authentication by text message: You need to keep your phone number (SIM). Sometimes, though, Facebook’s messages arrive late or not at all. If you use this method, set up another one as a backup.
- Authentication with recovery codes: You get 10 fixed backup codes to save somewhere safe, in case the other methods fail and you can’t receive a two-factor authentication code.
- Hardware security key (uncommon): You use a USB key for two-factor authentication. Every time you log in, you have to plug the USB key into your device. Feels like a spy movie, doesn’t it? This may be the most secure method, but it’s also the least convenient, so Lucid Gen doesn’t cover it here.
Even though they have the same owner, two-factor authentication on Instagram works a little differently from Facebook. Both support text messages and authentication apps; Instagram also offers WhatsApp, while Facebook also offers security keys (10/2026).
Turn on Facebook two-factor authentication on your phone
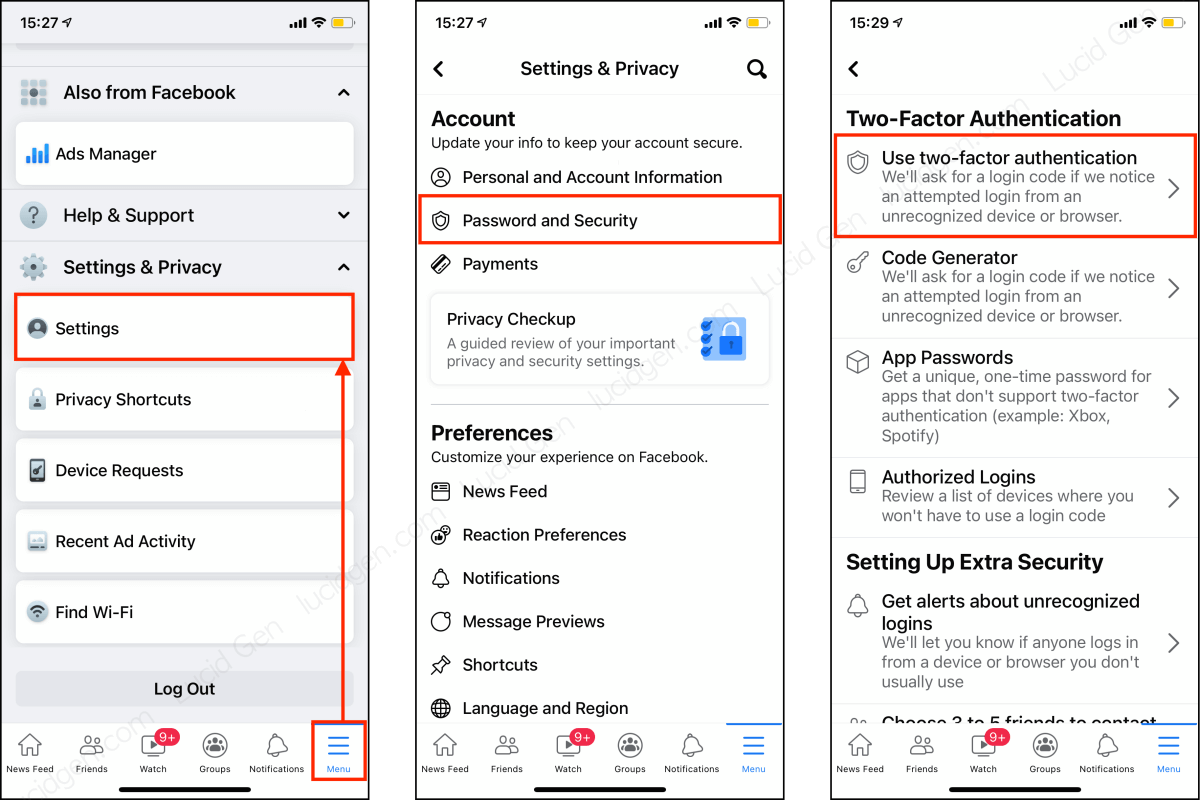
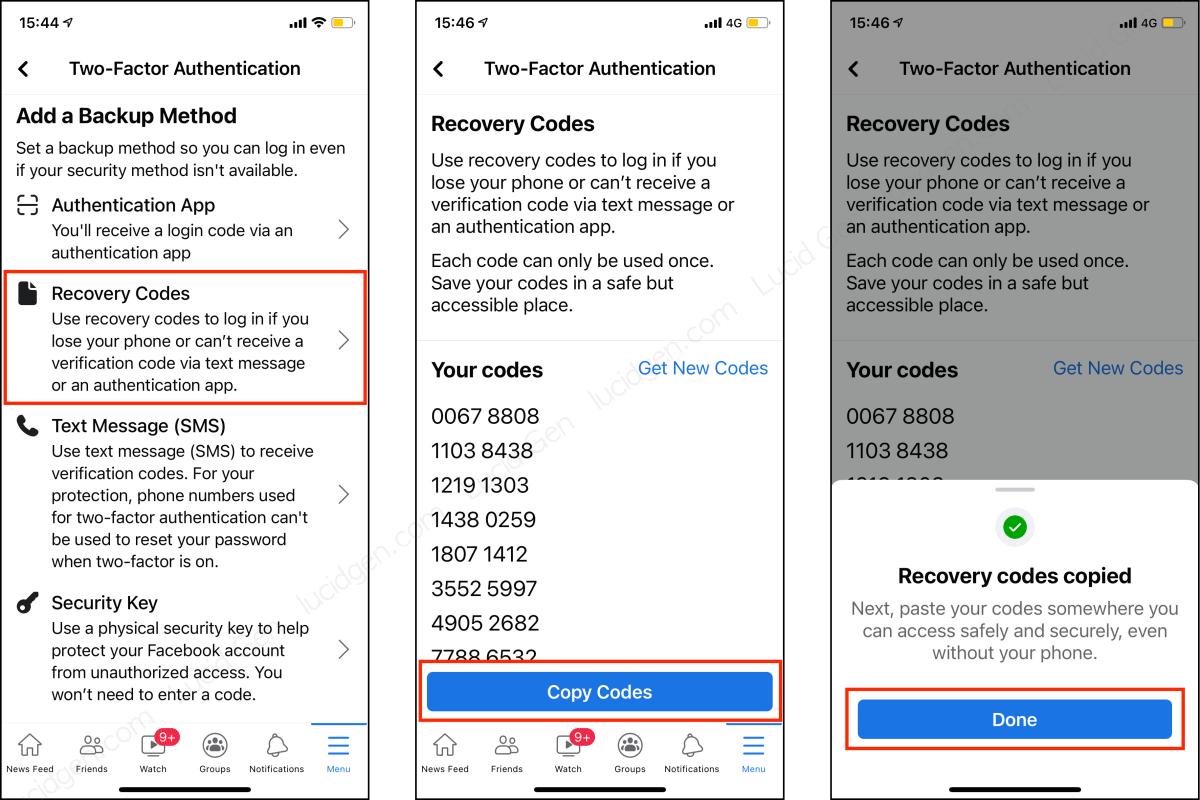
Open the Facebook app > tap Menu > Settings & privacy > Settings > Accounts Center > Password and security > Two-factor authentication, then select your Facebook account (10/2026).
Authenticate with the Google Authenticator app
Google Authenticator is one of the most popular two-factor authentication apps today. Download it from Google Play or the App Store on your phone; on a computer, there’s a different way to use it. If it’s your first time, check out the article on How to use Google Authenticator.
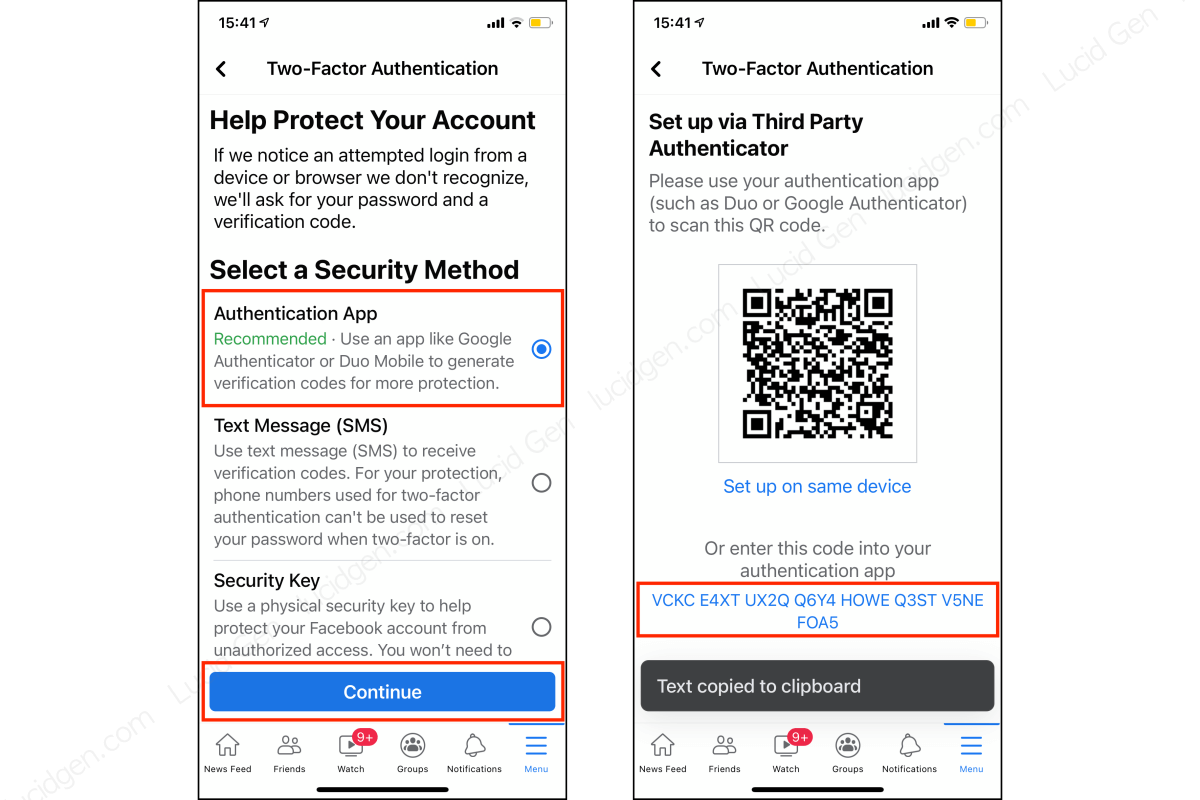
Step 1: Select Authentication App > tap Continue > tap the setup key to copy it.
This setup key is fixed. Two-factor authentication apps like Google Authenticator use it to generate a new random code every 30 seconds. Lucid Gen recommends keeping this key somewhere private, so you still have a way back into Facebook if you lose your phone.
If you want to change the setup key, just turn off Facebook two-factor authentication and then turn it back on.
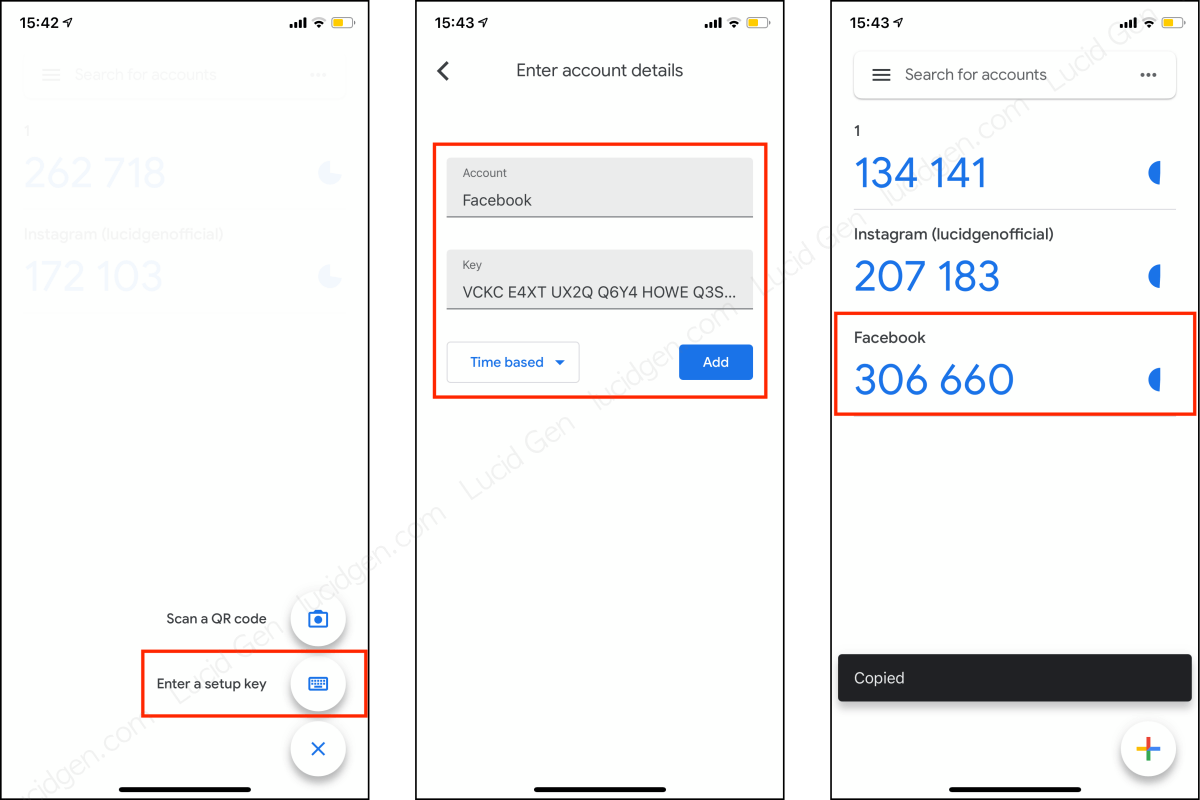
Step 2: Open the Google Authenticator app > tap the plus button > select Enter a setup key. Next, enter an account name and the setup key, then tap Add. Once the 6-digit code appears, tap it to copy.
Step 3: Go back to Facebook > tap Continue > paste the authentication code and tap Continue > tap Done to finish.

Authentication by text message
To turn on two-factor authentication by text message, select Text Message > choose an existing phone number or add a new one > enter the code from Facebook’s text message and tap Continue to finish.
You’ll usually get the message within 1 minute. If you’ve waited more than 5 minutes and still don’t see it, tap Resend Code. If you’ve tried a few times and still haven’t received the code, try again later or use a different phone number, because Facebook may be having trouble with text message authentication at that moment.
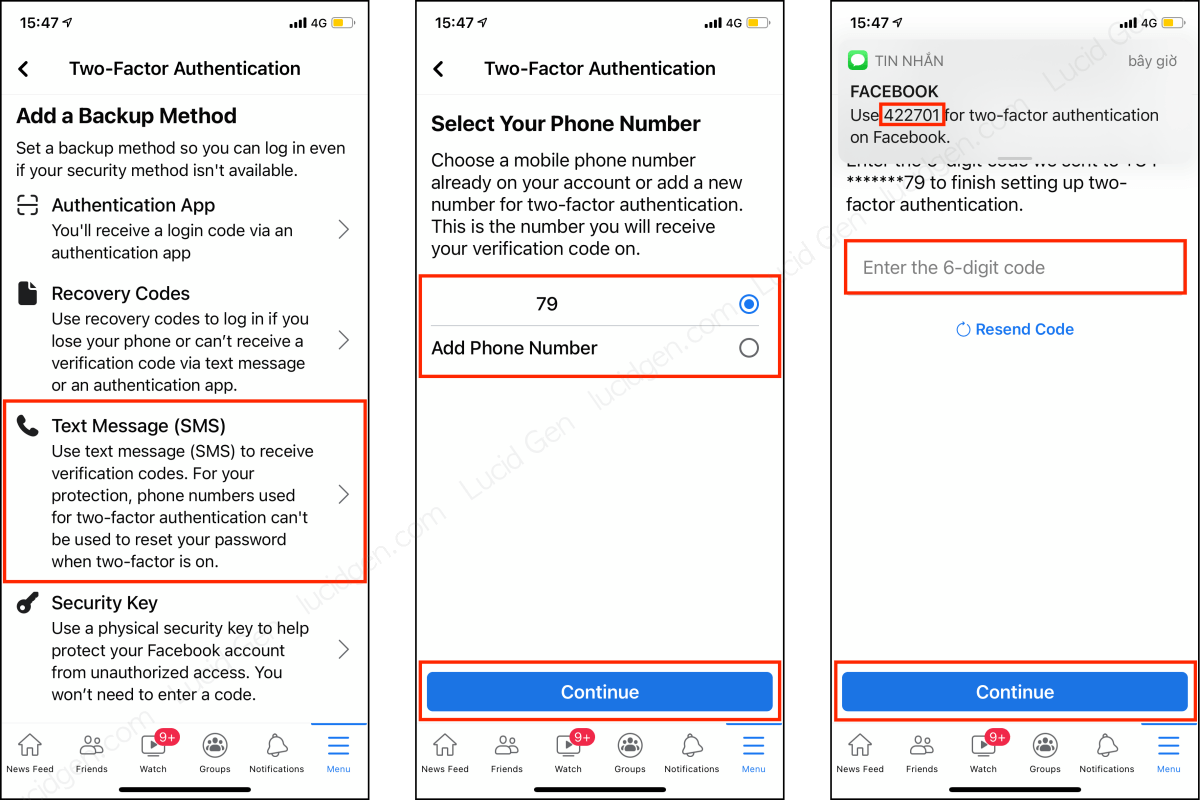
Since Facebook’s verification code sometimes doesn’t arrive, set up another authentication method as a backup.
Authentication with recovery codes (backup)
Tap Recovery Codes > tap Copy Codes > tap Done to finish. Then paste these recovery codes somewhere private, in case you lose your phone or can’t get a code by text message or app.
Turn on Facebook two-factor authentication on your computer
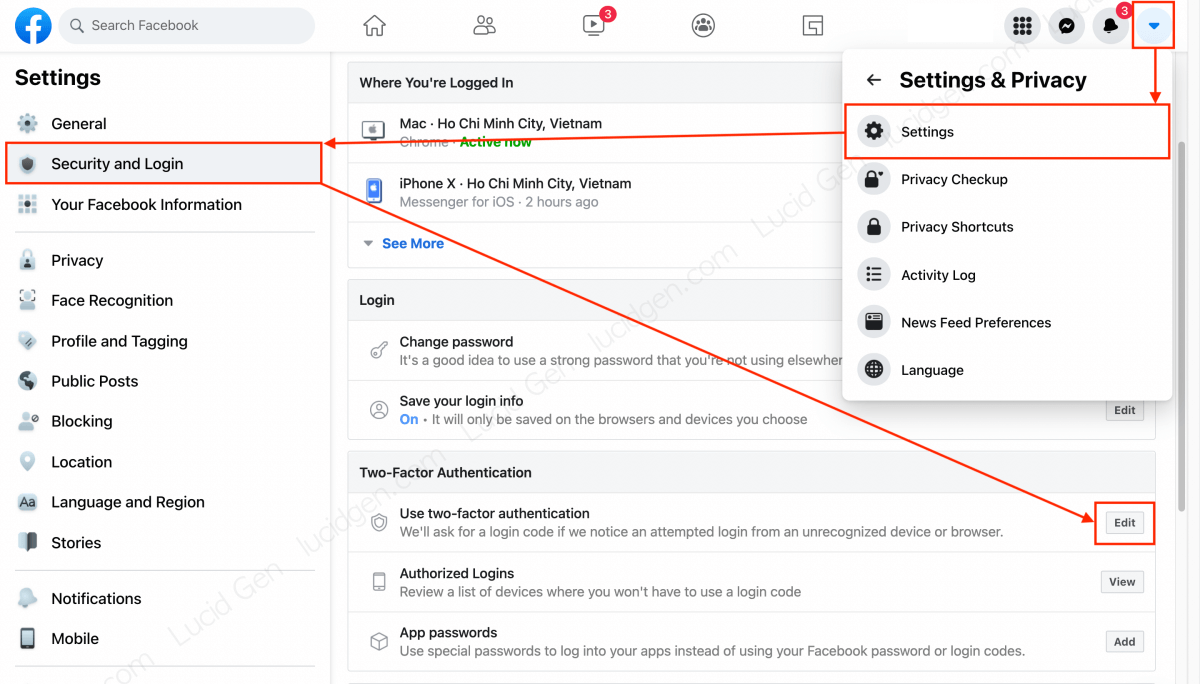
On your computer, click your profile picture in the top right > Settings & privacy > Settings > Accounts Center > Password and security > Two-factor authentication, then select your Facebook account (10/2026). The screenshot below shows the older interface, when this option was under Security and Login.
Authenticate with the Google Authenticator app
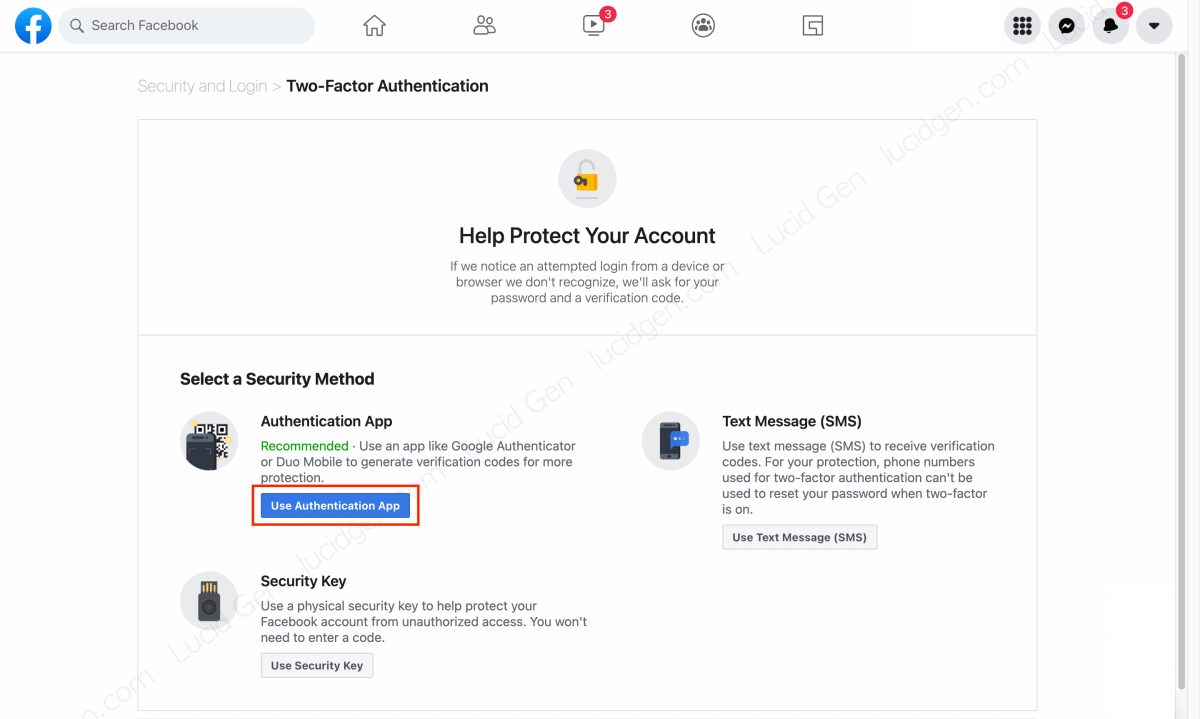
Step 1: Select Use Authentication App.
Step 2: Open the Google Authenticator app and scan the QR code on your computer screen, or enter the setup key to generate a two-factor authentication code.
You should still copy the setup key and keep it somewhere private as a backup, as I explained in the phone section.
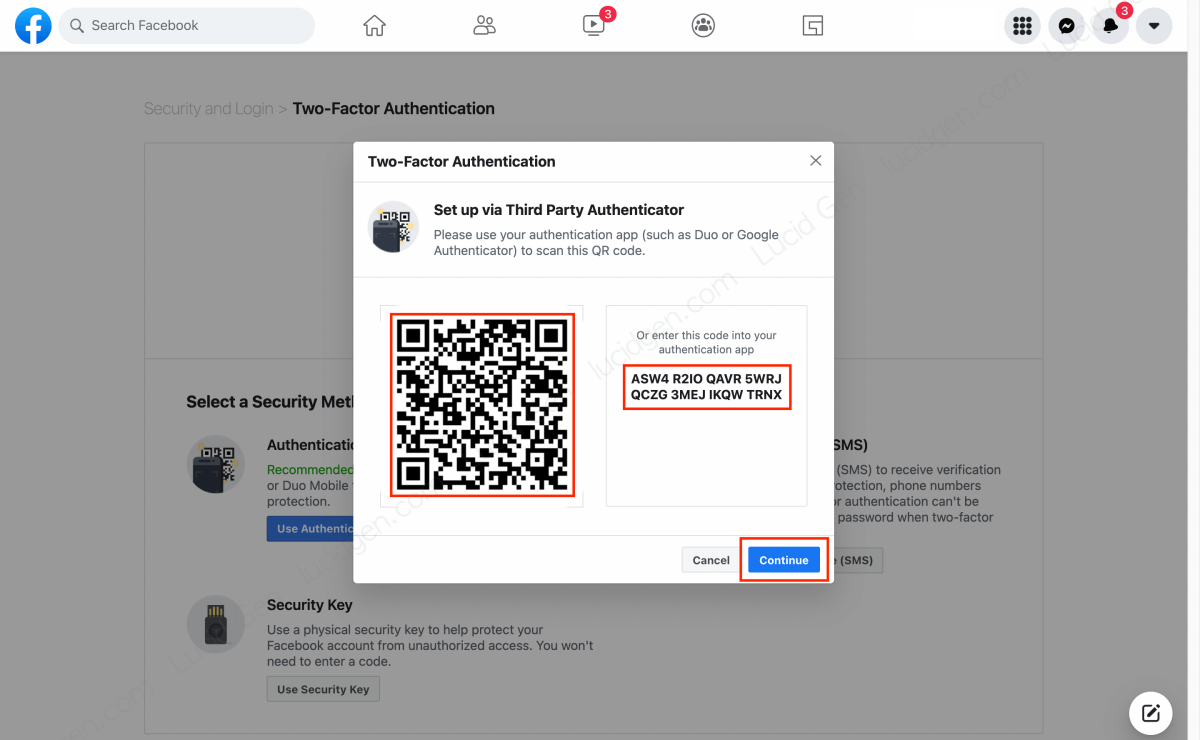
To enter the setup key, tap the plus button > select Enter a setup key. Next, enter an account name and the setup key > tap Add.
Step 3: Enter the two-factor authentication code and click Continue to finish.

Click Done on the message confirming that two-factor authentication is on.

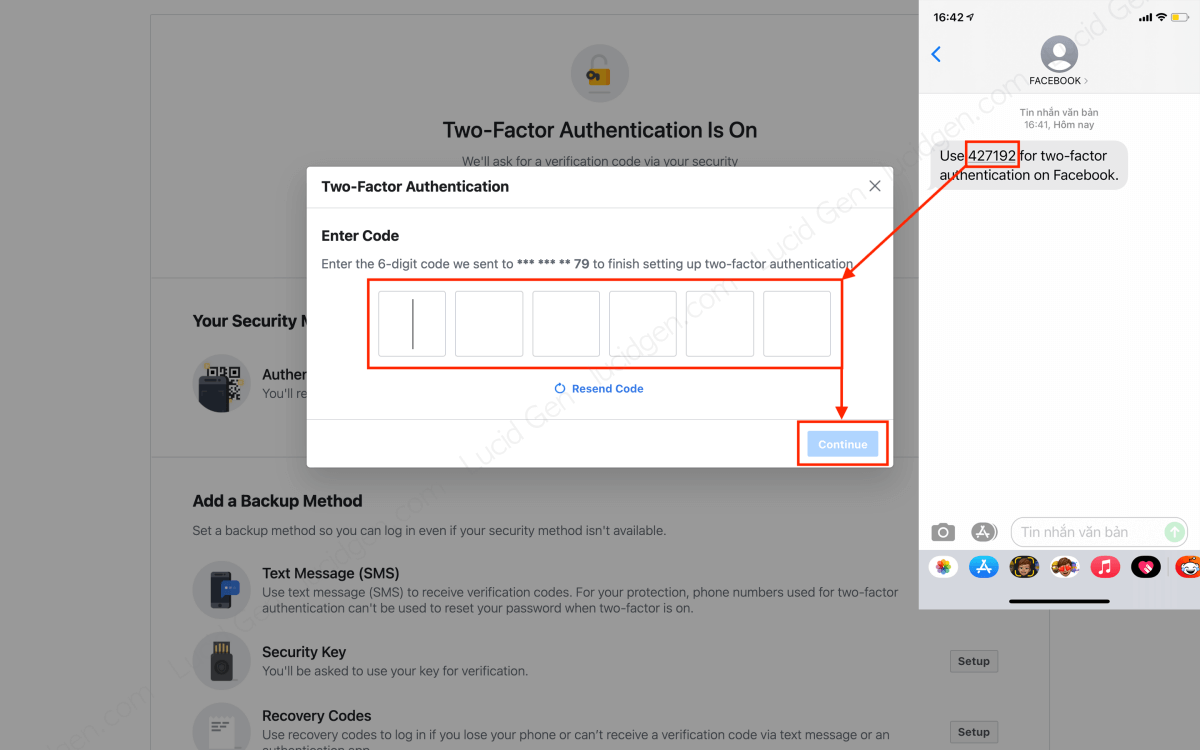
Authentication by text message
Step 1: Click Setup next to the Text Message method.

Step 2: Choose an existing phone number or add a new one, then click Continue.

Step 3: Enter the code from the text message Facebook sent to your phone number and click Continue to finish. If you’ve waited more than 5 minutes and still don’t see the message, click Resend Code.
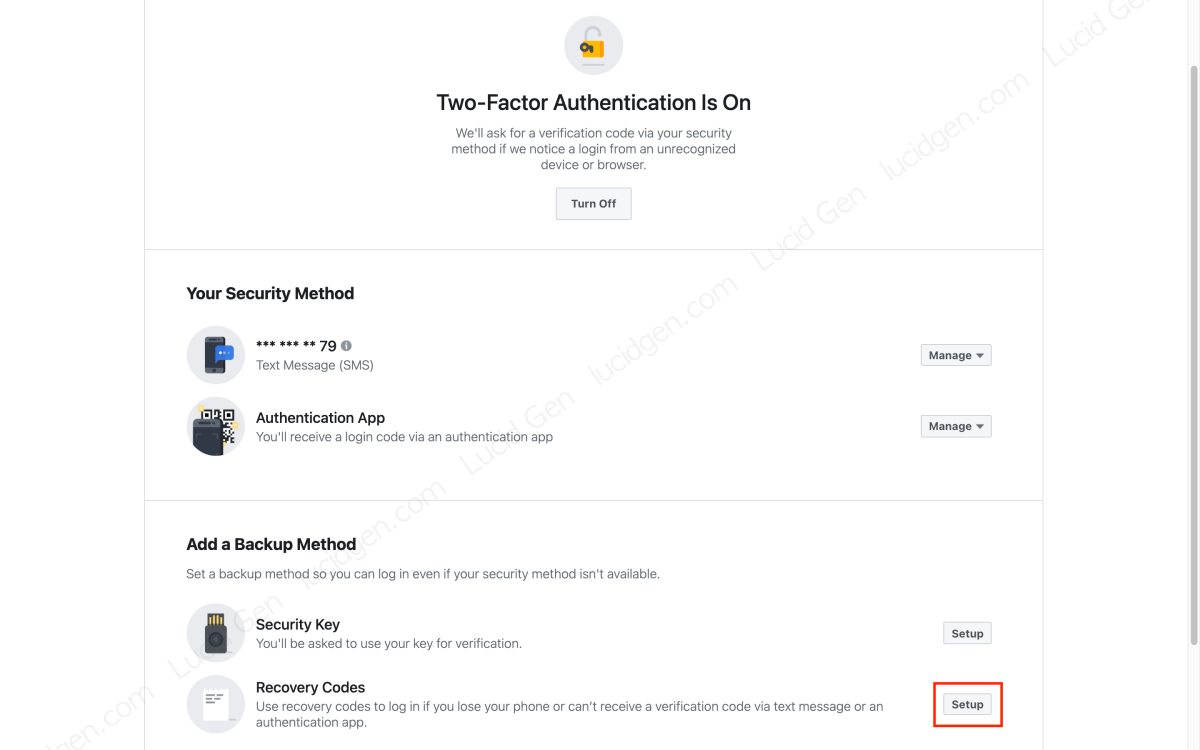
Authentication with recovery codes (backup)
Step 1: Click Setup next to the Recovery Codes method.
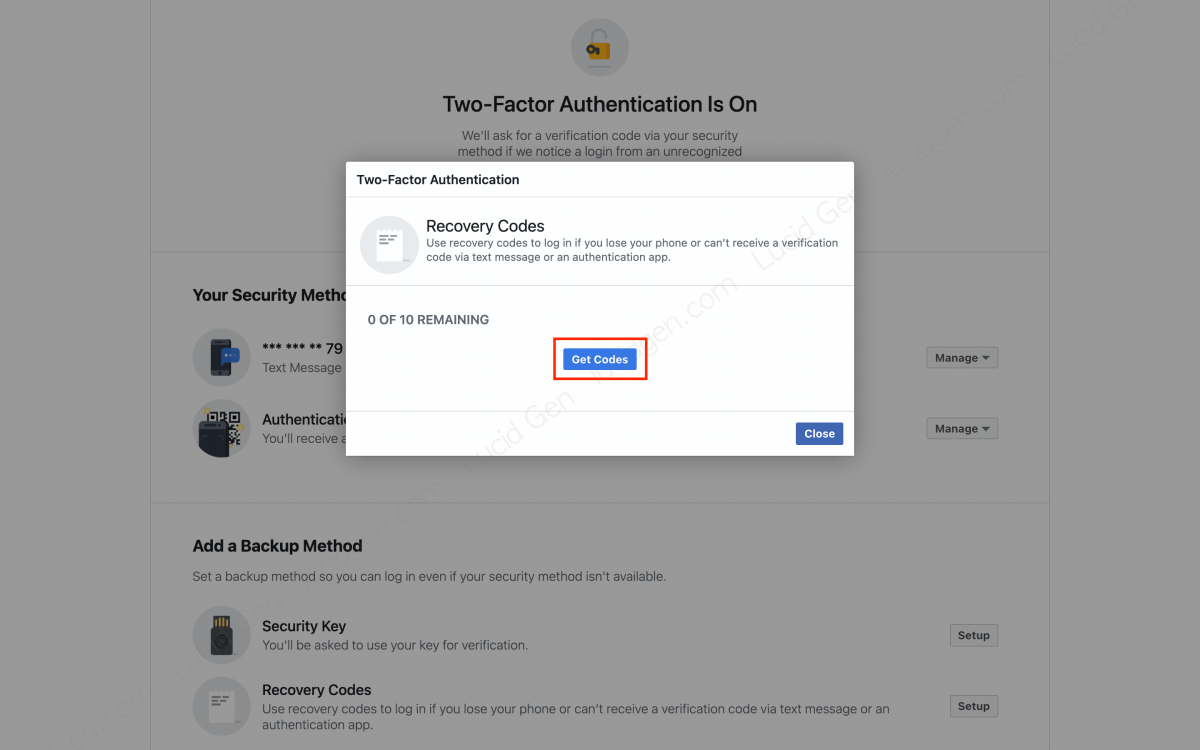
Step 2: Click Get Codes to receive 10 backup verification codes.
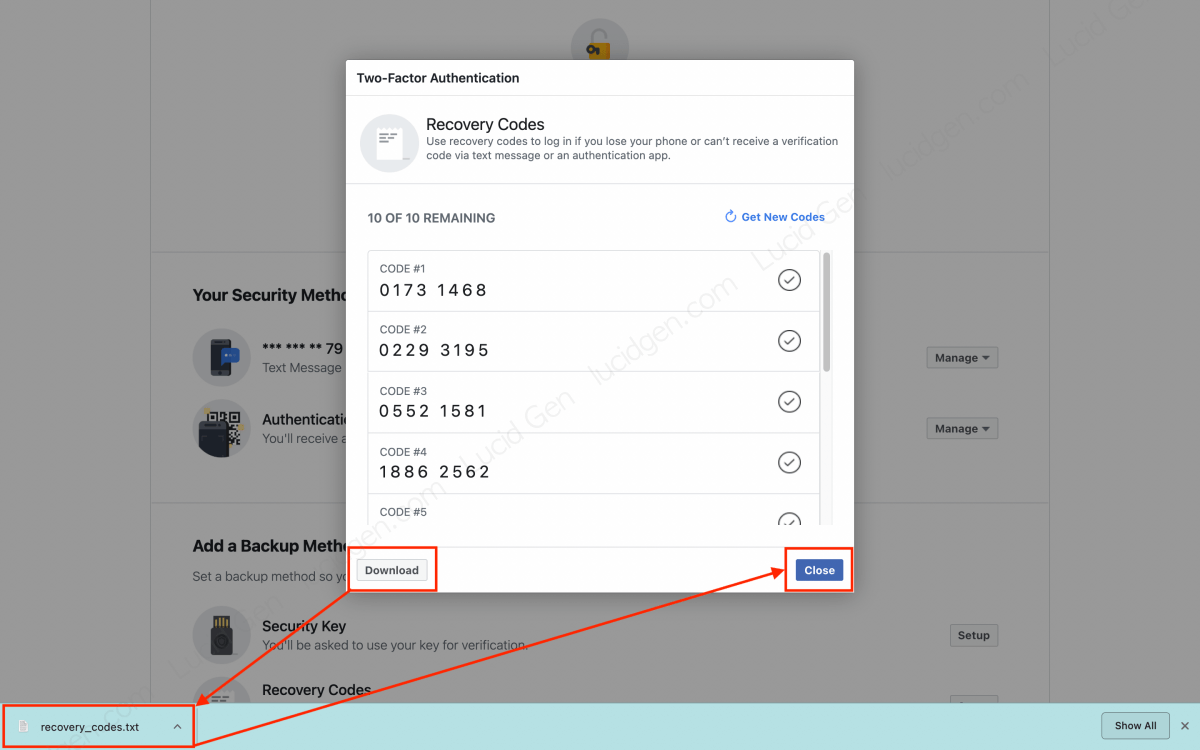
Step 3: Click Download, then Close to finish. Keep these 10 recovery codes somewhere private and only use them if the other two methods don’t work.
How to turn off Facebook two-factor authentication
Some people want to turn it on, others want to turn it off. However, you should only turn it off temporarily to get something done, then turn it back on as soon as possible to protect your account. Here’s how to turn off Facebook two-factor authentication on both phone and computer.
Warning: Quite a few readers have told me that after turning off Facebook two-factor authentication, they couldn’t log in to Facebook anymore. For example, they entered the correct password, Facebook asked them to turn on two-factor authentication to continue, but tapping the button to turn it on just sent them back to the login page (stuck in a loop due to a Facebook bug).
So think carefully before you decide to turn off Facebook two-factor authentication. I can’t help you recover your account if you run into this situation.
Turn off Facebook two-factor authentication on your phone
Step 1: Open the Facebook app > Menu > Settings & privacy > Settings > Accounts Center > Password and security > Two-factor authentication, then select your Facebook account (10/2026).
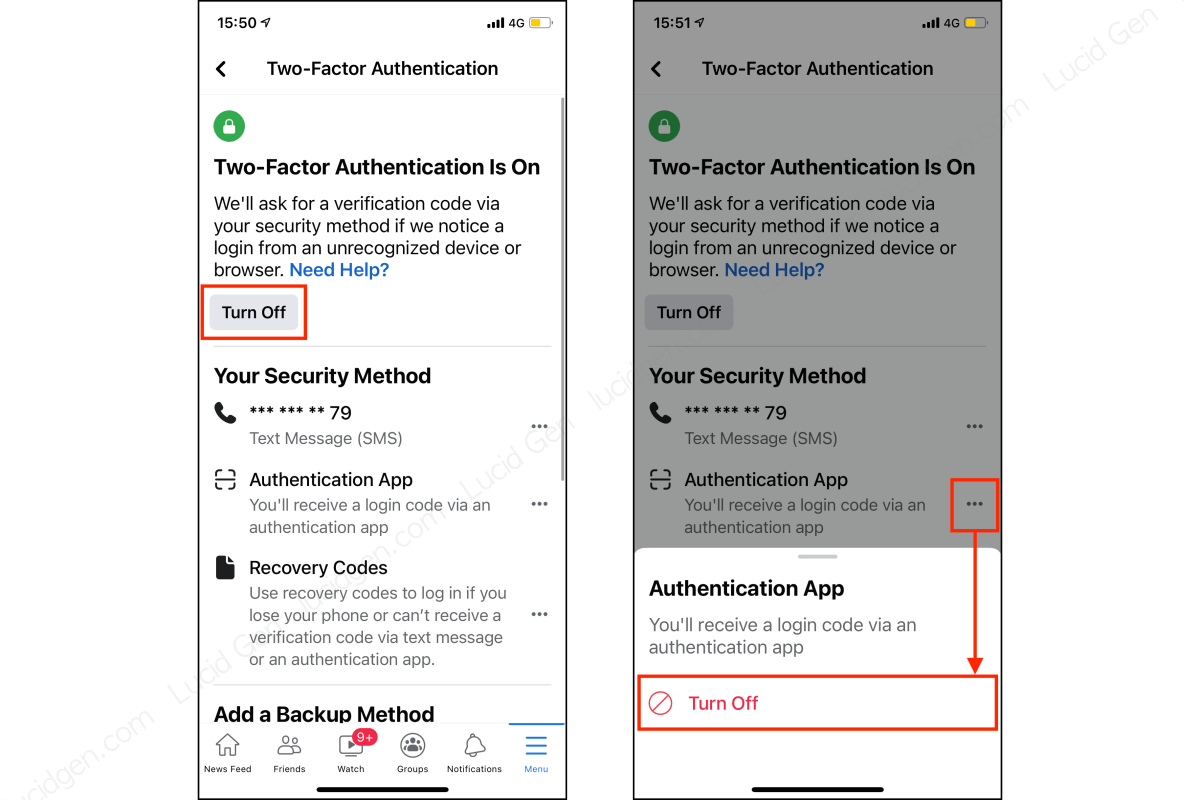
Step 2: Tap Turn Off to turn off all authentication methods, or tap the 3-dot button to turn off a specific method.
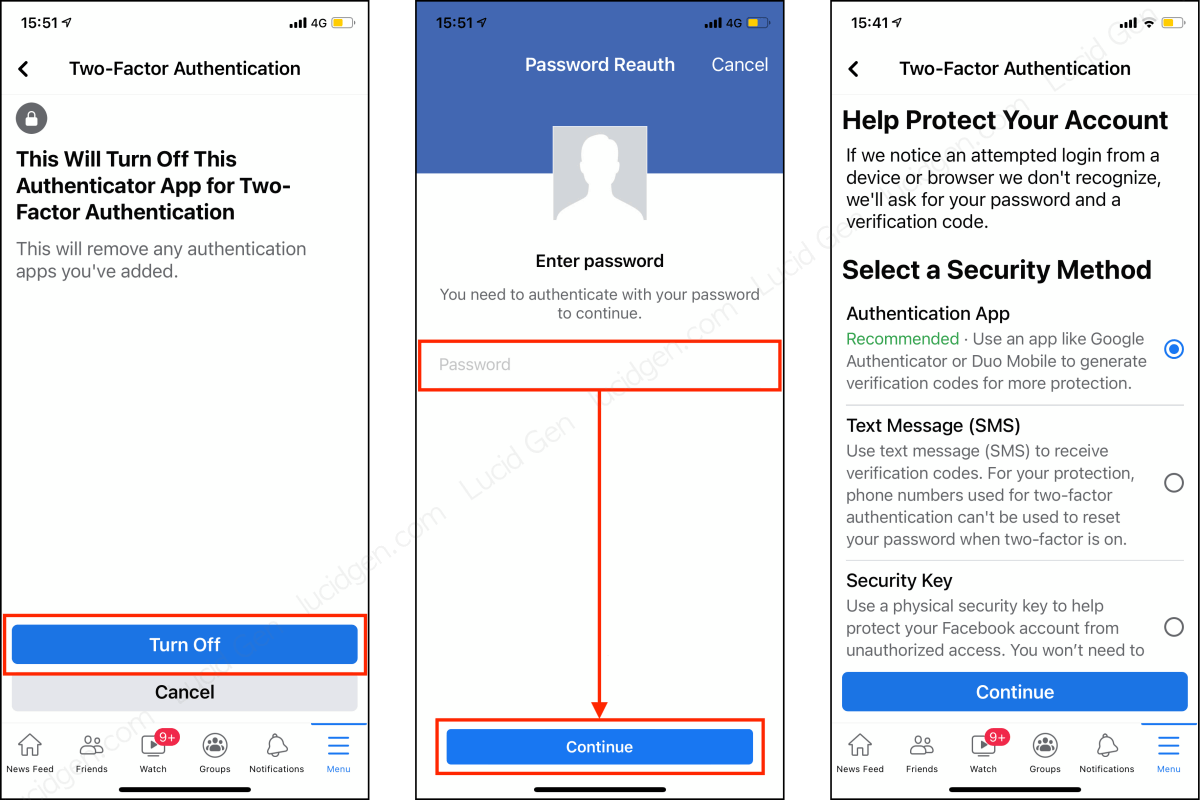
Step 3: Confirm Turn Off again > enter your password > tap Continue to finish turning off two-factor authentication.
Turn off Facebook two-factor authentication on your computer
Step 1: Log in to Facebook > click your profile picture > Settings & privacy > Settings > Accounts Center > Password and security > Two-factor authentication, then select your Facebook account (10/2026).
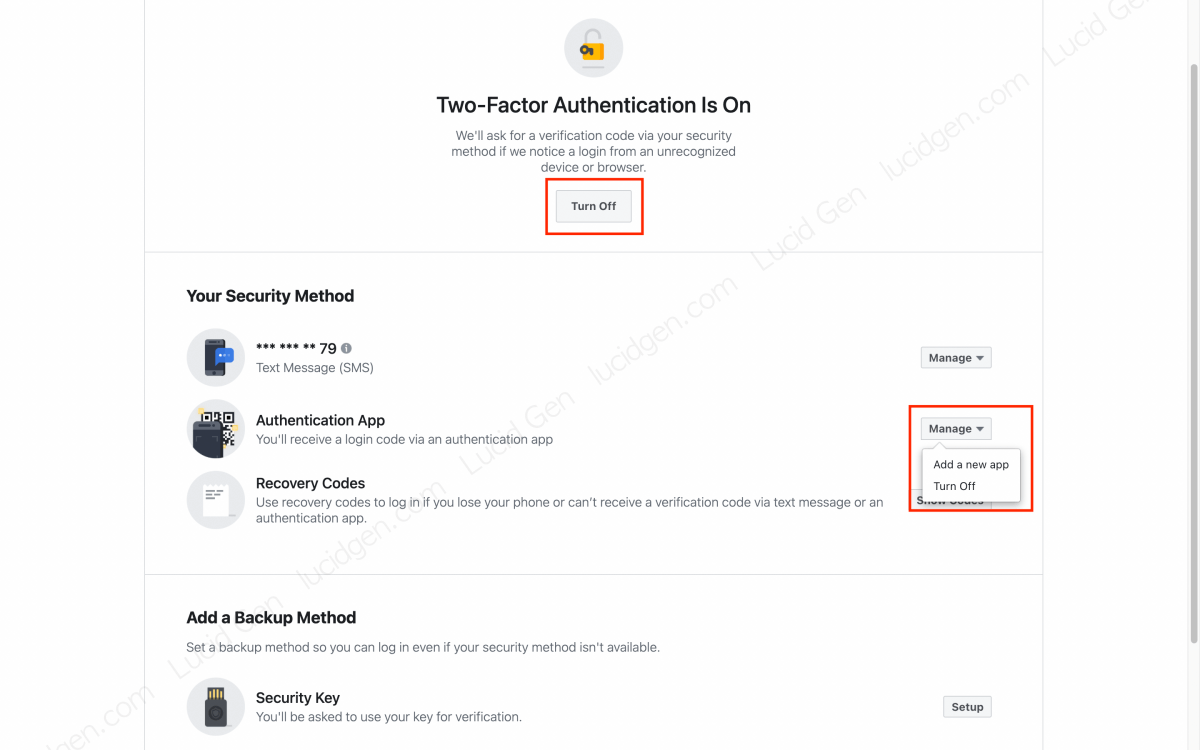
Step 2: Click Turn Off to turn off all current authentication methods. If you only want to turn off one method, click Manage next to it.
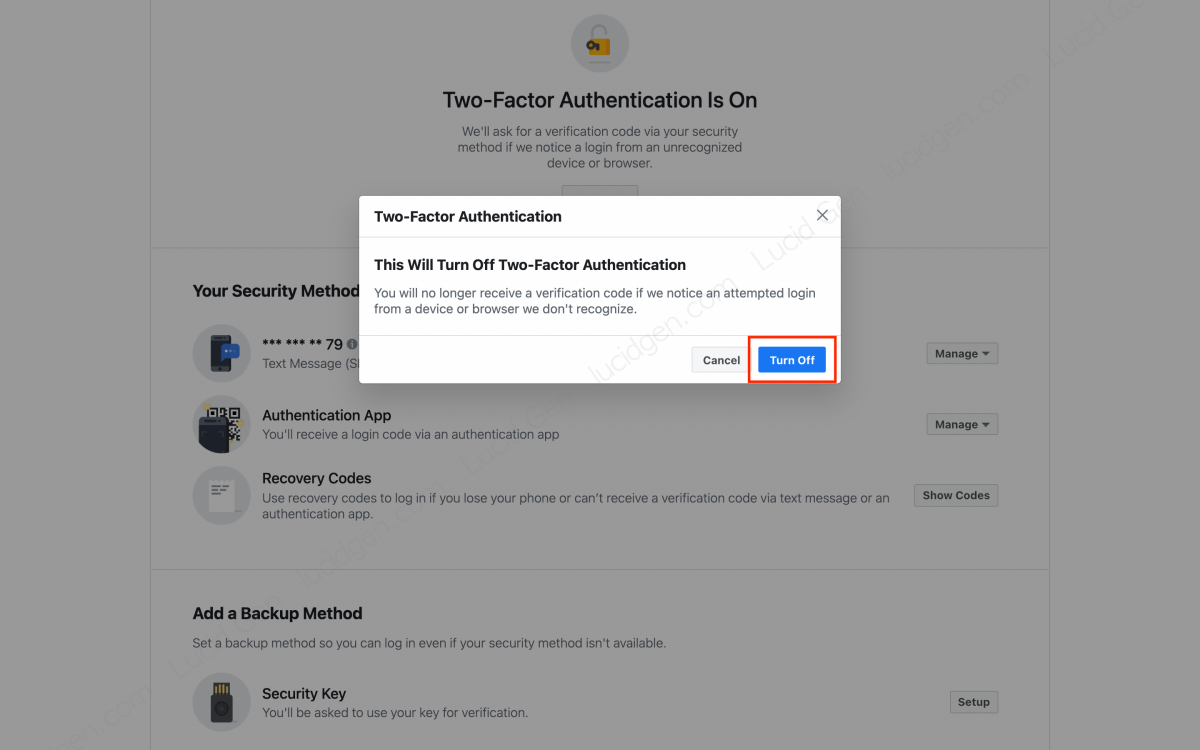
Step 3: Click Turn Off in the confirmation window to finish turning off two-factor authentication.
What to do if you don't receive the Facebook verification code
If you’re having phone problems and can’t get your two-factor authentication code, try one of these options.
- Reset Facebook password: Try resetting your Facebook password with your email or phone number. After setting a new password, you may be able to get into Facebook without going through the login step, just like when you reset your Instagram password. Then turn off two-factor authentication and turn it back on soon.
- Use your recovery codes: Think back to where you saved your recovery codes and use one of them.
Tips for logging in to Facebook safely
- Think before saving a trusted device: When you log in to Facebook on a new device, Facebook asks whether you trust it. If you do, you can log back in easily after logging out, sometimes even without a password. If you’re using someone else’s device, choose not to trust it.
- Don’t save passwords in your browser: Malicious extensions or viruses can attack your browser and steal your Facebook password. If someone borrows your device, they can also easily see your password in the browser’s saved passwords.
- Watch out for fake Facebook pages: There are many fake pages that look exactly like Facebook, so always check that the domain really belongs to facebook.com. If you log in to a fake Facebook page without two-factor authentication turned on, it won’t be long before you lose your account.
Conclusion
Setting up two-factor authentication is simple and doesn’t take much time, but it makes your Facebook account much safer. I’d recommend doing the same for all your social media accounts today. What do you think of this article, or do you need any help? Feel free to leave a comment for Lucid Gen below.


