
Booking appointments on Facebook page Facebook is a feature that has just been released not long ago, but few people notice it. This feature is very suitable for pages about direct services. About how to use appointment booking, the interface on the phone and computer will be different. So, in this article, Lucid Gen will guide the whole version. The upper part is making an appointment on a Facebook page for phones, and the lower part is making an appointment on Facebook for computers.
Benefits of making appointment on Facebook page
Every feature must have its benefits, so does the scheduling. Here are some of the benefits I see:
- Create professionalism with customers: after closing the appointment time and you create an appointment schedule, the customer will feel more serious and formal.
- Remind customers of upcoming appointments: Facebook will remind customers 1 day in advance that an appointment is coming tomorrow.
- Increase in-store conversions: of course, there will definitely be an improvement in your store visits.
Main content to pay attention to
- Make an appointment, edit, cancel an appointment.
- Manage tagging appointments.
- Customize some settings of the make appointment on Facebook page feature.
- Select the Set Now button as the main button on the page.
- Add a Book Now button to a page post.
Instructions to make an appointment on the phone
This article Lucid Gen guides with the Facebook Page Manager application. If you do not have it, you can download it via the following links:
Make an appointment
In the conversation with the customer, you click on the calendar icon as shown in the picture (I think it’s more like a computer ^_^).

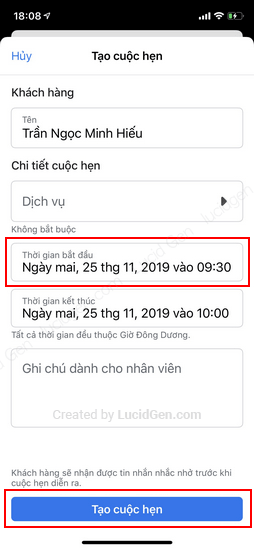
If there is no service yet, you can update later. Set the appointment start time and then tap Create Appointment.
The most basic and fastest is just that. If you want to learn more deeply to optimize once, use it forever; you can continue reading the content below.

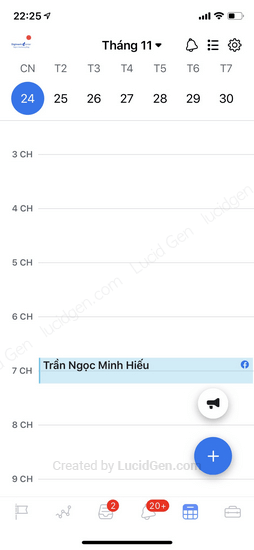
In the site manager, click the Calendar icon to see what times the appointments are booked.
You can also create a new appointment in this area by clicking the + button as shown. Then fill in the customer’s name and appointment time.

Editing an appointment
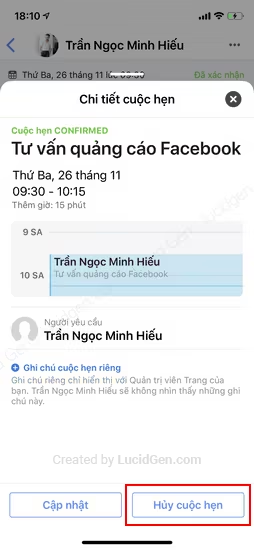
If you and the client change the appointment time, click View details on the scheduled appointment in the chat.
Click the Update button to start editing the calendar.

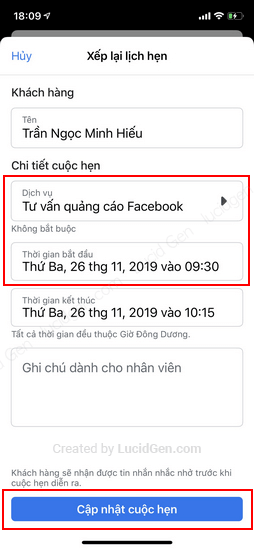
If you want to edit the service, then select the service you created.

Update the new appointment time again and then click Update Appointment to save.
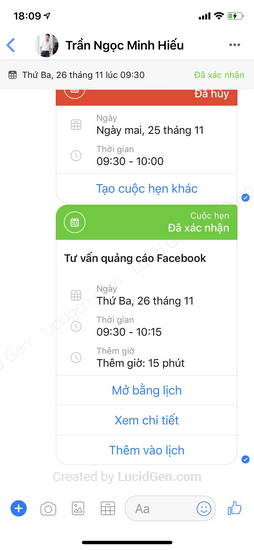
As a result, the old appointment was canceled, changed to red. The newly created appointment is blue.
Cancel appointment
If and the guest is no longer scheduled, click View details in the booking in the chat.
Then click Cancel Appointment.
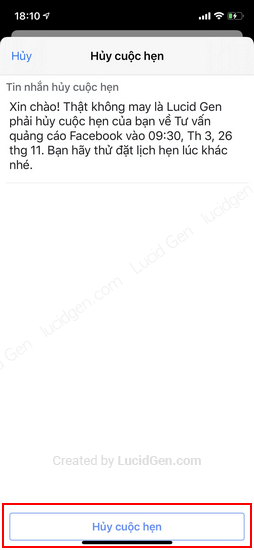
Review the content to cancel the appointment. Facebook has written it by default, and you can edit it accordingly.
Then click Cancel Appointment.
And this is the result when we cancel the appointment, the customer will see it. (It’s also quite professional. ^_^) .

Manage tagging Made an appointment on phone
To check how many appointments are created and who is booked, open the Site Manager app.
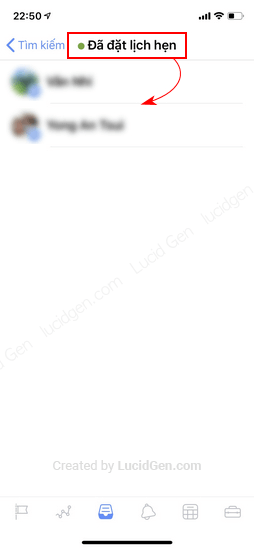
Go to the message section, click the search icon in the upper right corner.
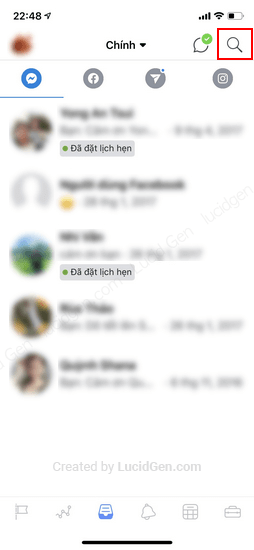
Type in “Appointment Booked” or “Appointment Booked” depending on what language your site is in.
You will count how many people have booked an appointment, like 2 people in the picture. But this count is only displayed on mobile phones, and the computer version does not show this number.
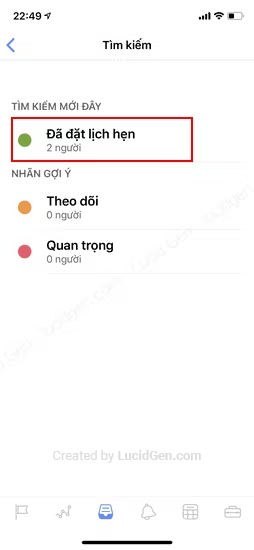
When you click on the Booked label, you will see customers who have booked your appointment.
Customize Phone Appointment Settings
Basic Settings
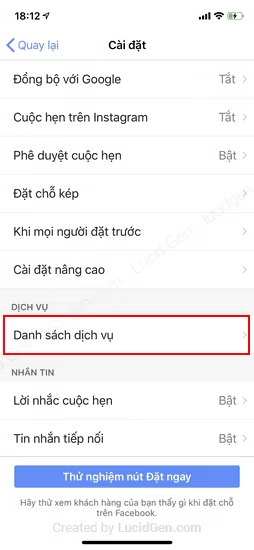
In the site manager, click the Calendar icon below, then click the Settings icon above as shown.
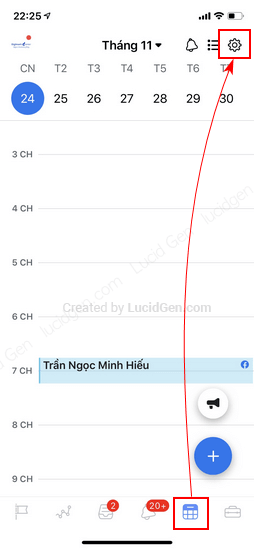
There are many settings. But pay attention to the 4 I circled in red, as shown in the picture.
- Free time.
- Double booking.
- When people book in advance.
- Advanced settings.

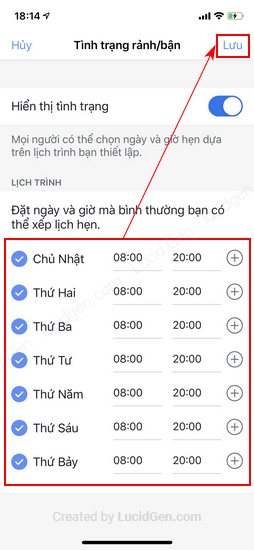
Free time: is the time setting that allows customers to book appointments. For example, store business hours.
Turn on the status display and adjust the time, then click Save.
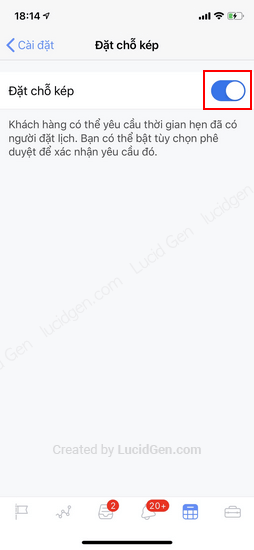
Dual booking: whether you allow multiple people to book in the same time slot.
For industries that need in-depth consultation, such as seeing a specialist, it is usually no, while retail industries that come to see products should turn on yes.
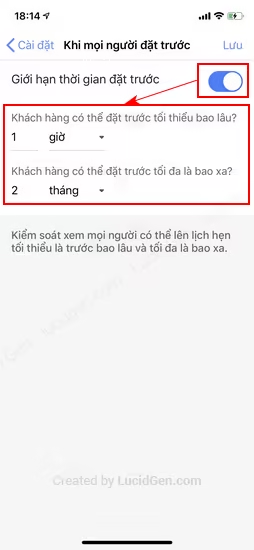
When people book: how long in advance will you allow customers to request an appointment?
At least a few hours to a day. Maximum 1-2 months, depending on your business.
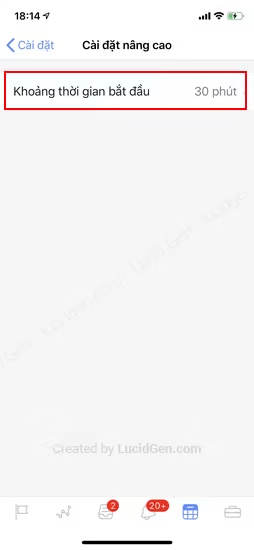
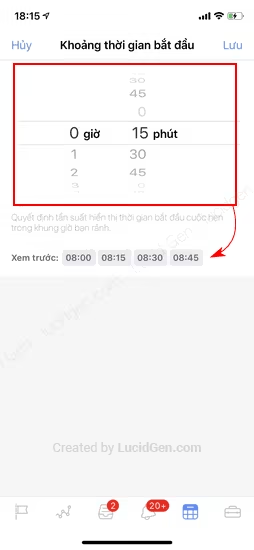
In Advanced Settings, there is only the Start Duration section: the time in minutes that you allow customers to book appointments for 1 hour.
For example, if you adjust 15 minutes, from 8 am to 9 am, the customer can make an arbitrary appointment as follows:
- 8h00
- 8h15
- 8h30
- 8h45
- 9h00
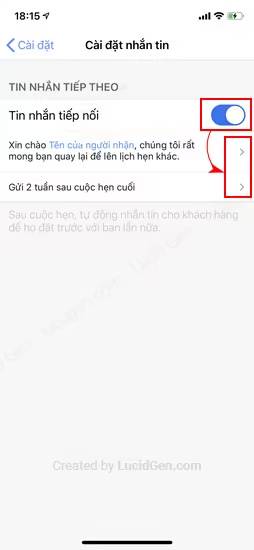
In addition, there is a Messaging Settings section in the settings, which is for the page to send a message “for new appointments automatically, please book an appointment”. If you need to, turn it on and customize the message content and when to text.
I don’t think it’s perfect, but you can edit it if you need it.
More services to choose from when making an appointment
This setting is also quite important if you have a lot of services to make appointments with guests. Or to make appointment scheduling even more professional.
Click Service List.
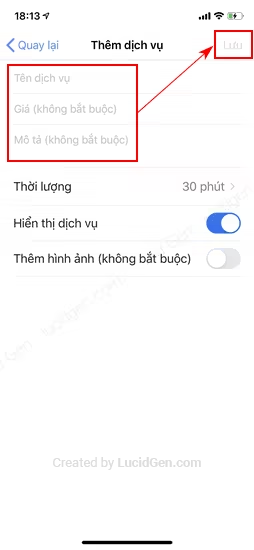
If you don’t have a service yet, click Add Service.
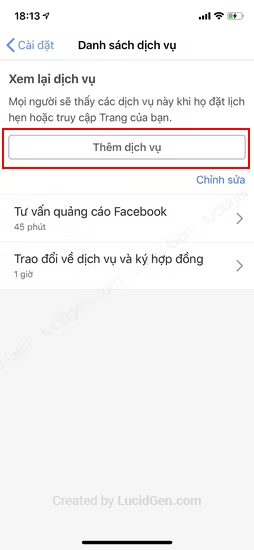
Enter your service information, most importantly Service Name only, then click Save.
Once you have the service, you can choose the service later when you make an appointment.
Manage customer booking requests on the phone
How customers book
Customers can actively book an appointment with the site in 2 ways:
- Use the reservation link
- Click the Book Now button on the page.
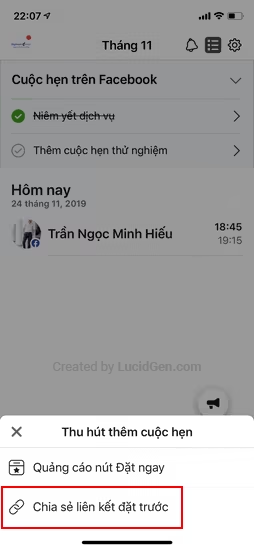
To get the reservation link sent to the guest, click the Speaker icon in the lower corner and select the Share reservation link (as shown).
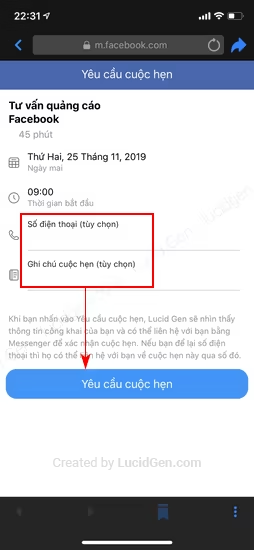
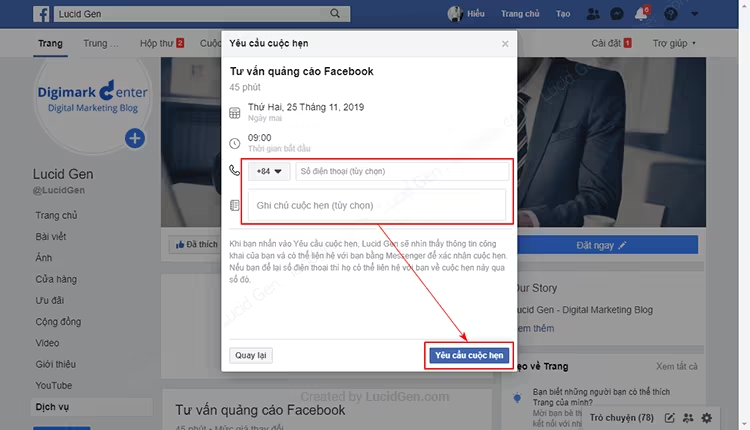
When guests click on the link to book an appointment, they will have an interface like this, and they will choose the date and time you have set up in advance.

Next, enter an additional phone number and note if necessary, then click Request Appointment.
That’s it, and your guest has made an appointment. But need your consent for the appointment to be created.
See how to approve appointments for clients below.

How admins manage requests
Way 1
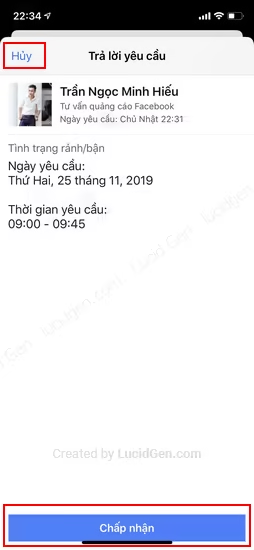
In the chat with the guest, you can click the Reply button in the upper right corner, as shown.

Check the information the guest booked, then click Accept or Cancel.
Way 2
In the site manager, click the Calendar icon and then click the Notifications icon in the upper corner as shown.
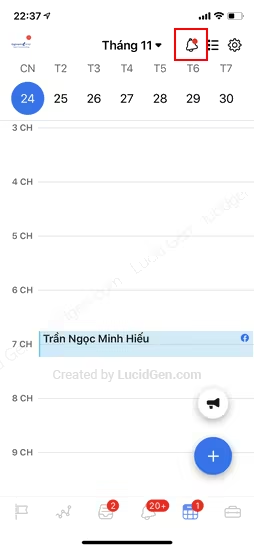
There will be requests from many customers here, and Approve or Edit is up to you to decide.

Choose to make an appointment as the main button on your phone
Suppose your page has reached the point where customers want to visit your store all the time and don’t need to chat first. You can edit the main button on the page to be a Book Now button.
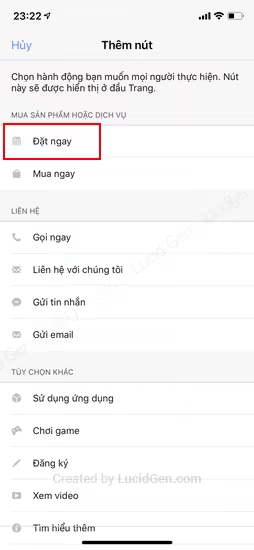
Click Add button or edit button if you already have another button.

Select the Book Now button.
Click Start Setup.

Review how long customers can book and click Next.
Turn on Appointment Approval if you want and Double Booking depending on how it works for you (I explained in the appointment setting step) and click save.

Review your Service List and click Next.

Click Other at this step to skip the Instagram link.
Click done to complete the Set Now button installation.
And this is the result of the Book Now button already on the page.

Add appointment button to post on phone
It’s great that you can even add a Book Now button to your page posts. Customers can click the Book Now button when they see your ad or post.
While composing an article, click on the area that says “Add to your post”.

Then, if you select Attract Reservations, your post will appear with a Book button right below the content.

That’s how I finished the tutorial on how to make an appointment on Facebook page for mobile already.
Instructions for making an appointment on a computer
Pre-create the service (can be omitted)
In the computer version, it is more convenient that you can easily manipulate in general. And you can also pre-create Services to add when make appointment on Facebook page. This step can be skipped for later.
In your site manager, click Services in the left menu, then click Add service.
If you don’t see it, you can access it with a link like: https://www.facebook.com/pg/page-your-services/

Fill in information about your service, mainly the name of the service, but the content inside the customer rarely reads, and Facebook also leaves it as “Optional”.

Make an appointment
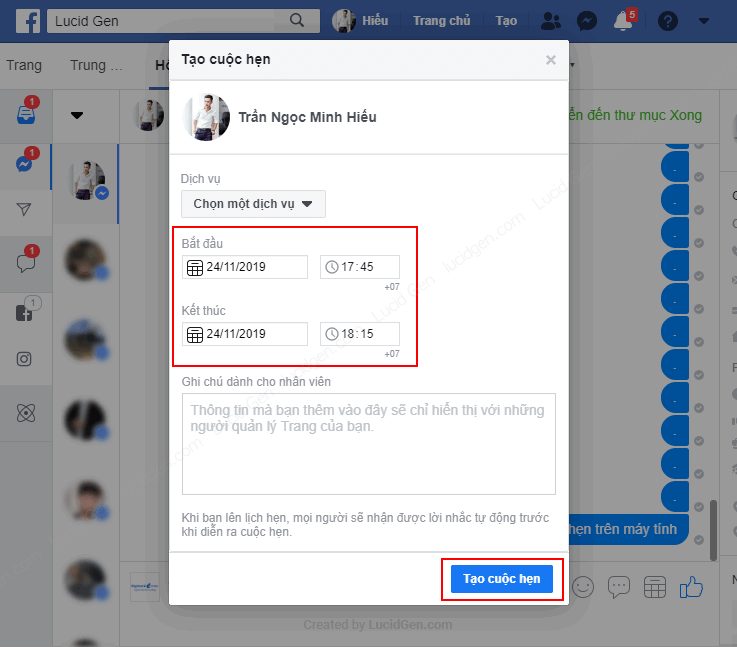
In the chat window with the customer, click on the Calendar icon as shown below (I think it looks more like a computer ^_^).
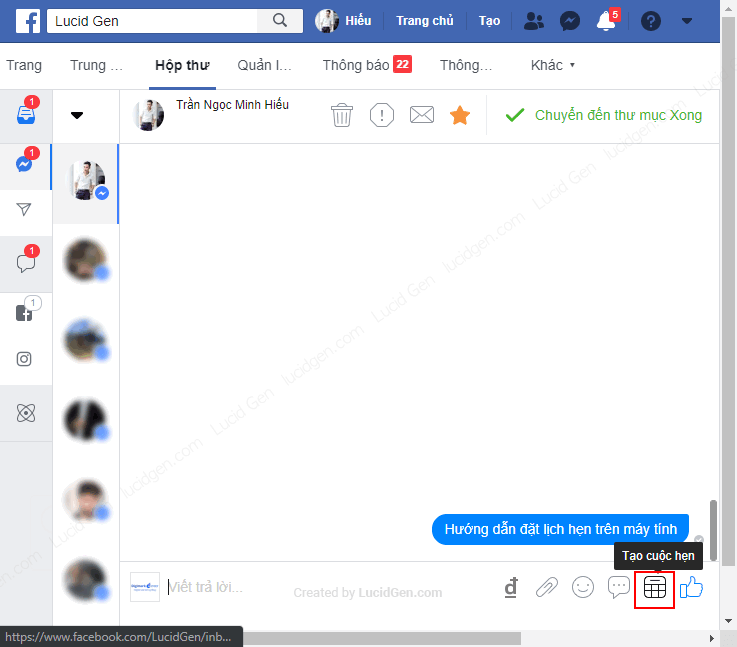
If you have created the service before, then you can choose now. Otherwise, skip it, or you can add it later. Edit the appointment start date and time, add notes if needed, then click Create Appointment .
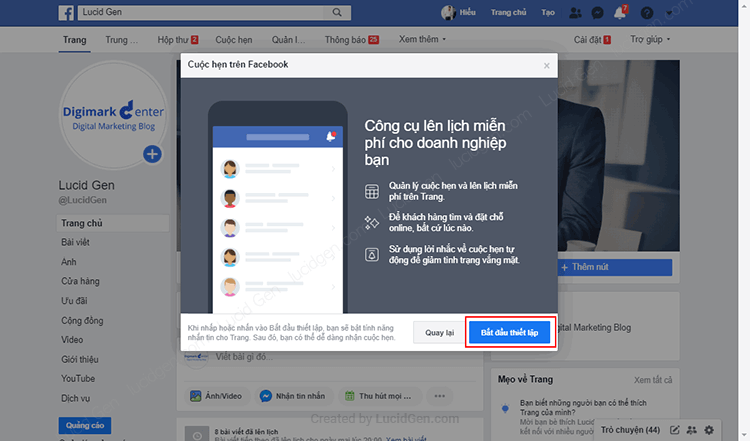
If you’re using the make appointment on Facebook page function for the first time, you’ll need to complete some of these basic setup operations just once. Click the Start button.

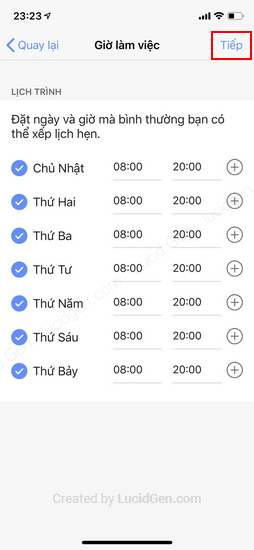
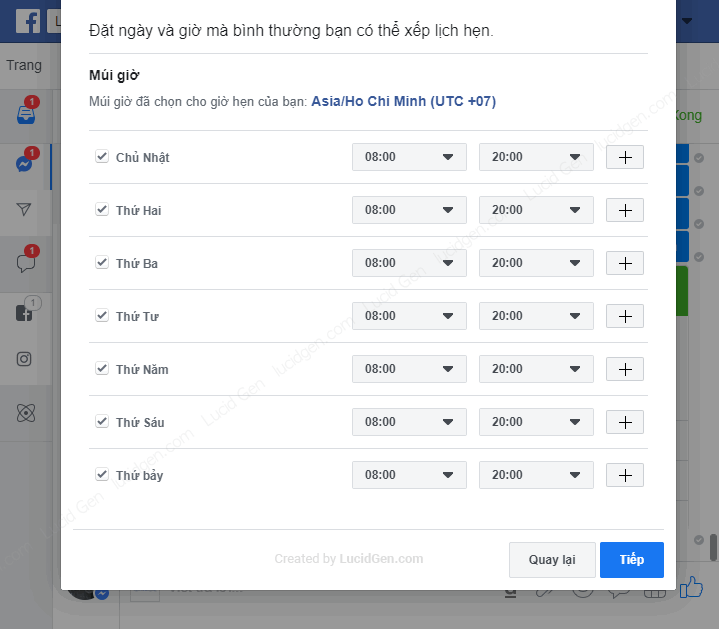
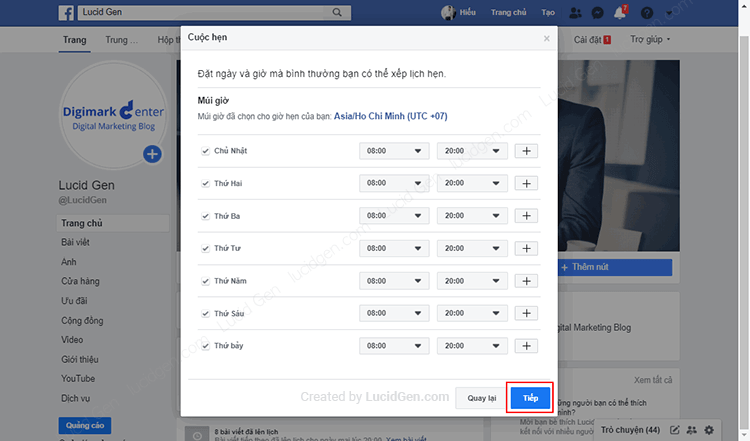
Checking the time allows customers to book an appointment with you proactively. Then click Next.
Next, there are a few options that are up to you to decide, and I will advise you further to guide your decision.
- Appointment approval: if you’re always available for appointments, there’s no need to turn it on. If your store can only accept customers from time to time, then turn it on.
- Double booking: if you can accommodate many customers at the same time, turn it on, otherwise turn it off.
- Sync with Google Calendar: let Google Calendar add events and remind you.

Click Next to add a few basic store services that customers can book an appointment with.

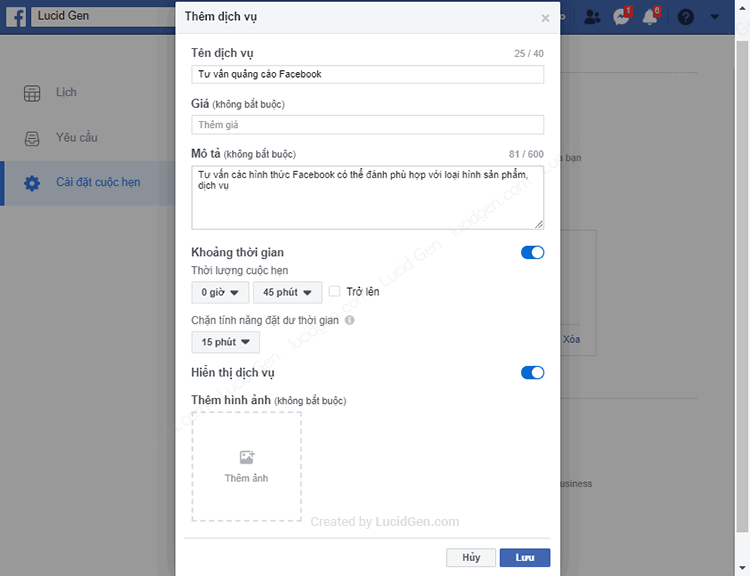
Click Add Service.
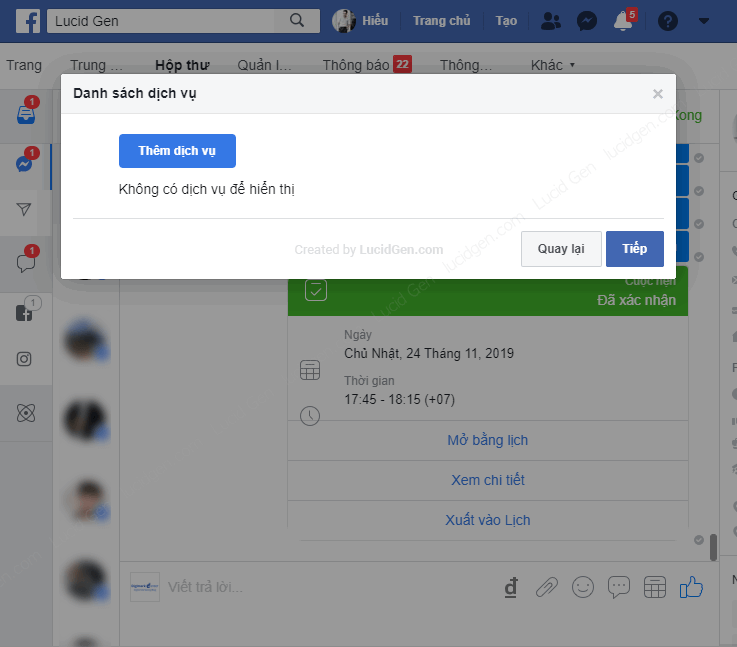
Fill in the information for your service, and just Service Name is enough; other information is optional. To explain more about the service display, display it outside of your page in the Services tab, see the service pre-creation step to understanding.

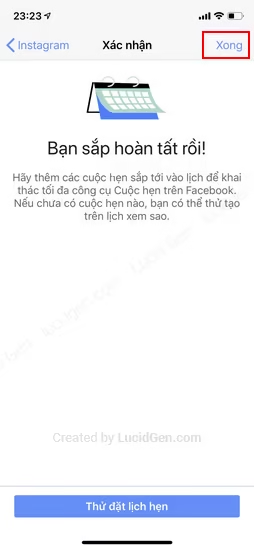
OK, then you click Next.

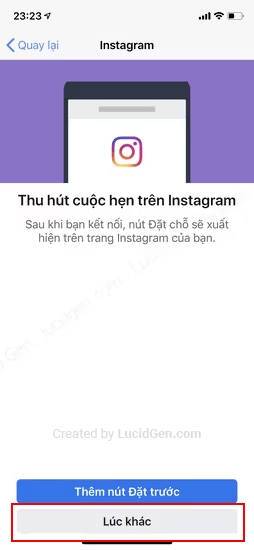
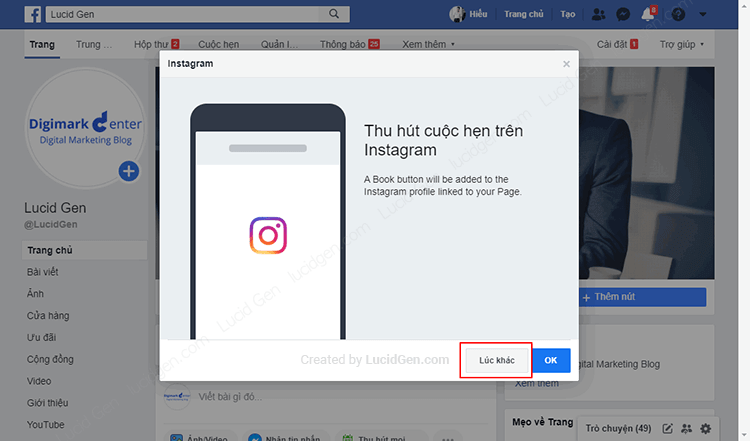
In the Instagram connection section, click Other times

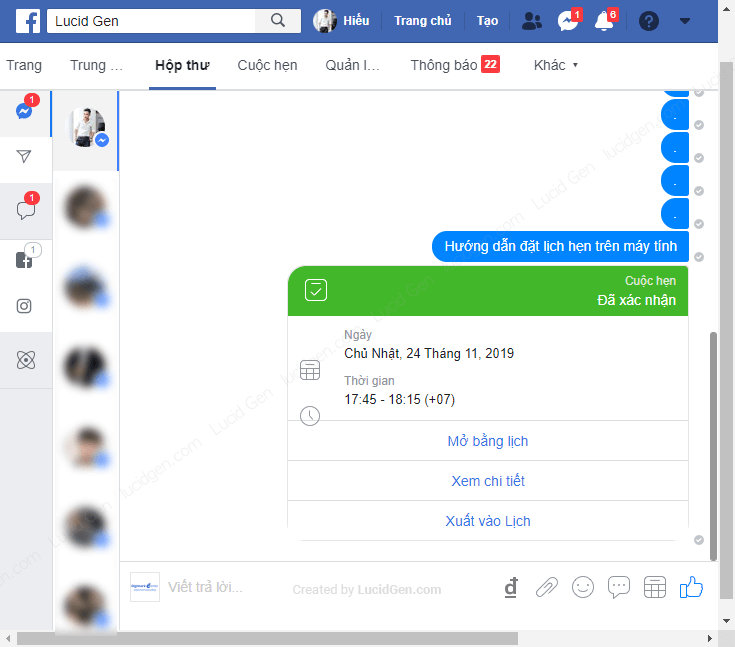
This is the result of Booking an appointment with a customer. Both the customer and the Facebook page admin see it.
After you have used the Appointment function once, reload the page, and you will see the Appointment tab appear on the menu above. Click and there to manage your appointments.
Or enter quickly with a link like: https://www.facebook.com/page-your-page/appointments/

You can also quickly create appointments by clicking the plus button in the Appointments section.

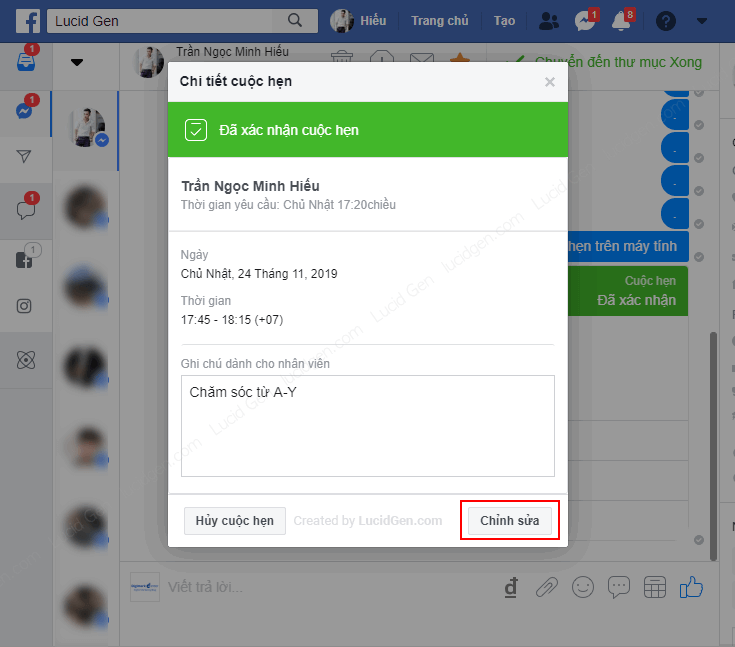
Editing an appointment
If you and the client change your mind, click View Details on the created appointment to start editing.

If you only add a note, fill in the Notes box for employees (i.e., only the site management members can see, customers will not see). If you want to edit the appointment time, click Edit.
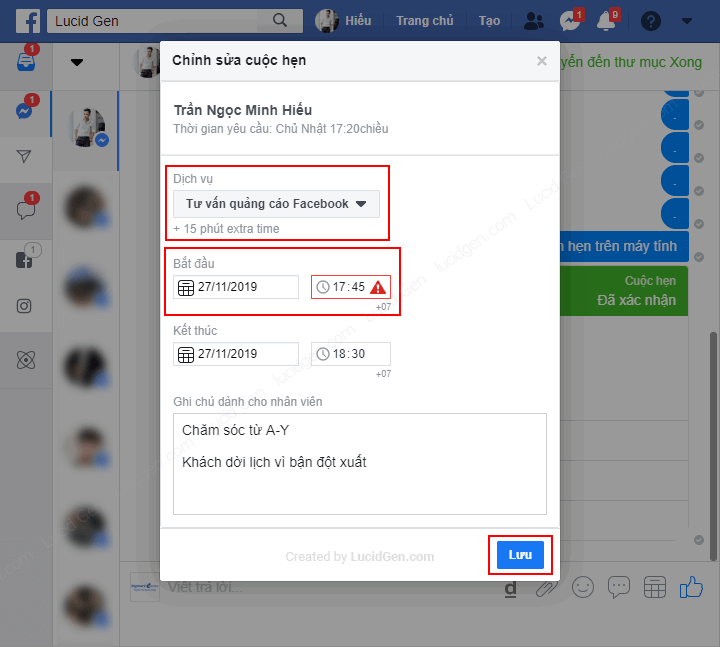
Recheck the Service, start time, then click Save to update the edit.
Cancel appointment
If you want to cancel an appointment, you still click View details on the created appointment.
Next, you click Cancel Appointment.

Check the content that you will notify the customer when canceling the appointment. By default, Facebook will also make it available to you like this template. Then you click Cancel Appointment.
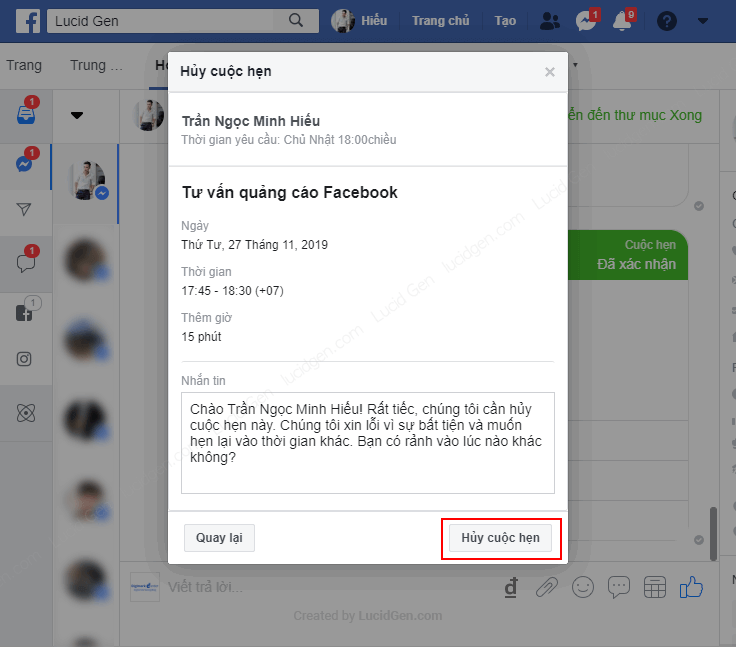
This is the result of completing the appointment cancellation, and the customer will receive it.

Tag Manager Made an appointment on computer
To manage people who have booked appointments, click on the Search icon as shown below.
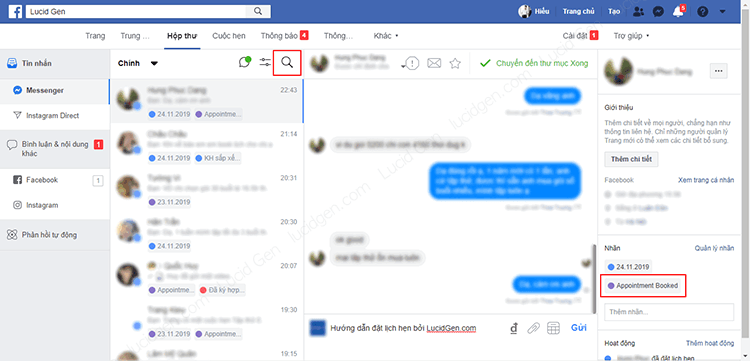
Type in “Appointment Booked” or “Appointment Booked” (depending on what language your site is in). You will see a list of people who have been tagged with this fully automatically.
But the downside of the desktop version is that it doesn’t count the totals for you. But on the mobile version, there is a total count. If you need the total number, please see it with the Site Manager application on the phone.

Customize Desktop Appointment Settings
For your convenience, the next time you use the make appointment on Facebook feature, you should check the default settings and edit them to suit your business.
Basic Settings
In the Appointments section, click Appointment settings.
First, take a look at the times when customers can actively book an appointment with you. If corrections are needed, click the Change button.

Next, Sync with Google Calendar, Accept Appointment, Double Booking I explained in the Make an Appointment step. Here are 2 new parts I will explain for you to understand and edit.
- Reservation: is the time period in which you allow the customer to make an appointment. They have to make an appointment with you a few hours in advance and the longest time (usually a few hours) they are booked is how many days (usually 1-2 months).
- Show appointment start time: is the time in minutes that you allow customers to create an appointment for one hour. For example, if you let it be 15 minutes, from 8 am to 9 am, customers can create an appointment at the following hours: 8:00, 8:15, 8:30, 8:45, 9:00.

Next, the Reminders section is for Facebook to remind your customers, make sure it’s On.
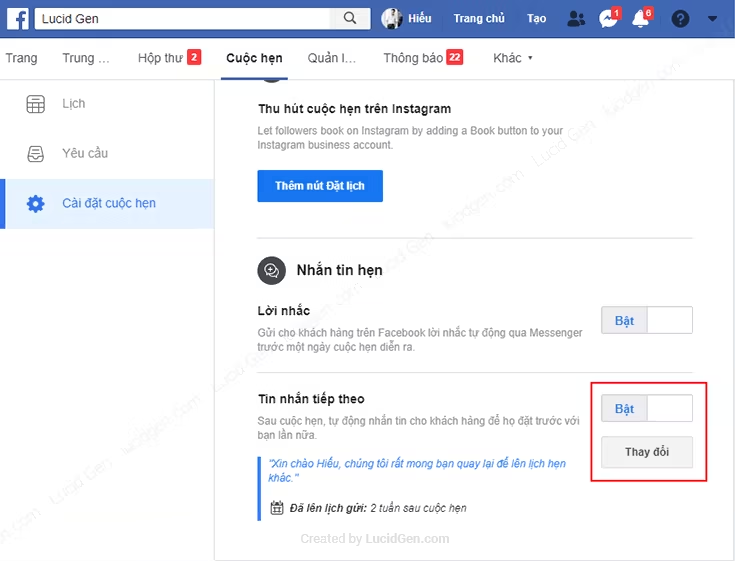
Also, Next message as an option to your site from sending messages solicited clients to make an appointment again. This setting is up to you. It can annoy your customers, but it can also help you get more appointments with old customers.
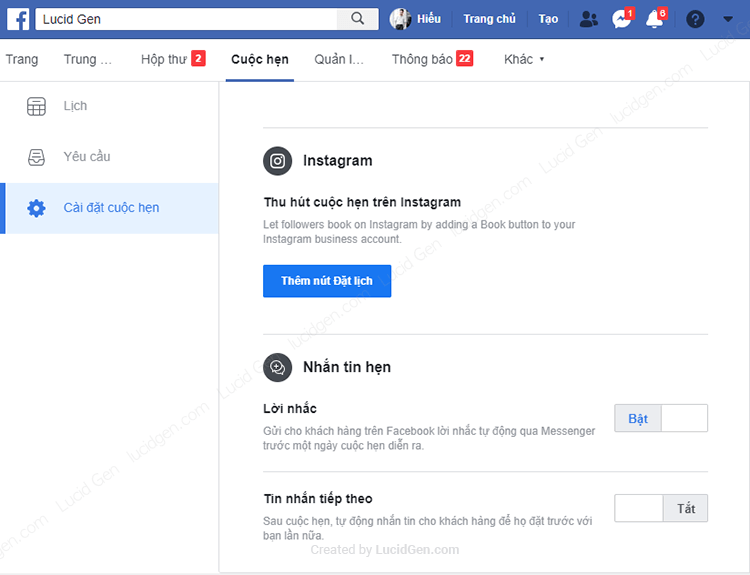
If necessary, turn On and click Change to edit the message content and time to send after the previous appointment.
More services to choose from when making an appointment
Another way to add services to your site, if you want to add click Add service.
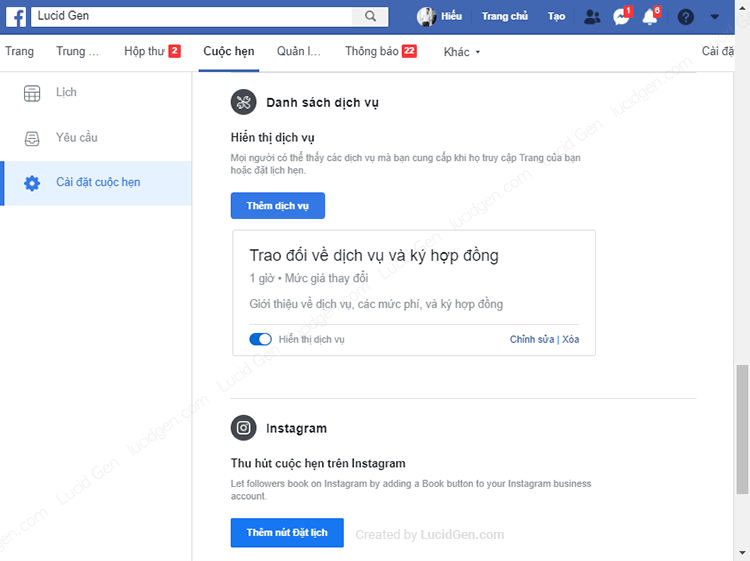
I repeat that only the Service Name is needed. Other information is optional. ^_^
Manage client’s appointment request on computer
How customers book
When customers actively book an appointment with you from the outside, they will see an interface to choose a date and time based on the time allowed that you have set up earlier.

They have the right to add phone numbers and notes or not.
How admins manage requests
You will see a notice in the Appointment section on the site administrator side in the Request tab, as shown below.
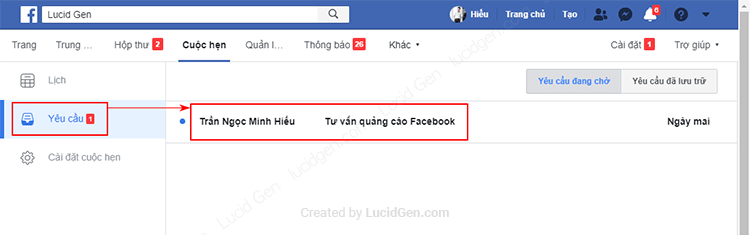
Clicking on the request will bring up an options window where you can add a note and then decide as follows:
- Accept: the appointment will be created according to the time the guest has selected.
- Archive: disagree but do not delete, if you change your mind, you can pull it out and Accept to create an appointment.
- Rescheduling: is to modify the appointment time to your liking, of course the customer will be asked and they will choose to agree or not.

Choose to make an appointment as the main button on your computer
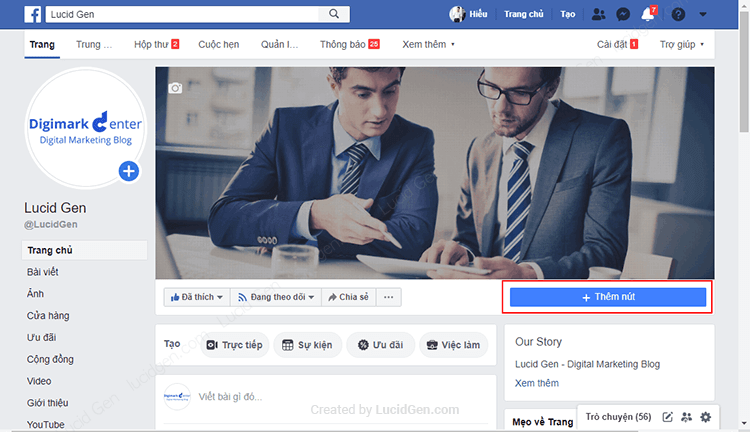
If your site is always ready for customers to actively book an appointment, add the Book Now button as the default button for your page. Click Add button or edit button as shown below.
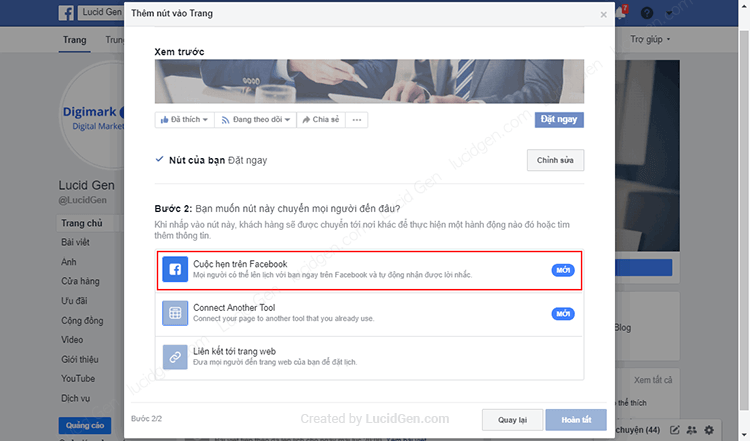
Select Book Now and click Next.

Then you choose Appointments on Facebook.
Click Start Setup.
You review the time that allows customers to book an appointment with the page and then click Next.
These are the 3 options I explained in the Make an appointment step. If you adjusted first, then click Next.

Click Other times if you have already created the service in the steps above.

Go to connect with Instagram you click Another time again to skip.
And here is the result page with the Book Now button.

Add appointment button to desktop posts
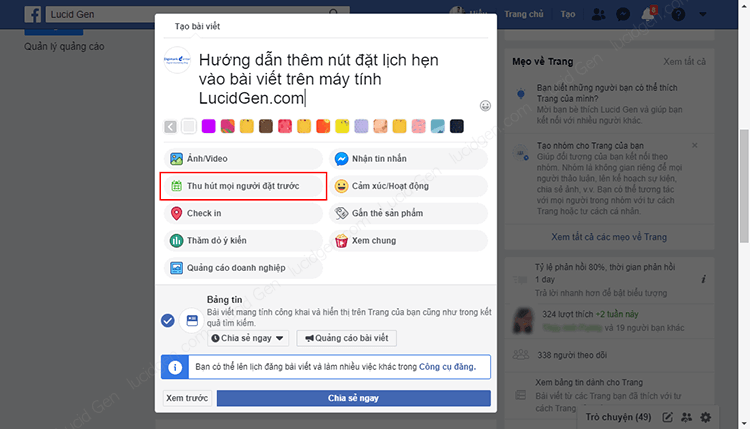
You can add a Book Now button at the bottom of your page post to drive more bookings by clicking Get people to book, as shown below.
Epilogue
Through this article, if you have any questions, please leave a comment below for Lucid Gen to answer for you. Wish you effectively use the make appointment feature on your Facebook page Facebook and have many appointments.


