

Facebook is one of the most widely used social networks in the world, and almost everyone has a Facebook account; even parents now have learned to use it. Therefore, if you are running a business on a website, giving visitors a quick way to message your Facebook Page will make it easier for you to advise customers. You can reply later if you are not online in time, and every conversation lands in the same inbox as your Page messages. In this article, I will show you how to add a Messenger button to your website in a way that still works today.
Update (October 2026): Meta discontinued the Facebook Chat Plugin (the Messenger chat box embedded on websites) on May 9, 2024. The “Add Messenger to your website” option is gone from Page settings, and any old Chat Plugin code still on your site will no longer show a chat box. That is why I removed the old steps for getting the code and replaced them with a button that links to m.me, which Meta still supports.
If your website still has the old Chat Plugin code (usually starting with <div id="fb-root"> and containing fb-customerchat), remove it first. It no longer does anything, but it still loads Facebook scripts and slows your site down.
Pros and cons of using Messenger for customer support
Without the embedded chat box, visitors are sent to Messenger to chat with your Page. Most of the benefits come from the Page inbox, so they still apply.
Advantages:
- Keep in touch with customers: if you don’t reply while the customer is messaging, you can still reply later from your Page inbox, while with many other live chat tools the conversation ends when the visitor leaves.
- Opens the app on mobile: most young people have the Messenger app installed on their phones, so when they tap the Messenger button on your website, the app opens directly for a smoother chat.
- Combine with a chatbot: a chatbot can create a menu in the chat window and send automatic replies. It can also connect via API to warehouse, banking, and shipping systems to notify customers about payment and order status automatically (I have not explored this part myself, but many businesses already do it).
- Build a remarketing audience: people who have messaged your Page can become a potential audience for your future remarketing campaigns.
- Make an appointment: service businesses often need to schedule appointments with customers. You can create appointments on Messenger to show professionalism, and customers are also reminded when an appointment is about to start.
- Direct sales: when you combine APIs, chatbots, and online consultants, closing orders right inside Messenger is quite normal.
- Manage customers by label: you can label customers for easy care, for example: Pending payment, Purchased, Product A, Product B…
- Note important information: the Page inbox lets you add notes to each customer’s profile, which is handy for remembering their issues.
- Assign customers to team members: just like other live chat tools, if you have several people handling customer care, you can assign conversations to each of them.
- Create sample messages for reuse: you can save message templates to reply faster next time.
- Send multimedia: you can send documents, images, videos, audio files… to customers.
Disadvantages:
- Visitors have to leave your website and switch to Messenger; they can no longer chat right on the page like with the old embedded chat box.
- Visitors need a Facebook or Messenger account to send a message. For people who don’t use Facebook, you should also offer another channel such as phone, email, or a contact form.
- It does not collect email addresses and phone numbers the way many other live chat tools do.
How to create an m.me link for your Page
m.me is Meta’s official short link: anyone who clicks it opens a Messenger conversation with your Page. You don’t need any code or domain setup, just your Page’s username.
Step 1: Find your Page’s username. Open your Page in a browser; the part after facebook.com/ in the address bar is the username. For example, for facebook.com/mycoffeeshop the username is mycoffeeshop.
Step 2: Build the m.me link. Add the username after https://m.me/, for example https://m.me/mycoffeeshop. If you want to know whether people message you from the website or somewhere else, you can add a ref parameter, such as https://m.me/mycoffeeshop?ref=website.
Step 3: Test the link. Open it on your phone and your computer; if you see a chat window with the right Page, you are good to go.
Messenger button code for your website
To replace the old chat box, the simplest option is a floating button in the bottom right corner that opens your m.me link. Copy the code below and replace your-page-username with your Page’s username.
<a href="https://m.me/your-page-username?ref=website" class="lg-messenger-btn" target="_blank" rel="noopener" aria-label="Message us on Messenger">Message us</a>
<style>
.lg-messenger-btn {
position: fixed;
right: 20px;
bottom: 20px;
z-index: 9999;
padding: 12px 18px;
border-radius: 24px;
background: #0866ff;
color: #fff;
font-weight: 600;
text-decoration: none;
box-shadow: 0 4px 12px rgba(0, 0, 0, 0.2);
}
</style>- Button color: you can change
#0866ffto your website’s main color (for example, your logo color) so the button fits your design. If the background color is the same as the button color, the button will blend in, so pick a contrasting color in that case. - Position: the right side usually works better because most people are right-handed and find it easier to tap. If you already have another floating button on the right (phone, WhatsApp, Zalo…), increase the
bottomvalue so the buttons don’t overlap.
Add the Messenger button to a WordPress website
You should not paste the code directly into your WordPress theme, as it may be lost when you update the theme. Instead, install the Insert Headers and Footers plugin to insert any code. The plugin has since been renamed WPCode (October 2026), but it is the same plugin.
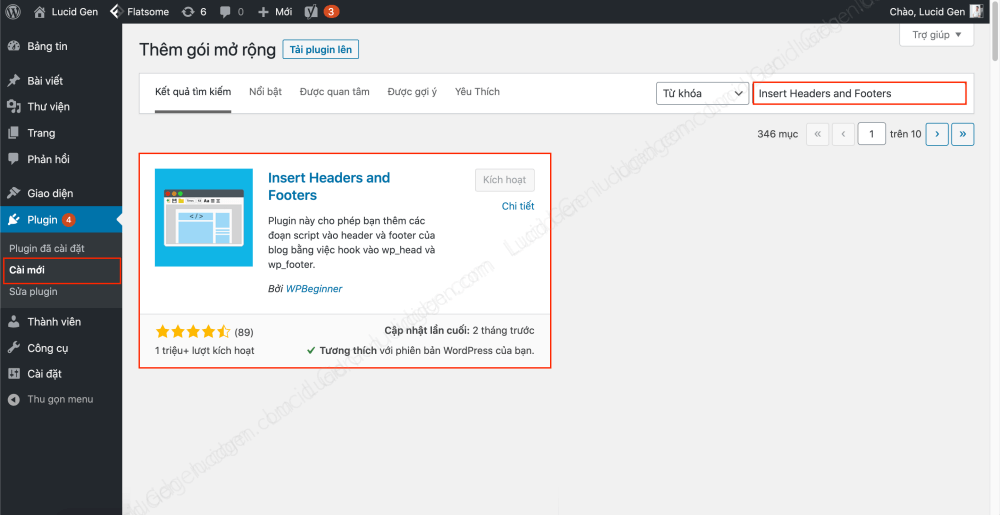
Go to Code Snippets > Header & Footer (in older versions, Settings > Insert Headers and Footers), paste the button code in the Body section, and then click the Save button.

Note: if you don’t see the Messenger button after adding the code to your WordPress website, please clear the cache.
Add the Messenger button to a LadiPage website
LadiPage is strongest at form filling, but if you think customers need advice via chat, you can add a Messenger button to your LadiPage website too.
In the LadiPage editor, click Setup and select Javascript/CSS Code. Paste the Messenger button code into the Before the body tag box, then click Publish. You can also create a button in LadiPage and set its link to your m.me link.

Add the Messenger button to a Haravan website
If you use the full Haravan suite with Harafunel, you should ask their support team how to connect Messenger with your sales system, as this part needs its own API setup. If you only need a simple Messenger button on the website, do as I do.
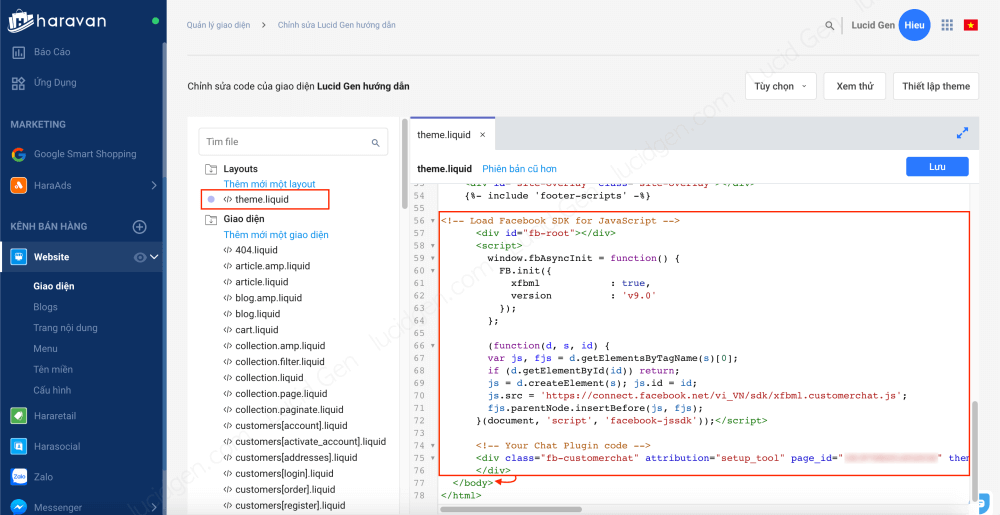
Step 1: Go to Website in Haravan’s left menu and select Appearance. On the right, click the three-dot button and select Edit code.

Step 2: Open theme.liquid for editing. Find the </body> tag, paste the Messenger button code above it, and then click the Save button.
What if you want a chat box on your website?
If you still want visitors to chat right on your website without leaving the page, you need a third-party live chat tool. Many live chat tools today can connect to your Facebook Page and bring website chats and Messenger messages into one inbox. Each tool has different free plans and features, so try the free version first before paying, as some of them are quite heavy to load.
Conclusion
The embedded Messenger chat box is gone, but a well-placed m.me button still lets customers reach you in one click. It is also much lighter than the old Chat Plugin code because it doesn’t load any Facebook scripts. You can do the same on other website platforms; just paste the code in the right place. And if you prefer to use Zalo, see the article on how to embed Zalo on the website.
If you have any questions, feel free to leave a comment below and I will help you out. Good luck adding the Messenger button to your website!


Why Won’t Facebook Let Me On Messenger
Hello, did you check with another account?