
Many businesses encounter the problem of sending emails to customers who cannot reach the primary mailbox because they have not set up DKIM, DMARC, and SPF correctly or skipped this part. We should follow Google’s instructions for businesses using Google Workspace to increase mail reliability. Lucid Gen will guide you on how to set up DKIM for Google Workspace in the most precise way; let’s get started.
Why do we need DKIM, DMARC, and SPF?
Lucid Gen would like to convey this easily because using specialized terminology will confuse those new to this field.
- DKIM: Helps Google authenticate whether your email is spoofed or not or whether the domain owner authorizes it.
- DMARC: This mail authentication protocol helps protect domain names from unauthorized use or mail tampering.
- SPF: Let Google prevent spam and detect whether the sender’s address is real or fake.
We need DKIM, DMARC, and SPF to help outgoing mail get to the primary mailbox smoothly. Lucid Gen talked to Google Workspace support staff, and they shared that setting up DKIM correctly will help reduce the rate of mail sent to spam.

How to check a domain’s DKIM, DMARC and SPF
Go to the MX Check page to check if you have set up DKIM, DMARC, and SPF correctly. Paste your domain name in the Domain name box and click the Run test button.
For example, if lucidgen.com has a yellow warning in the DKIM and DMARC section, we know that lucidgen.com has not set up DKIM and DMARC for Google Workspace correctly. Please try testing with your domain name to see the results.
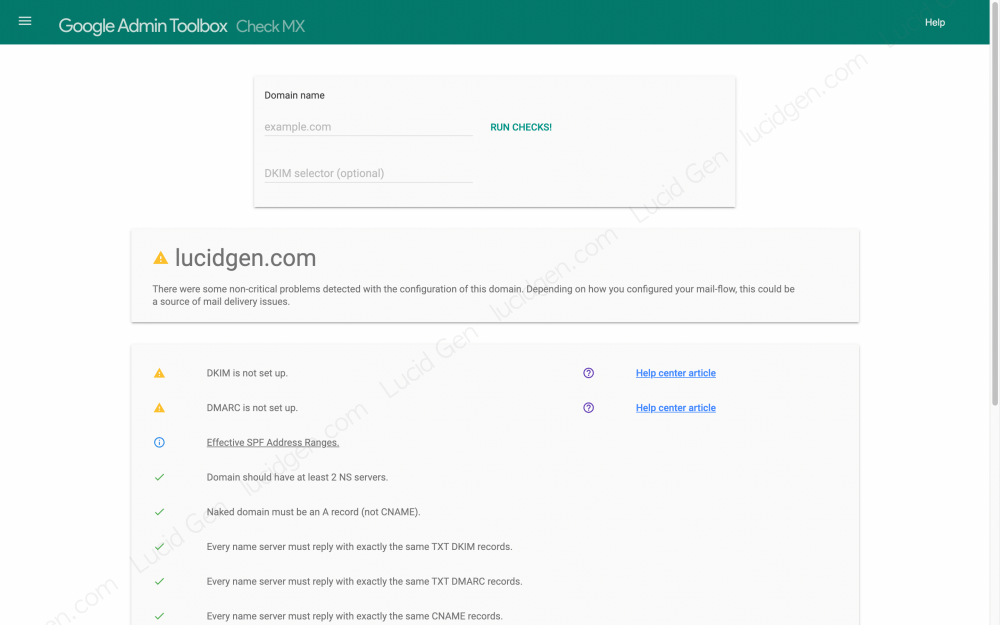
The warnings were gone after Lucid Gen revised the DKIM and DMARC settings. Now, lucidgen.com’s MX is entirely valid. I will guide you on how to set up DKIM and DMARC right below.

Note: If a domain name has many errors when checking MX, but they can still send mail to the primary mailbox, they probably do not use Google Workspace; for example, if they use Outlook, they will set it up as required. Outlook requirements.
Setup DKIM, DMARC, SPF for Google Workspace
Set up DKIM Google Workspace
To set up DKIM for Google Workspace, you must use the account with the highest authority in your (or the company’s) Google Workspace.
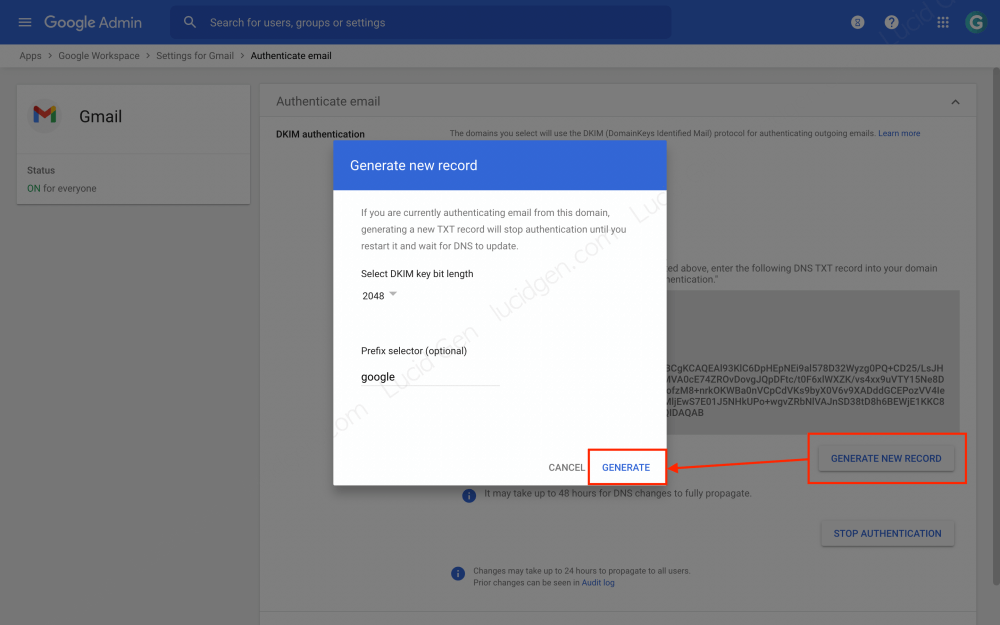
Step 1: Go to admin.google.com > search for DKIM in the search bar > click DKIM authentication.

Step 2: Click the Generate new record button > select the DKIM key length > click the Generate button.
- DKIM Key bit 1024: Compatible with many older email systems. Suitable for any DNS that only allows 255 character values to be filled in. Most used, Lucid Gen temporarily suggests you choose this option.
- DKIM Key bit 2048: More secure, compatible with popular mail systems such as Gmail and Outlook. Suitable for any DNS that allows a value of more than 255 characters to be filled in. It will be the trend of the future.
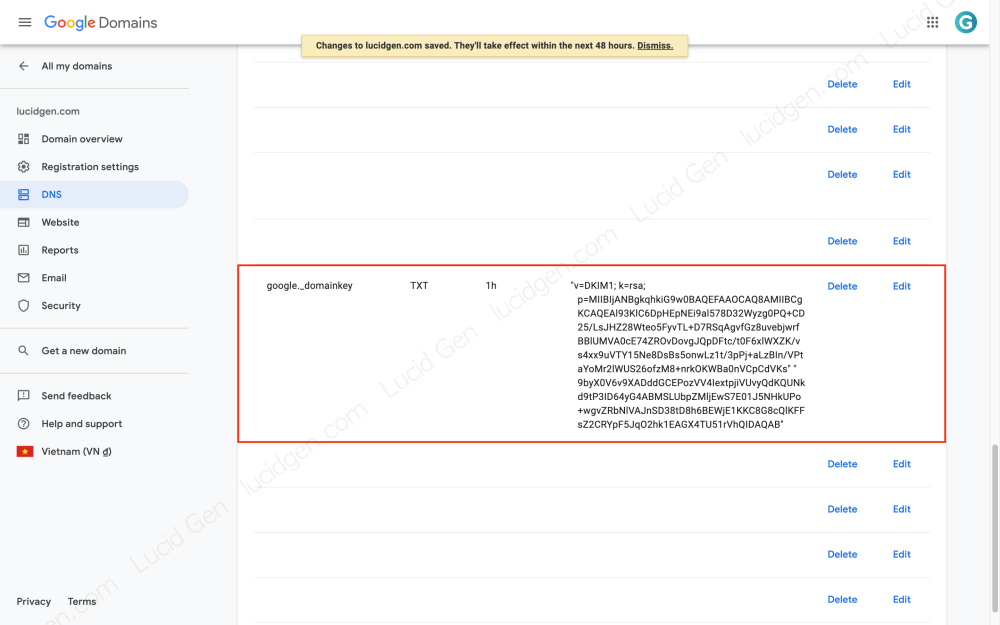
Step 3: Copy google._domainkey and DKIM value to add to your DNS.
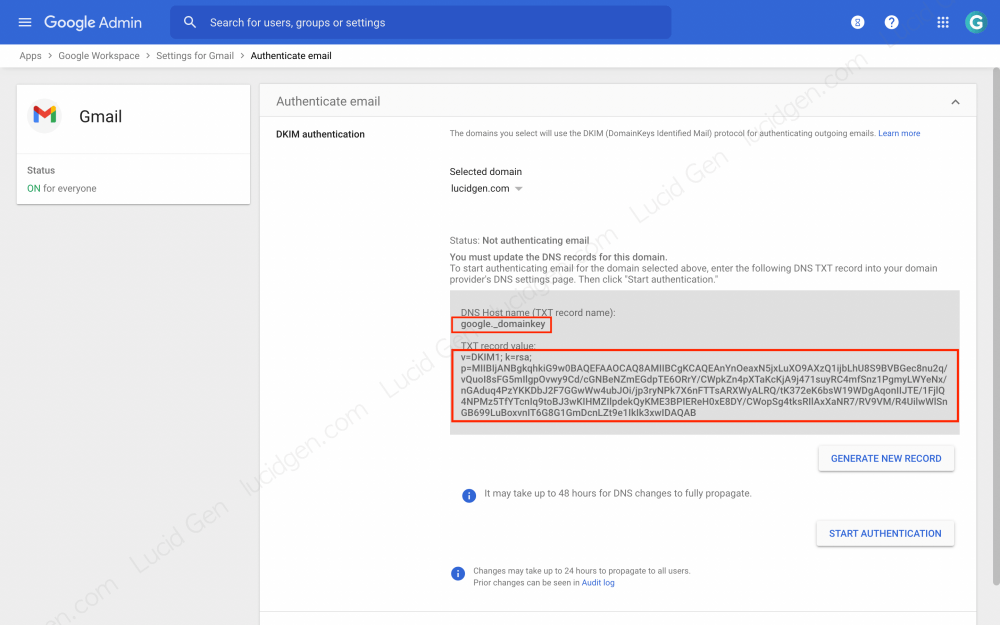
Step 4: Go to domain name management > set up DNS > add DKIM record as follows.
| Name | Loại | Thời gian | Dữ liệu |
|---|---|---|---|
| google._domainkey | TXT | 1h | Khóa DKIM của bạn |

After you set up DKIM in DNS, you must wait 48 hours for the record to take effect (according to Google). Depending on your domain name provider, Lucid Gen found that it takes about 30 minutes for it to take effect.
Step 5: After you have waited 30 minutes to 48 hours, return to the DKIM authentication page > click the Start Authentication button to verify your domain has Google Workspace’s DKIM.

When you see the status has changed to “Authenticating email”, you have successfully authenticated.

But if you fail to authenticate and receive a message like below, wait until 48 hours and then click the Start Authentication button again.
Email authentication was not verified. Please allow 48 hours for DNS to update and make sure you entered the correct TXT record into your domain provider’s DNS settings page.
Error message when authenticating DKIM
Set up DMARC for Google Workspace
DMARC setup has three popular types introduced by Google as follows, you only choose 1 of these three types to add to DNS.
| Name | Loại | Thời gian | Dữ liệu | Giải thích |
|---|---|---|---|---|
| _dmarc | TXT | 1h | v=DMARC1; p=none; rua=mailto:email-nhan-thong-bao@tenmien.com | When the message is not successfully authenticated > Do nothing, send it to the recipient. Everything is logged and sent to you. |
| _dmarc | TXT | 1h | v=DMARC1; p=reject; rua=mailto:email-nhan-thong-bao@tenmien.com | When the message is not authenticated > Do not send it but return it to the sender. There is notice for you. |
| _dmarc | TXT | 1h | v=DMARC1; p=quarantine; rua=mailto:email-nhan-thong-bao@tenmien.com | When the sent message is not successfully authenticated > Mark the message as spam and send it to the recipient’s spam box. There is notice for you. |
According to Lucid Gen, the second option is the most reasonable to control unauthenticated messages.

Set up SPF for Google Workspace
Setting up Google Workspace’s SPF is quite simple and has no options. You need to add both records to DNS, and you’re done.
| Name | Loại | Thời gian | Data |
|---|---|---|---|
| @ | TXT | 1h | v=spf1 include:_spf.google.com ~all |
| @ | SPF | 1h | v=spf1 include:_spf.google.com ~all |

Conclusion
After setting up DKIM, DMARC, and SPF, go back to Google’s Check MX page to check if the status has changed to fully valid. Please leave your results or questions below in the comments section. Good luck!


