
Your SEO will improve if you add SSL to website, and redirect HTTP to HTTPS will help you increase your SEO competitive advantage while also helping to increase security and increase credibility with users. Remember that this feature is free on most hosting providers. Now, let’s learn what SSL and HTTPS are and how to configure them.
Summary of general knowledge
What is SSL and HTTPS?
- SSL (Secure Sockets Layer): is the standard technology to keep internet connections secure and protect sensitive data being sent between two systems (although now upgraded to TLS (Transport Layer Security) but people are still more used to calling SSL) . SSL helps prevent bad guys from reading and modifying information sent between two servers. For example, to make it easy for you to understand, the two servers are you and the customer, when you are transacting on the website, the payment information is sent. In short, if you need to dig deeper, you can look at Wikipedia.
- HTTPS (Hypertext Transfer Protocol Secure): is an upgraded version of HTTP, used to communicate more securely on the internet environment, authenticate websites that are accessed, and protect user privacy and data integrity. when sent (HTTPS requires SSL/TLS). HTTPS also helps against hacker attacks with websites. After redirecting HTTP to HTTPS, please refer to how to enable 2-step verification in WordPress and use Wordfence Security to enhance website security.
What is the difference between free and paid SSL?
Because many people who are not familiar with the website array still misunderstand that adding SSL to the website is costly, so they hesitate. I repeat that it is completely free with most hosting providers. Whichever party “instigates” you to spend more money, please “avoid” that side. Below is a comparison table of free and paid SSL for you to understand more, and of course, usually, we will choose free.
| Criteria | Install Free SSL | Set up enterprise SSL SSL |
|---|---|---|
| Suitable object tượng | Small and medium enterprises, websites are not the number 1 brand in Vietnam. | Large enterprises, the number 1 brand in Vietnam. For example, on thegioididong.com page, when you click on the padlock, you will see MOBILE WORLD JOINT STOCK COMPANY [VN]. |
| Manufacture | Let’s Encrypt is included in the hosting packages. | COMODO, GEOTRUST, THAWTE, DIGICERT… You can buy through the hosting provider you are using. |
| Benefit | The benefits are listed below. | The benefits I listed below + Extremely high reliability with users and search engines. |
| Procedure | No, as long as you go to the hosting manager, you can handle it yourself according to the instructions of this article. | You need the same business license and various other documents related to the business. The process depends on each provider that will be different; they will advise you. |
| Expense | Free of charge. | From 300,000 VND to 12,000,000 VND / year. Each package and benefits vary. |
Benefits of redirecting HTTP to HTTPS for websites
- Web loads faster: many people think that HTTPS encryption will make the web load slower, but it really isn’t. HTTPS has a lot of improvements over HTTP and makes your website load faster.
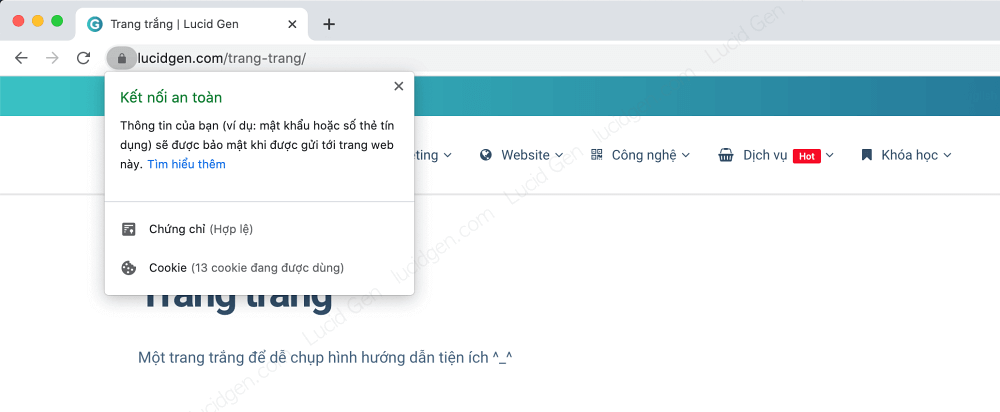
- Increased reliability with visitors: everyone feels more secure when accessing a website knowing that it is safe, right? Users now, especially technology people, will easily understand the safety of the website through the small padlock icon in front of your domain name. This shows that you respect the privacy of their information.
- Security at payment: when buying on the website, buyers will want their payment information to be secure. Hence the HTTPS padlock symbol to ensure that their information is sent in and out securely.
- Increase SEO competitive advantage: all search engines encourage website owners to add SSL to their website and redirect HTTP to HTTPS to their website. Pages that are still HTTP will not be prioritized in search ranking.
- For the website name to display beautifully: you have racked your brains to come up with a beautiful domain name. If you’re still using HTTP, many browsers will append the word “Not Secure” in front of you. Very bad, isn’t it? Then you must add SSL to website and redirect HTTP to HTTPS to keep the domain name beautiful and neat.
Install free SSL for your website on the server
Most of the server providers nowadays usually integrate cPanel into their hosting packages. So in this article, I only guide to add SSL to website on cPanel. Other servers are similar but with different interfaces.
Add SSL to website in cPanel
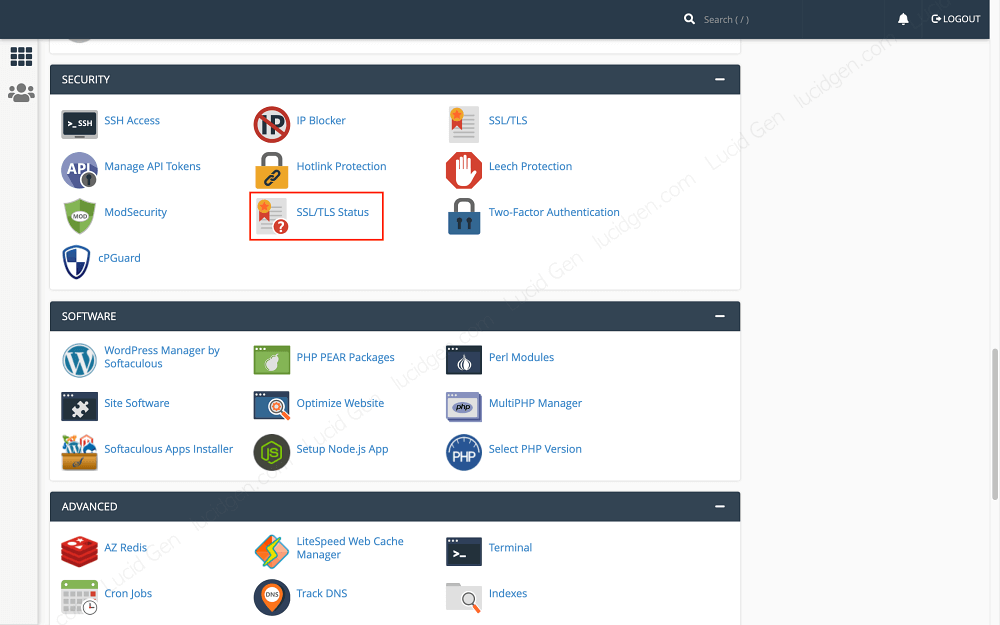
Step 1: Go to cPanel > SSL/TLS Status to add SSL to your website for free.
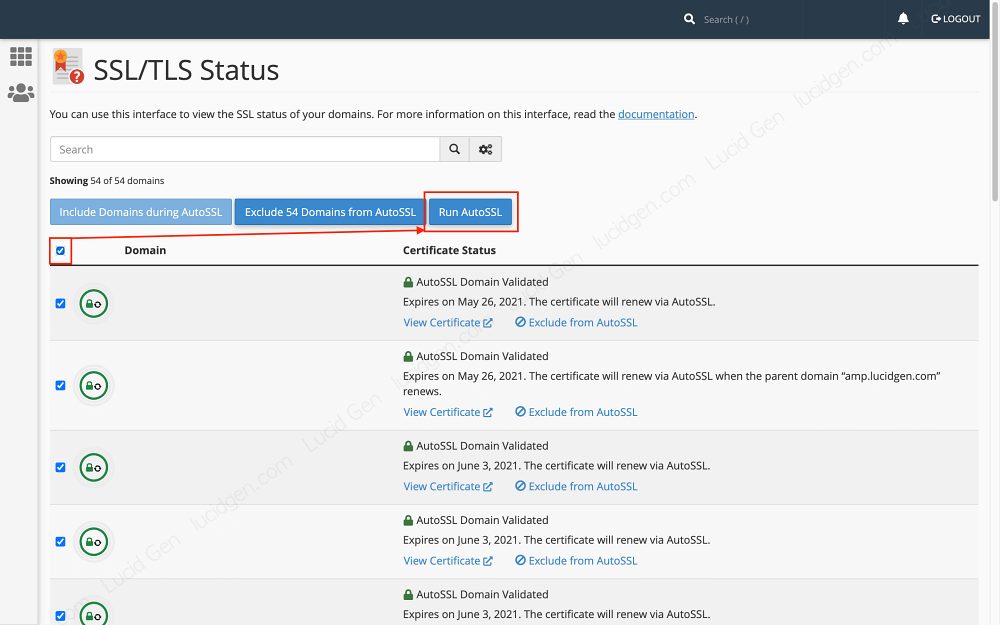
Step 2: Select all domains > click the Run AutoSSL button.
Other servers
You can also go to the SSL or TLS section to install free SSL for the website for other servers. The easiest way is to contact customer service directly or the technical department of the hosting service provider you are using. They will give you the appropriate documentation or do it for you.
redirect HTTP to HTTPS WordPress
With a new website, you just need to do step 1 to change the website address in the settings and step 2 is to redirect HTTP to HTTPS with htaccess in cPanel . The last 2 steps are for websites that have been created for a long time and have more data than I will specifically note in them.
Change website address in settings
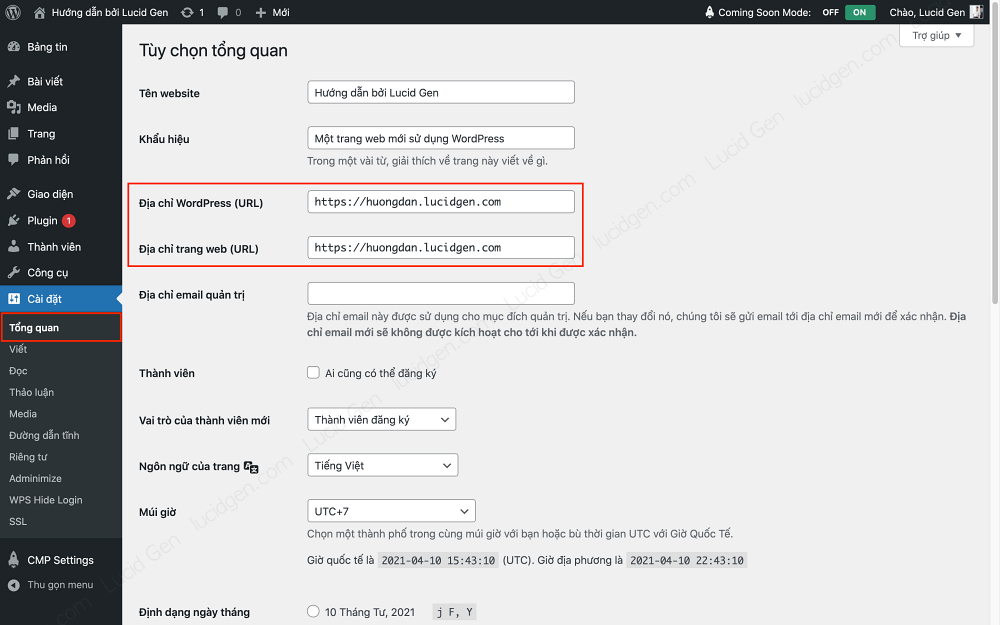
This is the first step to do and the simplest step in redirecting HTTP to HTTPS for the WordPress website. Go to Settings > Overview > update WordPress Address and Site Address to HTTPS.
Redirect HTTP to HTTPS với htaccess in cPanel
To automatically redirect HTTP to HTTPS when customers visit your website, you need to add a few lines of code to the htaccess file. Please follow the instructions below.
Step 1: Go to cPanel > File Manager to enter the file manager on your website.
Step 2: Go to the correct folder containing the website (usually public_html or by domain name) > Settings > Show hidden Files > Save to see the htaccess file.
If you still don’t see it, you can create a new file, name it .htaccess . There is a dot in front as shown below.
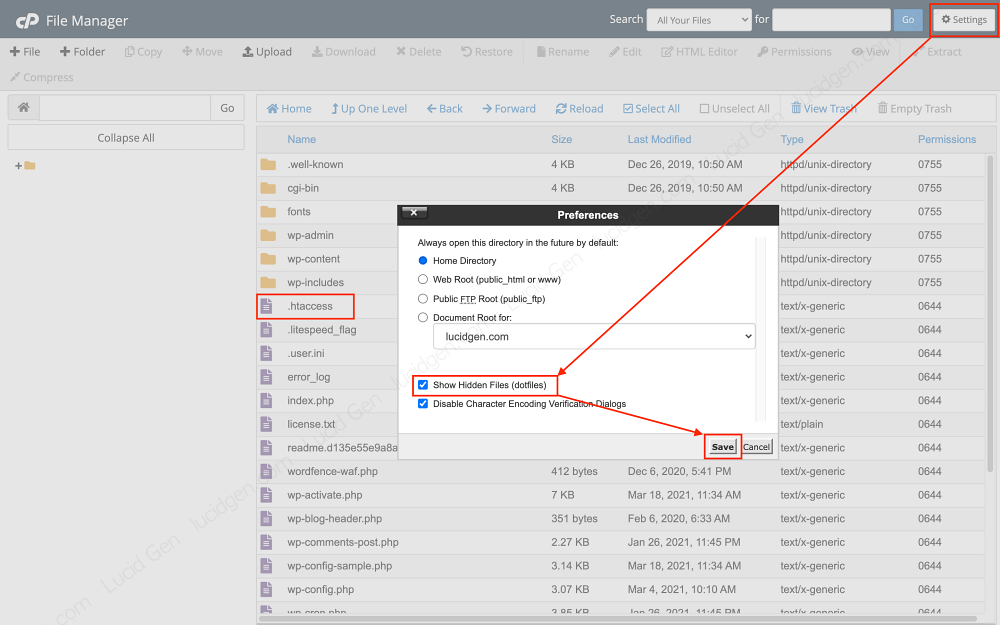
Step 3: Right-click on the htaccess file > Edit.

Step 4: You paste 2 lines RewriteCond and RewriteRule right below the line RewriteEngine On. Then click Save Changes, and you’re done.
# BEGIN WordPress
<IfModule mod_rewrite.c>
RewriteEngine On
RewriteCond %{HTTPS} !=on [NC]
RewriteRule ^(.*)$ https://%{HTTP_HOST}%{REQUEST_URI} [R=301,L]
Redirect HTTP to HTTPS in database
If your website has been around for a long time and has many pages, posts, links, and images that use HTTP, then you need to convert all WordPress HTTP to HTTPS in the database. It doesn’t sound easy, but there is a plugin to help you do this very easily. The divine WordPress is in the plugin, hihi.
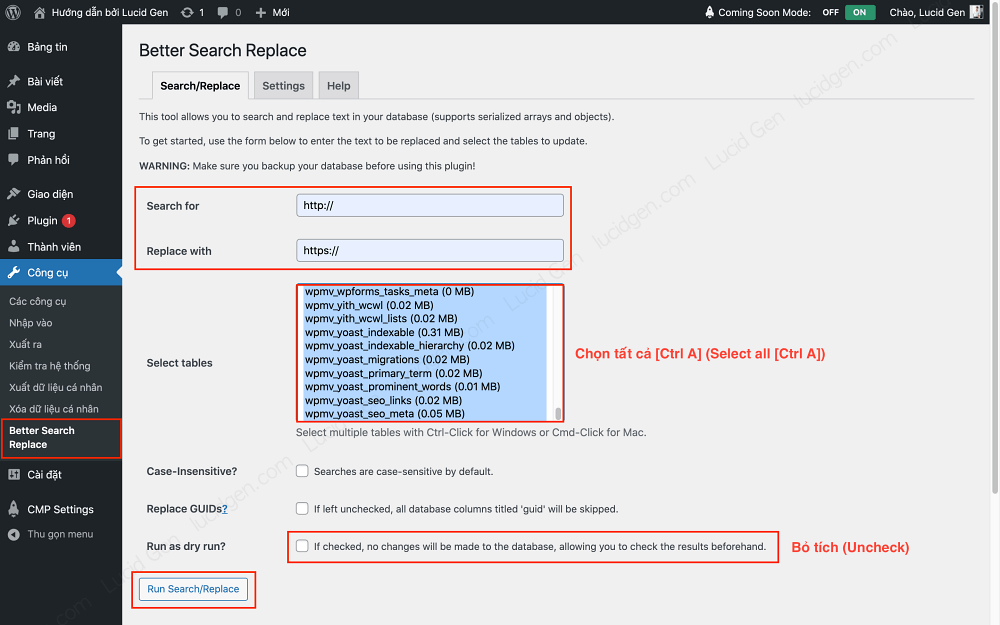
Step 1: Go to website administration > Plugins > Install New > Better Search Replace > Install and Activate.https://wordpress.org/plugins/better-search-replace/

Step 2: Go to Tools > Better Search Replace > configure according to the instructions below > click Run Search/Replace to convert all HTTP to HTTPS links in your website data.
- Search for: http://
- Replace with: https://
- Select tables: select all (click on any row and then press Ctrl A)
- Run as dry run: uncheck
redirect HTTP to HTTPS WordPress with a plugin
After completing the above 3-step combo and your website still has problems with HTTPS, this is the final solution for you. Handles almost any WordPress HTTP to HTTPS redirect problem.
Even if you use this method, do not skip step 3, because if one day you turn off this plugin, the content of your website will return to HTTP and be messed up.
Bugs that make us need this plugin: Mixed-Content is generated by 3rd party code or plugin, other plugins fix their own htaccess to work better but sometimes lose HTTPS redirects.
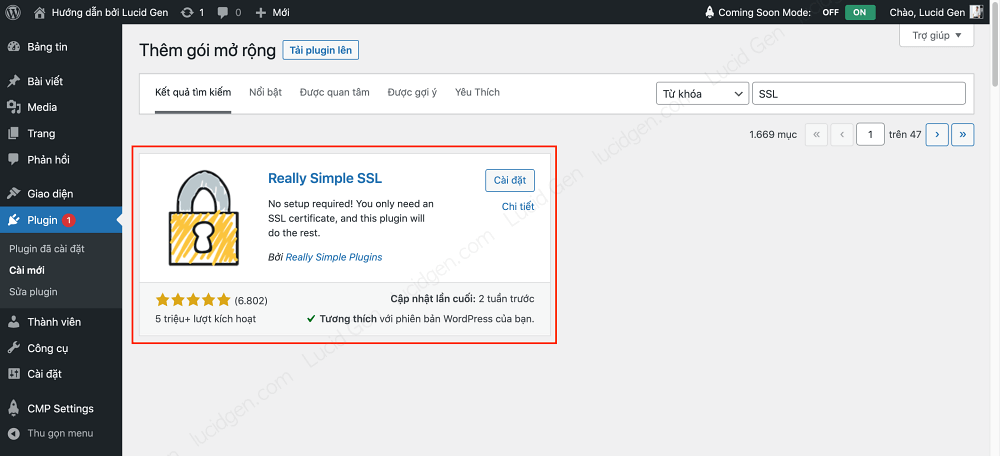
Step 1: Go to website administration > Plugins > Install New > Really Simple SSL > Install and Activate.https://wordpress.org/plugins/really-simple-ssl/
Step 2: Go to Settings > SSL > Activate SSL to enable the HTTP to HTTPS redirect to accept all the problems you face.
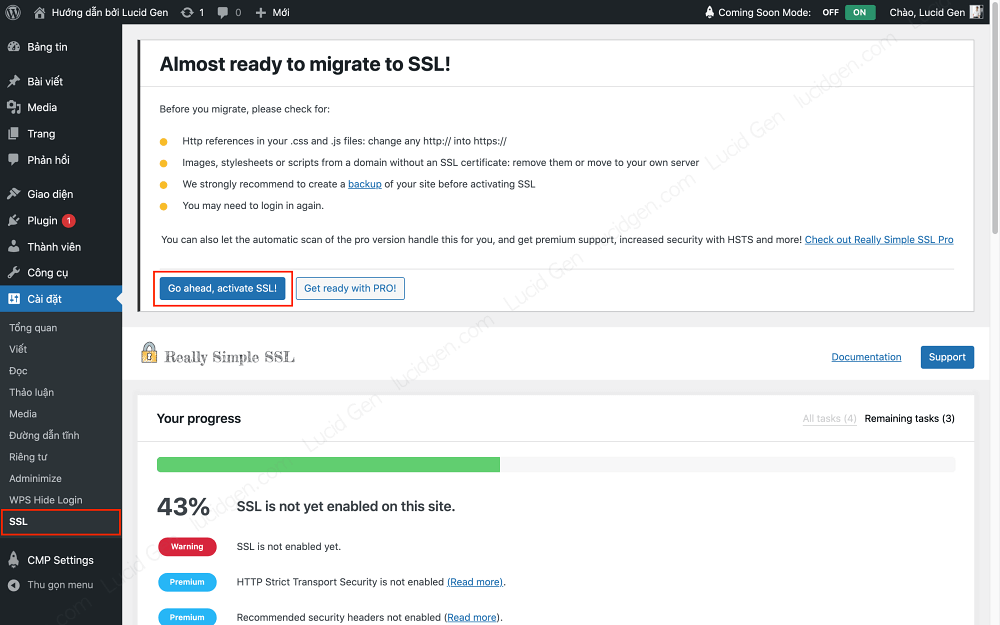
Step 3: To make it even better, turn on all the options in the settings, except for Stop editing the .htaccess file, because other plugins need to edit the htaccess file to work. Dynamic, such as caching and security plugins.

What to do after adding SSL to the website?
After adding SSL to website and redirecting HTTP to HTTPS, don’t forget to change the new website address with search engines and data analysis.
Edit website address in Google Analytics
If you do not have Google Analytics, see how to insert Google Analytics into your website to measure website traffic. If you already have Google Analytics when your website does not have SSL installed, follow the instructions below to update it again.
GA3 (old Google Analytics)
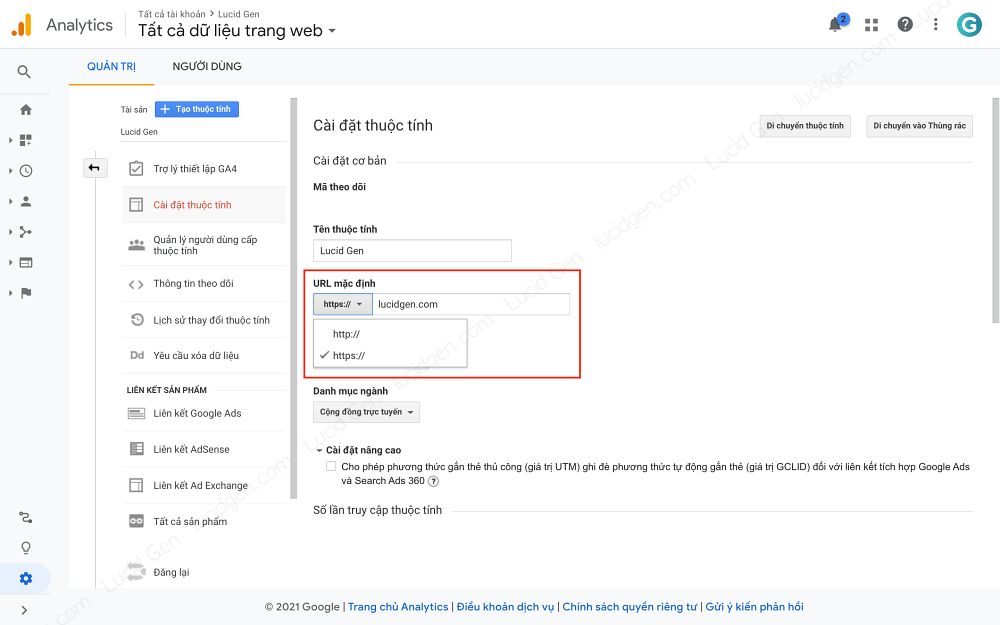
Go to Settings > Property Settings > Edit Default URL to https://
GA4 (New Google Analytics)
For GA4, you cannot update the URL and only create a new data stream and delete the old data stream.
Step 1: Go to Settings > Data Streams > Add Stream.

Step 2: You enter the website URL and Stream Name; remember to start with https://. Then delete the old web data stream.

Edit website address in Google Search Console
You need to update the new URL for Google Search Console so that Google knows your website has SSL installed and prioritizes higher search rankings (over HTTP pages only).

Conclusion
Adding SSL to website and redirecting HTTP to HTTPS is only a bit difficult the first time, but once you get used to it, you will find it as easy as pie. We only put in the effort to do it once, but the effect it brings is long-lasting and forever; why not do it.
One last note that is quite important, is that you must check to see if the hosting you are using has the SSL auto-renewal feature. It is not permanent but expires you and renews even though it’s free. The good hosting must automatically renew forever later. You must ask to know, to avoid the case that suddenly one fine day, when you go to the web, you see a red warning that is not safe, it is a search ranking.
How do you feel about this article, or if you need any assistance, feel free to leave a comment below this article. I will answer and assist you as best I can.


