
Lucid Gen’s comprehensive Contact Form 7 WordPress setup guide will help you get a contact form right away. You will be notified via email and get data from Contact Form 7 by Connecting Contact Form 7 to Google Sheets. I find this way very convenient for reusing data later. If your website is using WordPress, what are you waiting for? See how to use Contact Form 7 right below.
What is Contact Form 7?
Contact Form 7 is the most popular and completely free form builder plugin for WordPress. It will help WordPress have the ability to create a contact form and insert the form into any page you want. Contact Form 7 setup allows you to customize various fields of information and title. Contact Form 7 can send notifications when there is data to multiple emails at the same time. Because of its popularity, many other developers have added special features to it with add-on plugins.
Instructions on how to use Contact Form 7 include the following main ideas:
- Instructions to set up Contact Form 7 WordPress to have a satisfactory form.
- Configure SMTP for Contact Form 7.
- Connect Contact Form 7 with Google Sheets to get data from Contact Form 7.
- Finally, share some beautiful Contact Form 7 templates.
How to set up Contact Form 7 super standard
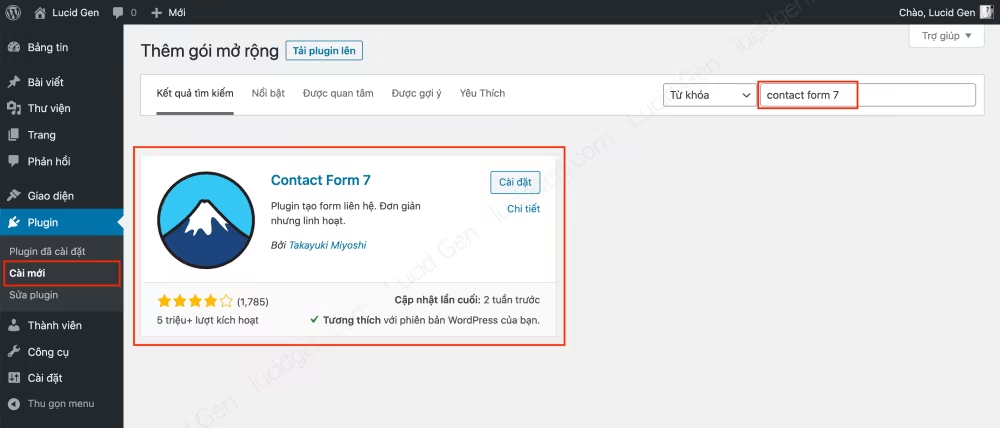
You access the website administration. Go to Plugins > Install New to install Contact Form 7.
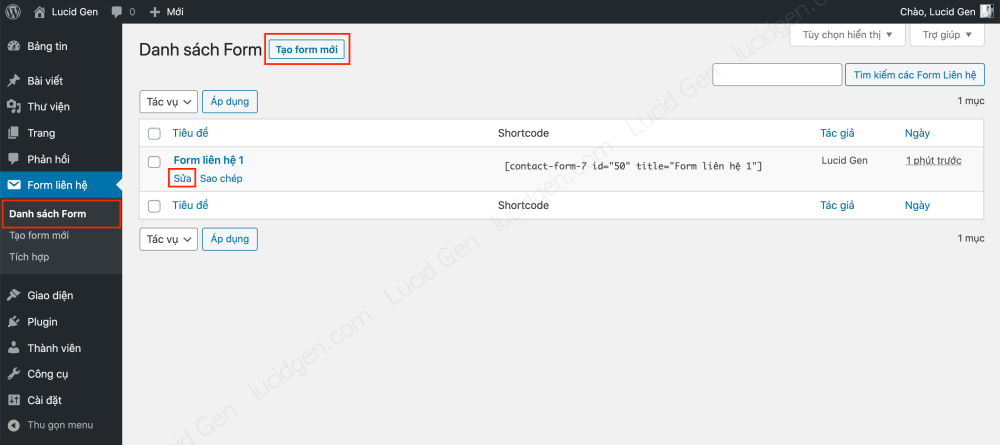
You go to Contact Form > Form List, and you will see a default form available. You can Create a new form or Modify this default form.
Set up Contact Form 7 parts of content
Before I show you how to set up Contact Form 7 WordPress, I want to explain what content types mean and when it’s appropriate to use them.
The most commonly used content:
- Short text: is the short information box, it is the most common. Can replace the content from 2 to 5 always. Especially, it should be used instead of Phone Number to reduce the difficulty when entering phone numbers for customers. Vietnam’s number is a bit diverse, not to mention +84 and 0 too, some customers like to copy paste, so it may contain periods and spaces, the form will report an error. Let guests feel free to enter their phone numbers their way.
- Long text: is a box to fill in information such as a long paragraph. Suitable for contact pages, not suitable for landing pages because it takes up a lot of space on the form.
- Email: is the field to enter the email address. Nothing to note.
- Phone number: is the field to enter the phone number. But you should use Short Text instead.
- Date: is in date format. Suitable for appointment booking forms.
- List menu : is a menu that outputs a list, the customer can only choose 1 value.
- Checkbox option: is many options, the customer can select many values.
- Radio options: are multiple options, the guest can only choose 1 value.
- Submit: just a submit button.
Rarely used content:
- URL: is the box to enter a website link. Suitable for website consultation form, or social network information request form.
- Number: is a cell that only allows numbers to be entered. Suitable for form with order quantity.
- Terms of Acceptance: next.
- Question: next.
- File: is a button to upload an attachment. Suitable for recruitment form.
To make it easy to understand, I will illustrate that I want to create a real estate consultation form. I want to use Contact Form 7 to get customer information, including:
- Name
- phone number
- Options: View Model Homes, Get a Quote, or Inquire Now.
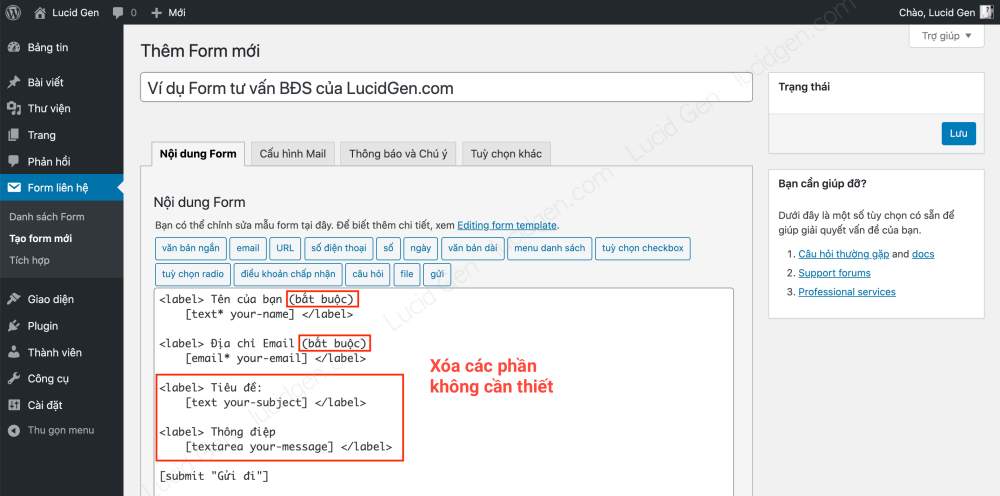
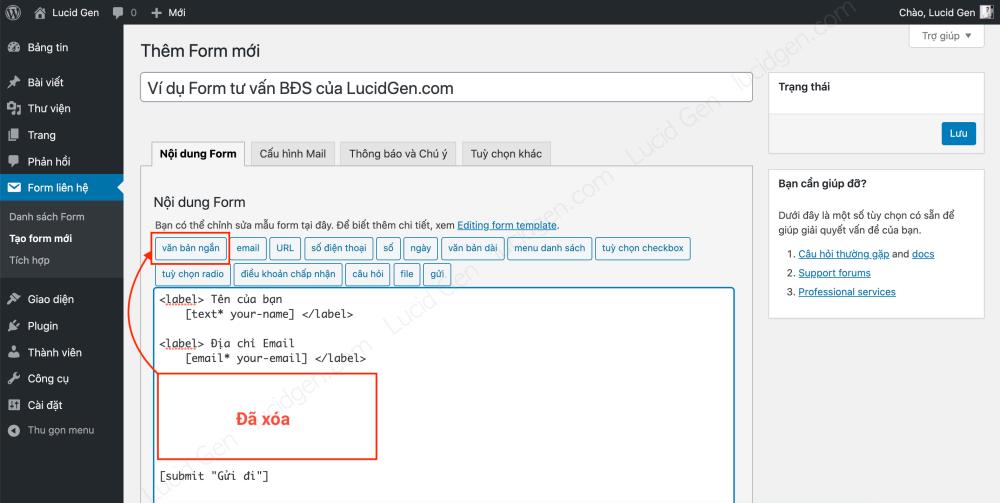
Step 1: You delete the redundant parts in the form content. Notice that we are missing the phone number and options field.
Step 2: Click Short Text to insert the Phone Number field.
Step 3: You tick the required item box and enter a name for this box (letters without accents). When done, click the Insert button below.
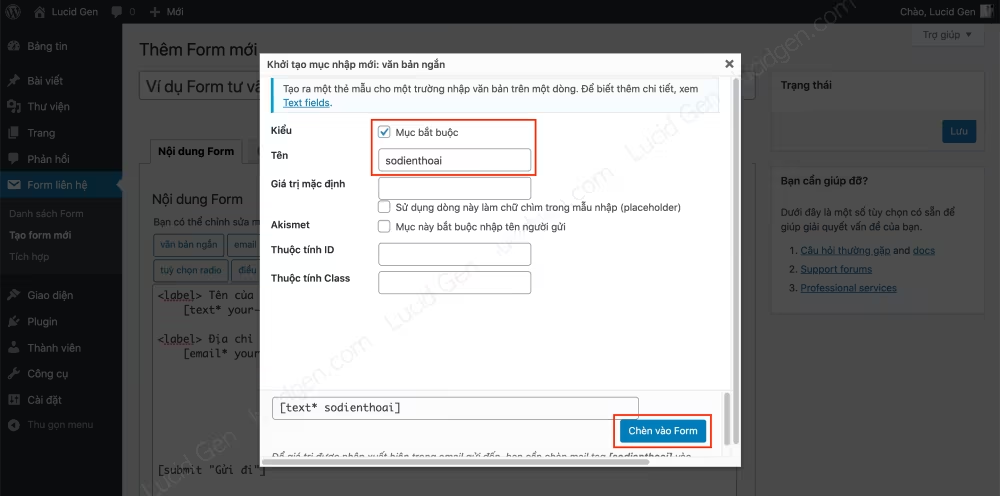
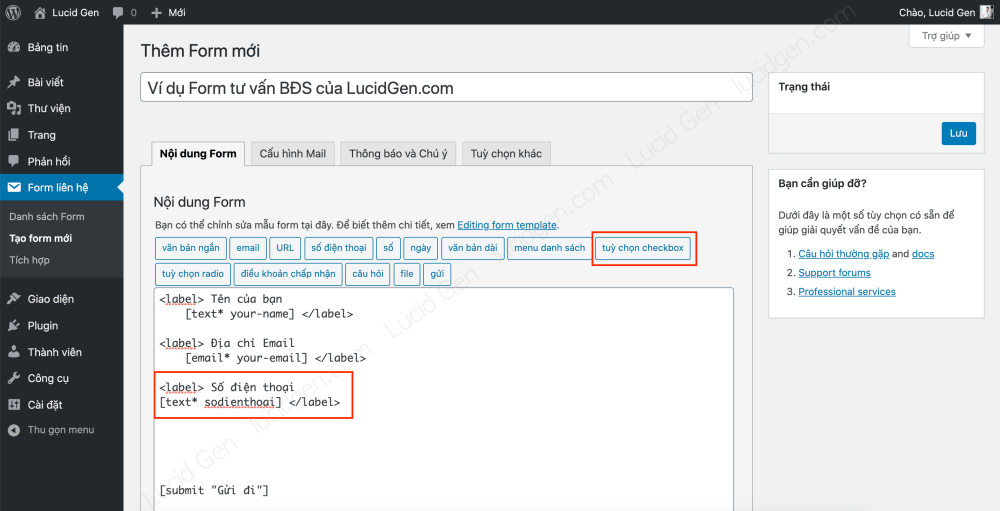
This is the result of step 3. But compared to the above content boxes, the label is missing <label> Phone number </label> . Please add it yourself.

Step 4: After adding the label to the phone number box, complete. You click the Options checkbox to add an optional section for the customer.
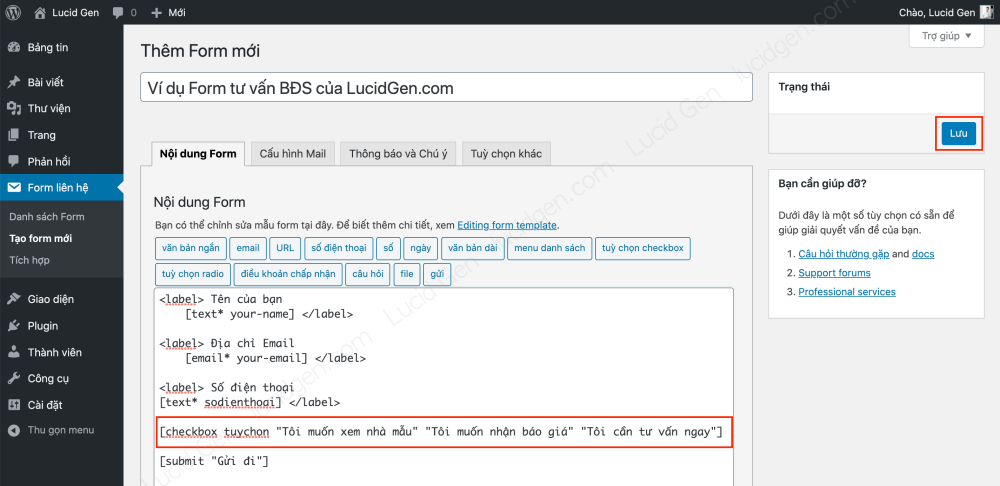
Step 5: You give this content a name (e.g., Tuychon), then fill in the Options; each line is an option. Done, click the Insert button in the form below.

And here is the result of step 5. So we have completed a real estate form.
Note: you must click the Save button before moving on to the Mail Configuration section.
Set up Contact Form 7 to send Mail
You click on the Mail Configuration tab to set the type of email that you will receive from Contact Form 7 when a customer successfully fills in the form.
- Mail received: enter the emails that will be notified when the customer completes the form successfully. Separated by commas.
- Mail sent: leave as is.
- Title: edit it for your work convenience. For example, I’m fine too.
- Additional headers: leave or add Cc according to Cc structure : email1,email2,email3 .
- Message body: should delete all and then recompose for quick reading or copying. For example, I am also short.

Set up Contact Form 7 notification section
You click the Notifications and Notes tab to edit the messages when customers fill out the form. In my opinion, you need to correct the message that the Form is sent successfully; the errors are left as is. Remember to Save.

A few basic steps, and you already have a professional real estate consultation form. Now we will insert it into the page to see how it is.
Insert Contact Form 7 on any page
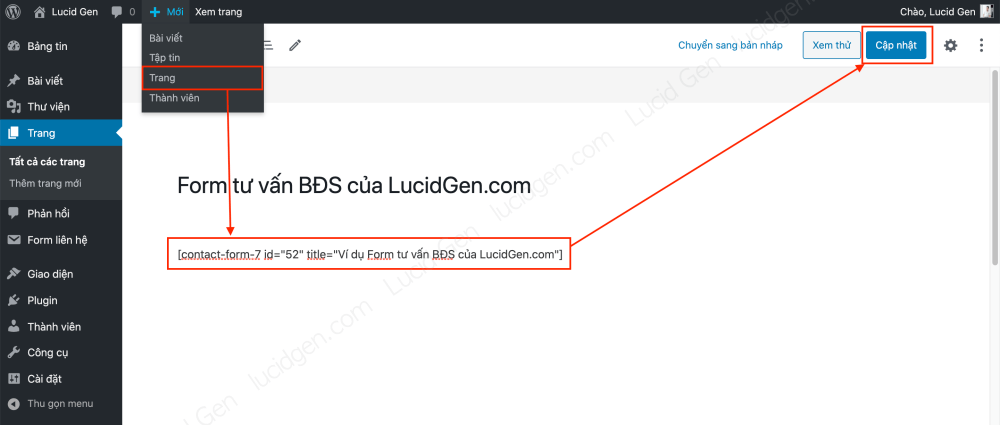
Step 1: Go to Contact Form > Form List. Copy the Shortcode of the form you just created.

Step 3: You create a page or edit any page you want. You paste the shortcode in as normal text and then click Publish (Update).
This is the result of the real estate consultation form that we created from Contact Form 7.
Add placeholder for Contact Form 7
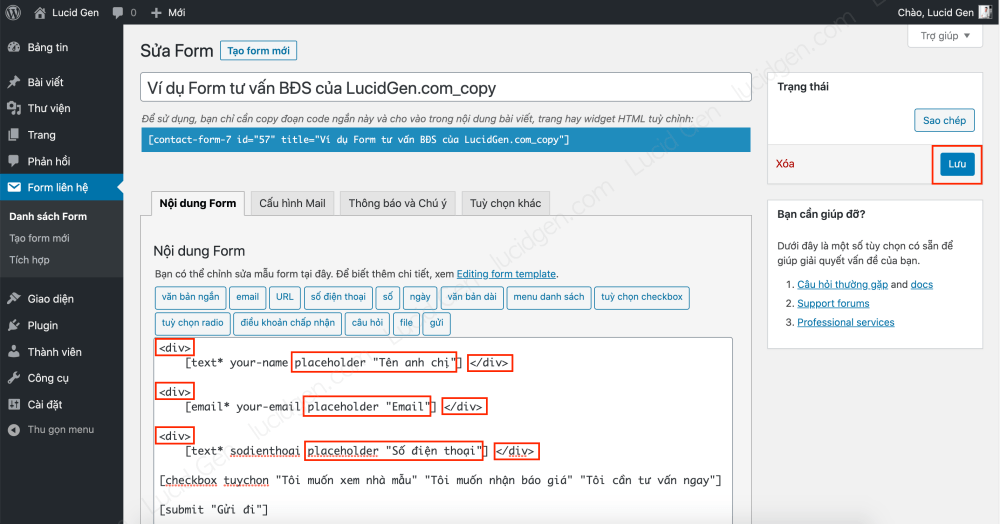
This section is supplementary, and you can skip it. The placeholder is the text displayed in the fill box. I like to use it to replace the labels above the cell, making the form more concise. For example, you can compare the difference between using a label and a placeholder in the image below.

Step 1: You should copy a completed form. Don’t edit lest you don’t like it; it’s hard to return, and don’t create a new one because it’s hard to edit the Mail and Notifications configuration sections.

Step 2: You follow these 3 small steps to change the label to a placeholder and reduce the space between the fields. Remember to save.
- Replace label with div in brackets, reducing the space between fields.
- Add the placeholder “Name of the cell” before the closing square bracket ] .
- Remove the labels above the information fields.
Configure SMTP for Contact Form 7 to send mail
Most WordPress websites will need to use SMTP for the system to send email notifications. If you try to fill out the form but do not receive mail from Contact Form 7, follow these steps to configure SMTP for Contact Form 7.
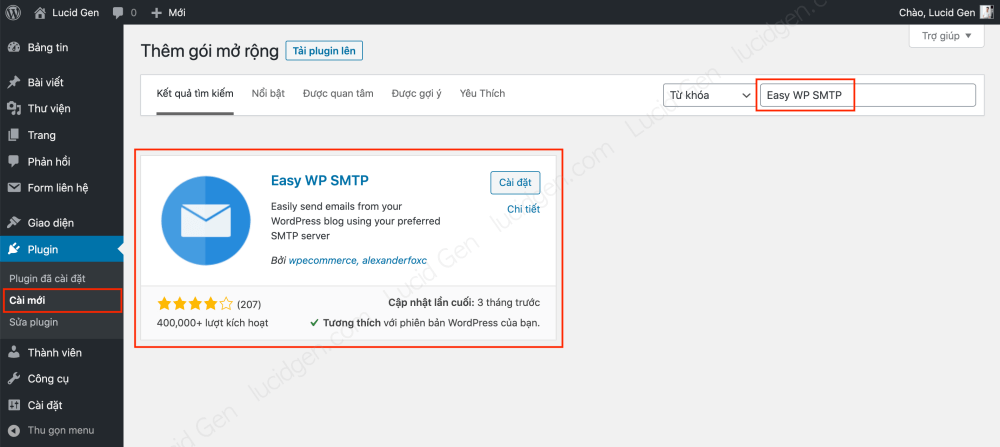
Step 1: Go to Plugins > Install New to install Easy WP SMTP .
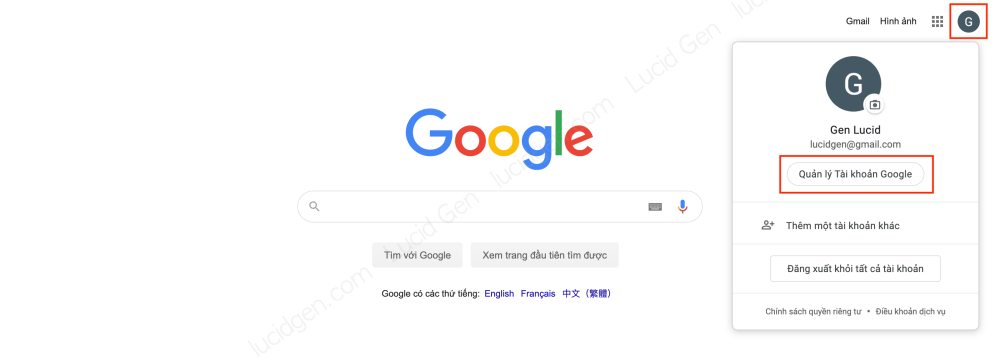
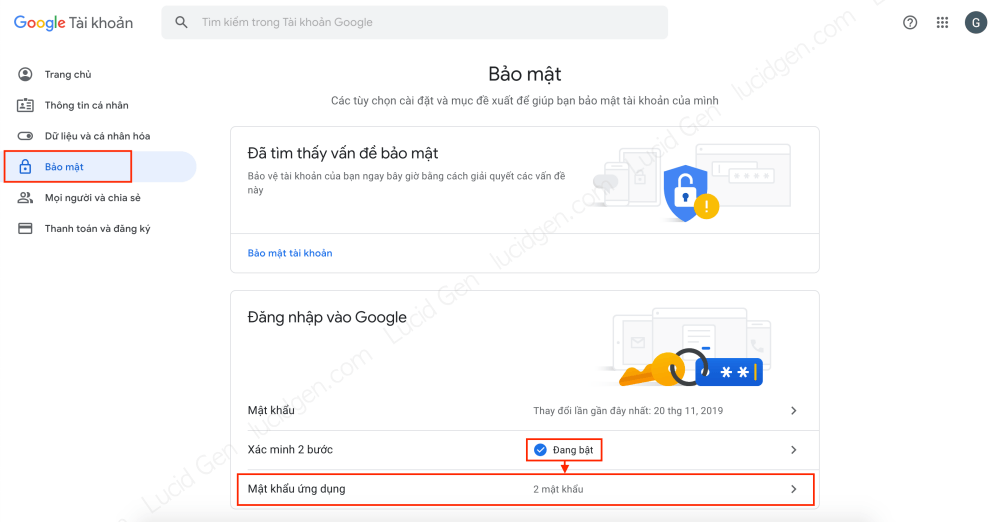
Step 2: You go to the Google Account Management page by clicking on the profile picture on the Google page.
Step 3: you click Security on the menu. You must enable 2-step verification first. Then you click on App Passwords.
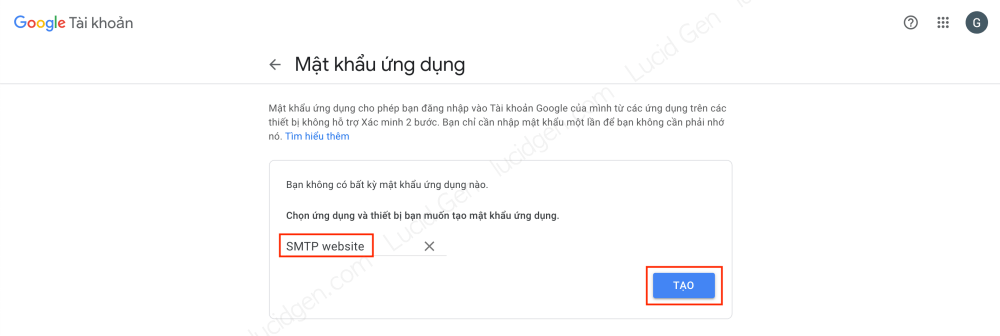
Step 4: You click Choose the application and select More (Custom name).

Step 5: You can enter whatever name you want, then click the Create button.
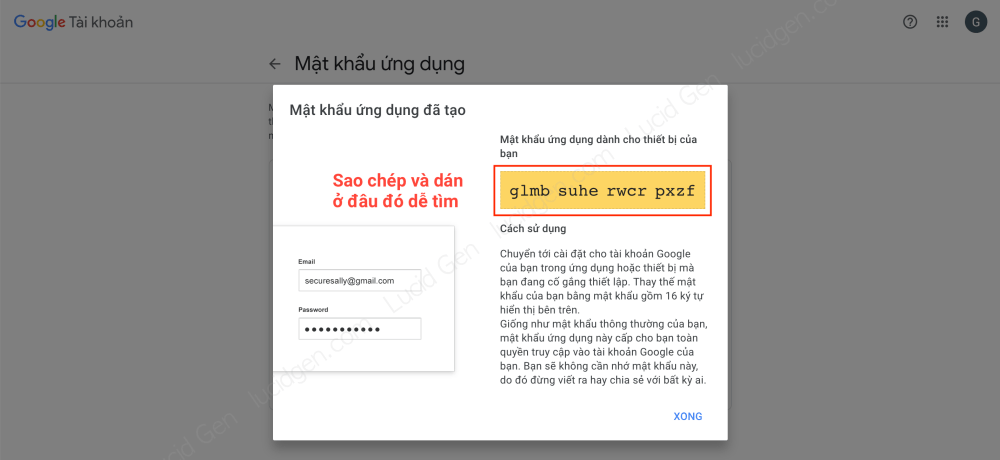
Step 6: You copy the application password in the yellow box, paste it somewhere to use for the next step.
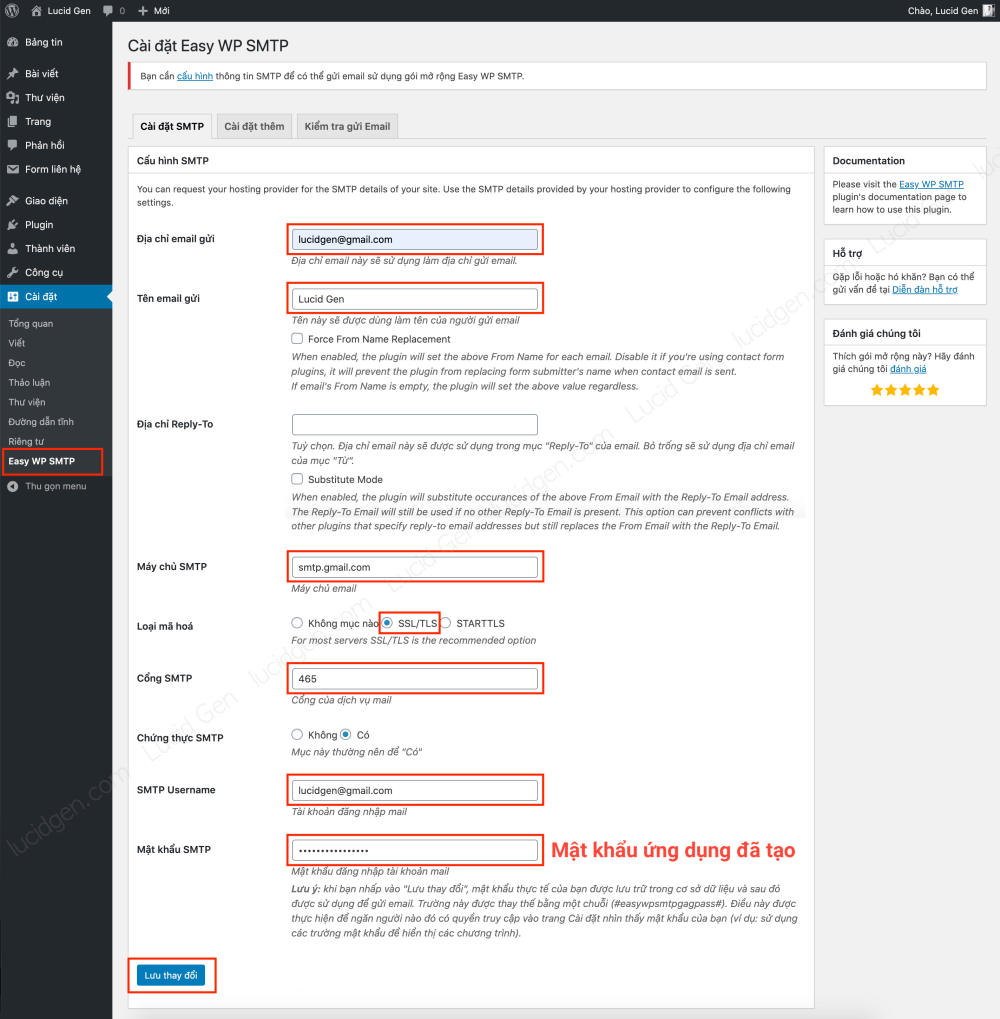
Step 7: Go to Settings > Easy WP SMTP. Please configure according to the instructions below or look at the image.
- Sending email address: your gmail.
- Email send name : whatever name you like.
- SMTP Server: smtp.gmail.com
- Encryption type: SSL/TLS.
- SMTP Port: 465
- SMTP Username: your gmail.
- SMTP Password: generated application password.
For the rest, you leave the default, click the Save changes button below (The part of the application password you should re-enter, and click the save button a few times, because I find this part a bit laggy lately).
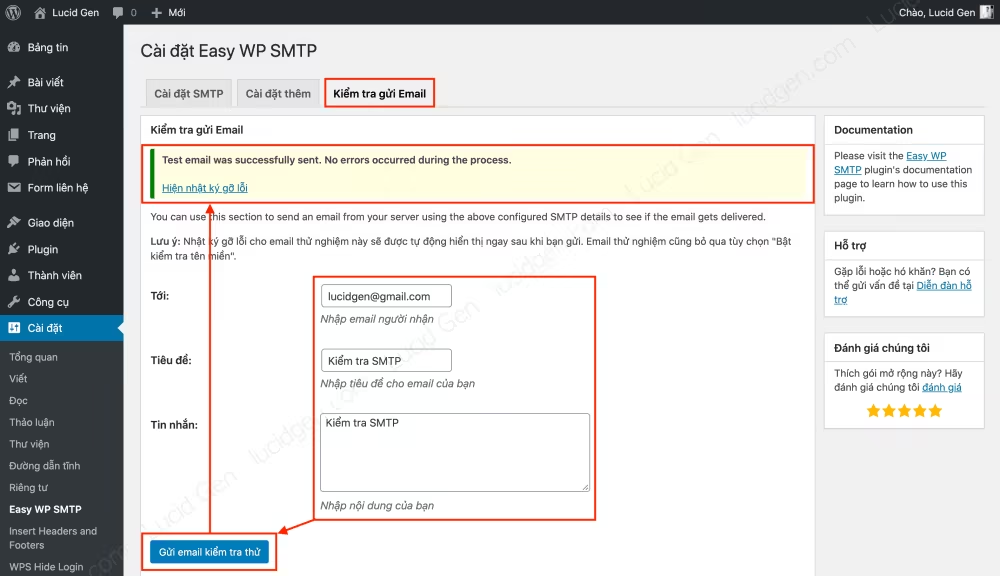
Step 8: You go to the Test Email tab, enter your email and content and then click the Send test email button. If the blue message is successful, you will see an email that has just been sent to Gmail.
So we have finished configuring SMTP for Contact Form 7 in particular and the website in general. Now your forms will automatically send you an email notification when a customer successfully fills in the form.
Connect Contact Form 7 with Google Sheets
Please link Contact Form 7 with Google Sheets if you want to manage the data of customers who have filled out the form in Google Sheets. This makes it easy to divide data for sales and reuse data in the future.
Step 1: Go to Plugins > Install New to install CF7 Google Sheets Connector.

Step 2: Go to Contact Form > Google Sheets and then click Get Code to get the code associated with your Google Drive account.

Step 2: you choose your Google account, then click Allow all.

Step 3: you copy the code and then return to the website to paste.
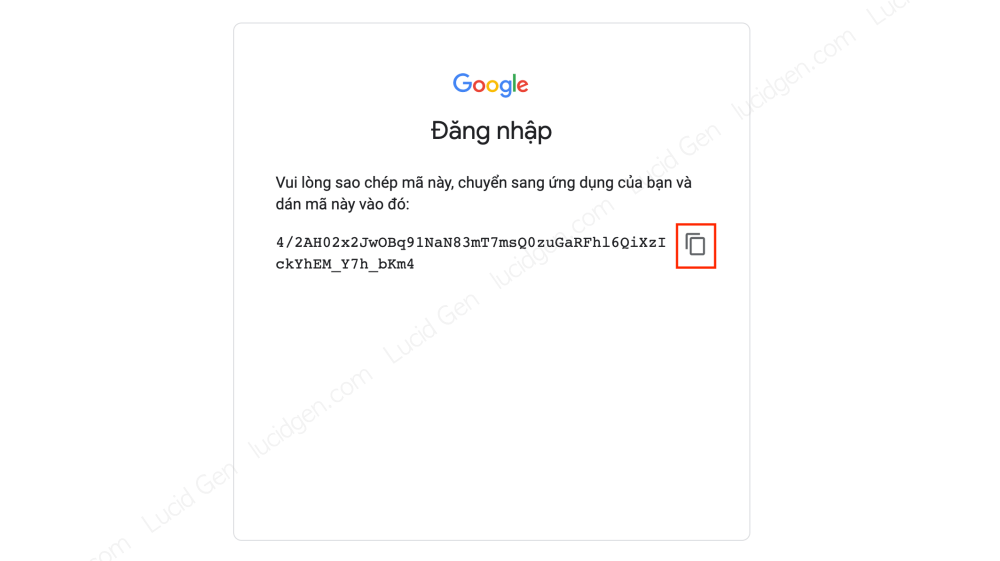
Step 4: you paste the code and then click the Save button, see the words “Your Google Access Code is Authorized and Saved” is successful.

Step 5: Go to Google Sheets and create a Sheet to receive data when customers fill out the form.

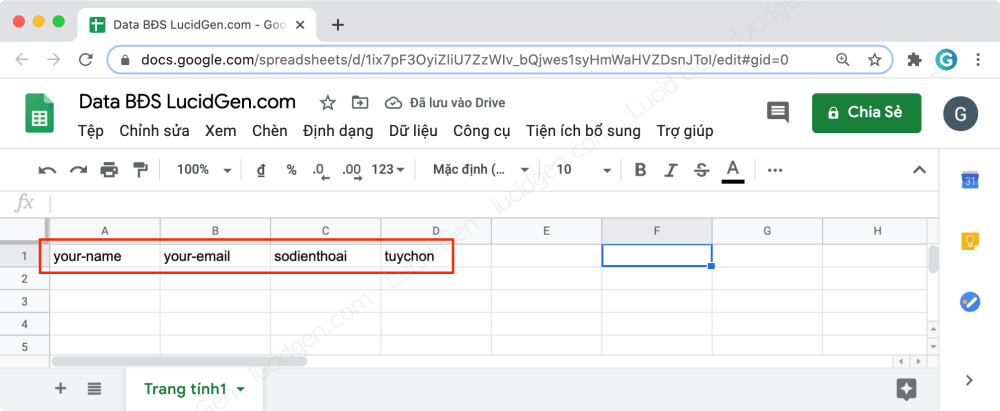
Step 6: Go to Contact Form > Form List, click Edit your form. In the form editing page, go to the Google Sheets tab and then fill in the Sheet you just created in the Google Sheets Settings section. Remember to click save.

Step 7: you scroll down to see the Field List section. Those are the names of the data columns, copy each name and paste it into the columns in the Sheet that receives your data.
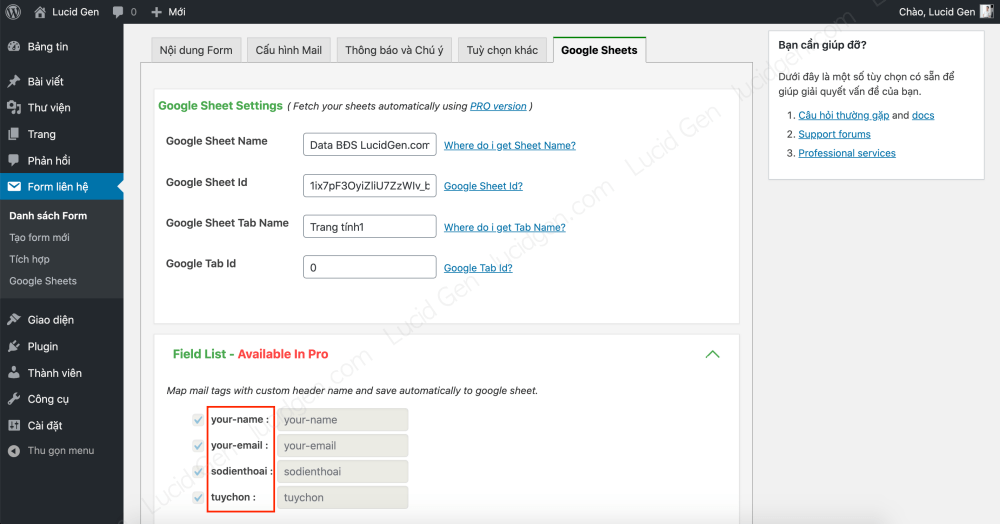
The result of step 7 is that the sheet receiving the data must have columns named in the Field List.
So we have linked Contact Form 7 with Google Sheets already. But you have to test it to see if it works properly.
Test sending Contact Form 7
Now I will try to send a real estate consultation form to see what the result will be. On the left is the information I filled in, on the right is the message when sending successfully.
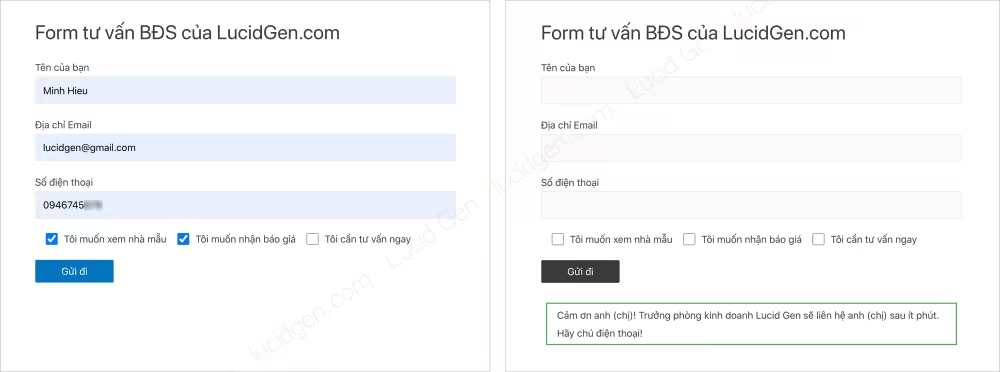
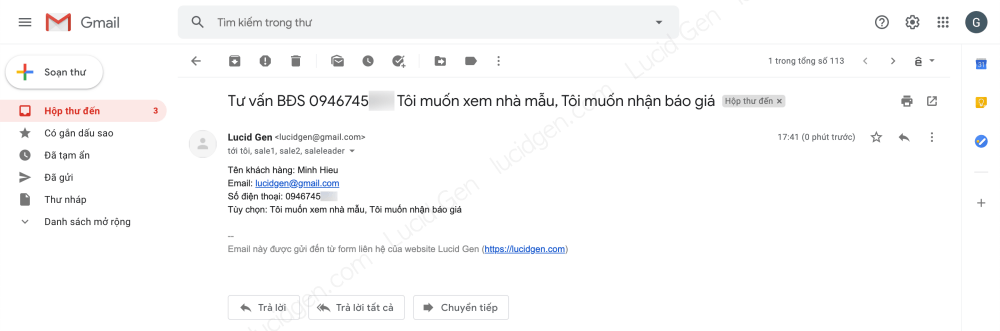
Immediately I received an email with the same content as I installed in the Mail configuration section.
And in the Sheet that receives my data, I immediately jump to the data I just filled in. Like, Share, Comment for Lucid Gen guys:v.

Share the beautiful Contact Form 7 template
I write articles with my heart. When I write, I write to the extreme. If you are still confused about how to create a form, I have some common templates available.
How to use: you copy the form’s code, paste it in the Form Content, edit the text and then click Save the form. Then you reload the page and then go to the Mail Configuration tab to edit the type of email received when the customer successfully fills the form.
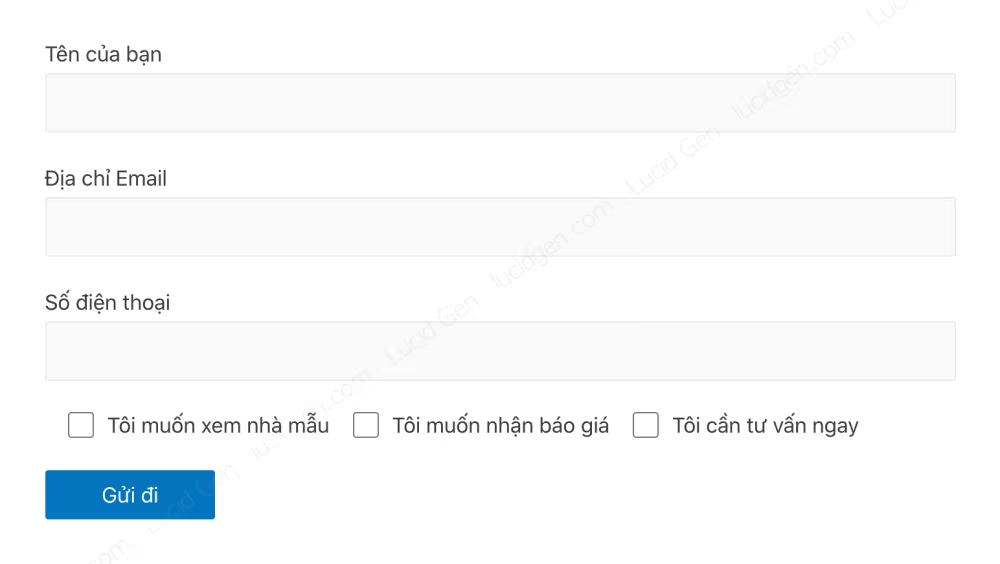
Beautiful Contact Form 7 template for real estate

<div> [text* tenkhachhang placeholder "Tên của bạn"] </div>
<div> [email* email placeholder "Email"] </div>
<div> [text* sodienthoai placeholder "Số điện thoại"] </div>
[checkbox tuychon "Tôi muốn xem nhà mẫu" "Tôi muốn nhận báo giá" "Tôi cần tư vấn ngay"]
[submit "Đăng ký"]Beautiful Contact Form 7 template for recruitment
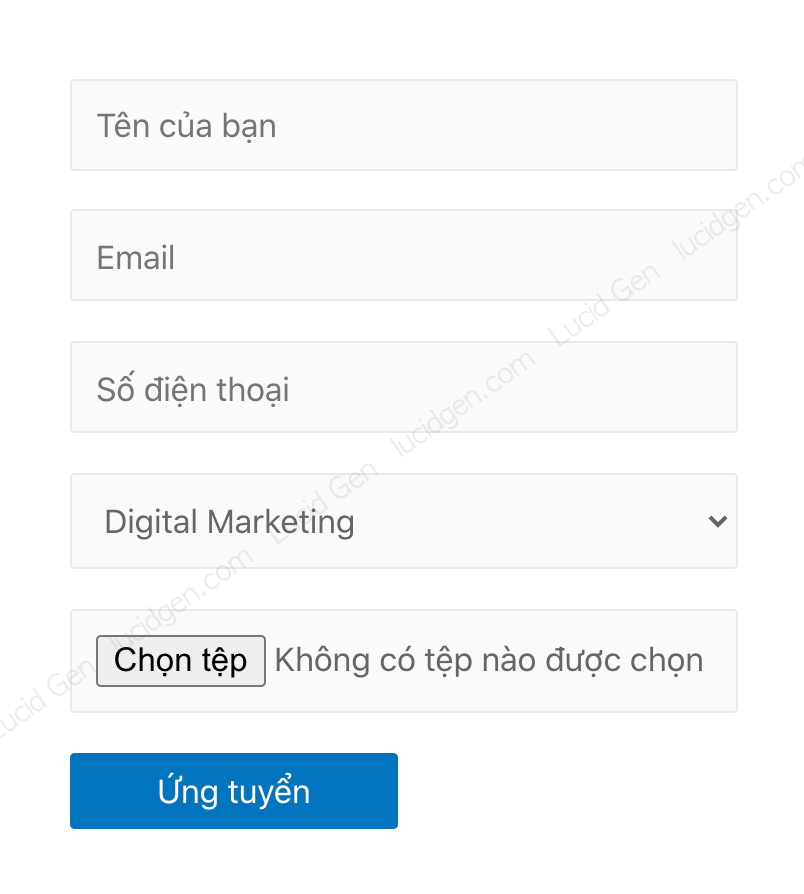
<div> [text* tenungvien placeholder "Tên của bạn"] </div>
<div> [email* email placeholder "Email"] </div>
<div> [text* sodienthoai placeholder "Số điện thoại"] </div>
[select* vitri "Digital Marketing" "Chăm sóc khách hàng" "Nhân viên thu mua"]
[file Filedinhkem limit:2048 filetypes:pdf|doc|docx]
[submit "Ứng tuyển"]Beautiful Contact Form 7 template for spa, dental and cosmetology bookings

<div> [text* tenkhachhang placeholder "Tên của bạn"] </div>
<div> [text* sodienthoai placeholder "Số điện thoại"] </div>
[date ngay]
[checkbox dichvu "Chăm sóc da" "Lấy nhân mụn" "Lăn kim tế bào gốc"]
[submit "Đặt lịch"]Beautiful Contact Form 7 template for a personal consultation

<div> [text* tenkhachhang placeholder "Tên của anh (chị)"] </div>
<div> [text* sodienthoai placeholder "Số điện thoại"] </div>
[textarea tinhtrangsuckhoe placeholder "Tình trạng sức khỏe của anh (chị)"]
[submit "Tư vấn ngay"]Beautiful Contact Form 7 for ordering
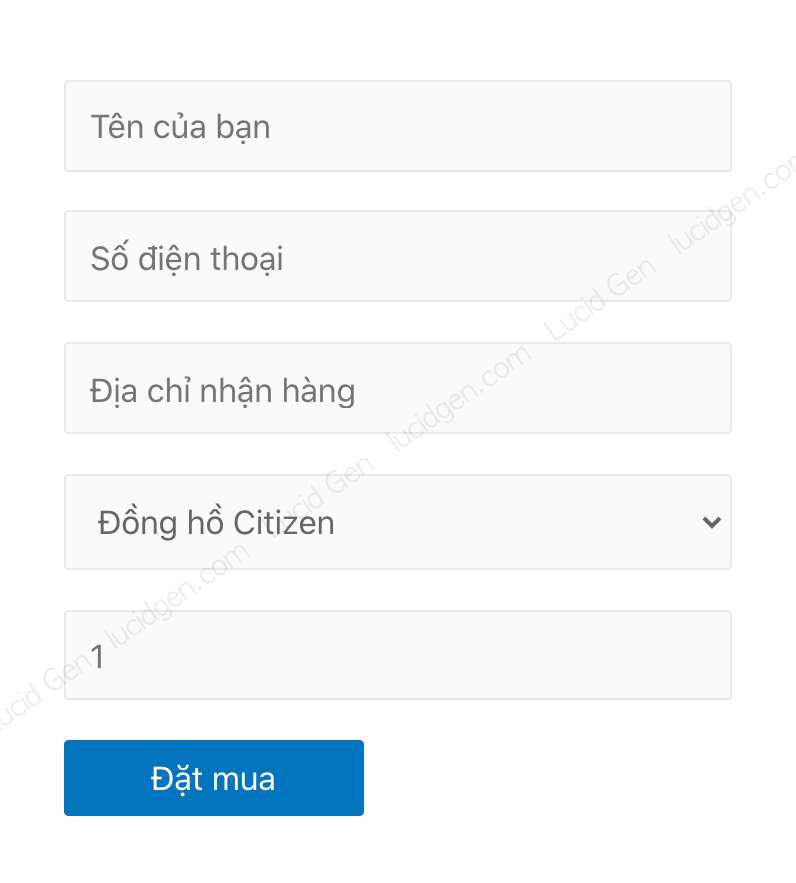
<div> [text* tenkhachhang placeholder "Tên của bạn"] </div>
<div> [text* sodienthoai placeholder "Số điện thoại"] </div>
<div> [text* diachi placeholder "Địa chỉ nhận hàng"] </div>
[select* sanpham "Đồng hồ Citizen" "Đồng hồ DW" "Đồng hồ Casio"]
[number soluong placeholder "1"]
[submit "Đặt mua"]Conclusion
This is a tutorial on using Contact Form 7 that I believe is sufficient to help you handle the form part of the website, I wrote another post about how to track Contact Form 7 conversions so that marketers can measure the effectiveness of their ads. If you find this article useful, don’t hesitate to leave a comment to let Lucid Gen know that we are doing well and make more useful articles. If you have a part that you can’t do, please comment below so I can help.


mãi cũng xong, bác nào làm mà ko có dữ liệu về GG Sheet là thiếu bước điền tên trường của CF7 vào sheet đó
Muốn tracking nguồn UTM qua CF7 connector được không b ơi, hay chỉ đơn thuần là đổ dữ liệu vào file Google Sheet thôi ạ. Cảm ơn b nhiều
Bên dưới bài viết này có giới thiệu một bài viết vê tracking CF7, bạn xem bài đó nhé.
Sao mình làm theo hướng dẫn mà chỉ nhận được email còn trong gg sheet nó lại không hiển thị nhỉ
Bạn kiểm tra thông tin Google Sheets mà bạn đã điền vào plugin, và kiểm tra tên trường thông tin mà bạn đã điền vào Google Sheets. Có thể có dấu cách hoặc gì đó. Ngoài ra bạn thử tải phiên bản plugin cũ hơn vì có lúc bản mới ko work với phiên bản WP của bạn.
Anh ơi mail server mình có kết nối được google sheet không vậy anh? Cảm ơn anh ạ
Không liên quan nhau em ơi, mail server thì em dùng dễ gửi mail bình thường, còn Google Sheets thì em cứ kết nối bằng tài khoản Gmail sở hữu Sheets đó thôi.
Dạ em đã hiểu rồi ạ anh