

To run Google Shopping ads, you need to upload a product feed to Google Merchant Center. Since most online stores don’t have their product data optimized yet, we usually use Google Sheets so the data columns are easy to optimize. And when you have a lot of products, entering them by hand simply isn’t possible. If the website you want to run Shopping ads for is built on WordPress, this problem can be solved. In this article, Lucid Gen will show you how to export a Google Merchant Center feed from WordPress WooCommerce to Excel (Google Sheets) to run Google Shopping ads.

Who this article is for
- Ad agencies that help clients export their products, or want to send this article to guide clients through it.
- You want to run Google Shopping yourself, or you’ve hired someone to run it and they’ve asked you to export your product list.
What you need
- The website admin login link. By default it looks like
website.com/wp-adminorwebsite.com/wp-login.php, but it may have been changed. Ask whoever built your website if the default link doesn’t work. - A website administrator username and password with permission to install plugins.
Steps to export a Google Merchant Center feed from WordPress WooCommerce
- Step 1: Log in to the website as an administrator.
- Step 2: Install a WooCommerce product export plugin.
- Step 3: Export the product file in CSV format.
- Step 4: Convert the CSV file to Excel (Google Sheets).
Log in to the website admin
Use your website’s login link and sign in with the administrator username and password. Make sure you have permission to install plugins, as some web developers hide this section so clients don’t accidentally break things.

Install the WooCommerce product export plugin
Click Plugins and select Add New.

Search for the plugin named Product Feed PRO for WooCommerce, then install and activate it. Or download it from the link below.
Note (10/2026): This guide used to include a button to download version 5.7.8 as a backup, in case the plugin got removed or a later update locked features behind a paywall. However, the plugin is now on version 13.x, and several security vulnerabilities have been published for older versions (fixed in newer releases), so I have removed that button. Always use the latest version installed directly from WordPress.
If an update breaks something and you need to roll back temporarily, download the previous version from the plugin’s own page on wordpress.org: click Advanced View in the sidebar, scroll down to Previous Versions, pick a version and click Download. WordPress itself warns that older versions may not be secure, so only go back one version and update again as soon as the developer ships a fix.

Export the product file in CSV format
On the left menu, click Product Feed Pro and select Create feed.

Then configure it as shown below and click Save & continue.
- Project name: a name for the feed
- Country: your country
- Channel: Google Shopping
- Include product variations: No
- Only include default product variation: No
- File format: CSV
- Delimiter: tab
- Refresh interval: No refresh
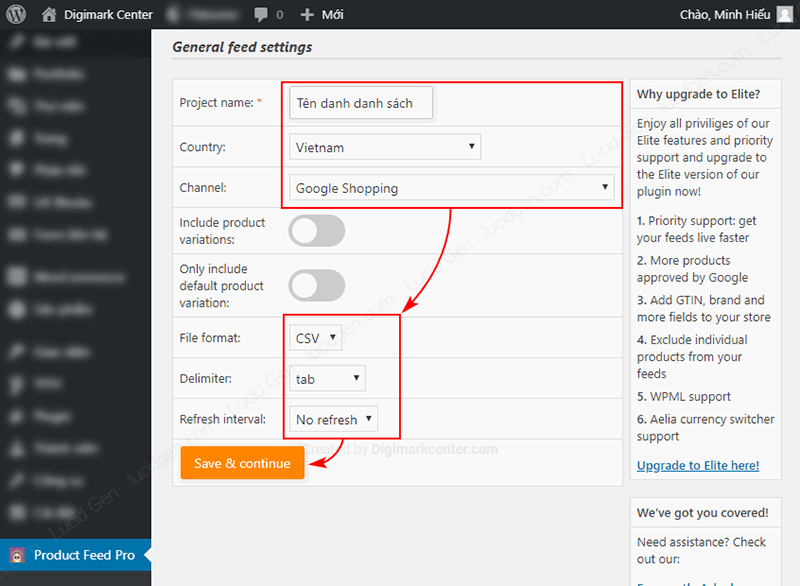
In the Field mapping step, scroll down to the bottom, click the Add field mapping button and set up 2 new rows like this.
Row 1 for the sale price:
- GOOGLE SHOPPING ATTRIBUTES: Sale price (sale_price).
- PREFIX: VND.
- VALUE: Sale price.
- SUFFIX: (blank).
Row 2 for the product type:
- GOOGLE SHOPPING ATTRIBUTES: Product type (product_type).
- PREFIX: (blank).
- VALUE: Category (not used for mapping).
- SUFFIX: (blank).

That gives you all the columns you need to run Google Shopping. Click Save to go to the next step.
The Category mapping step is for filling in the Google product category. You can do this later to save time. Click Save mappings.

In the Feed filters and rules step, you don’t need to do anything. Just click Continue.

In the Google Analytics settings step, fill in the parameters if you want UTM tracking. The plugin will automatically add UTM tags to all product links. I don’t use it, so I just turn it off. Decide what works for you, then click Generate Product Feed.

That’s it. The plugin will create the CSV file for you, which takes about 1 to 3 minutes depending on how many products you have. Reload the page every minute or so to check whether it’s finished.
Once it’s done, click the download button to download the product CSV file.
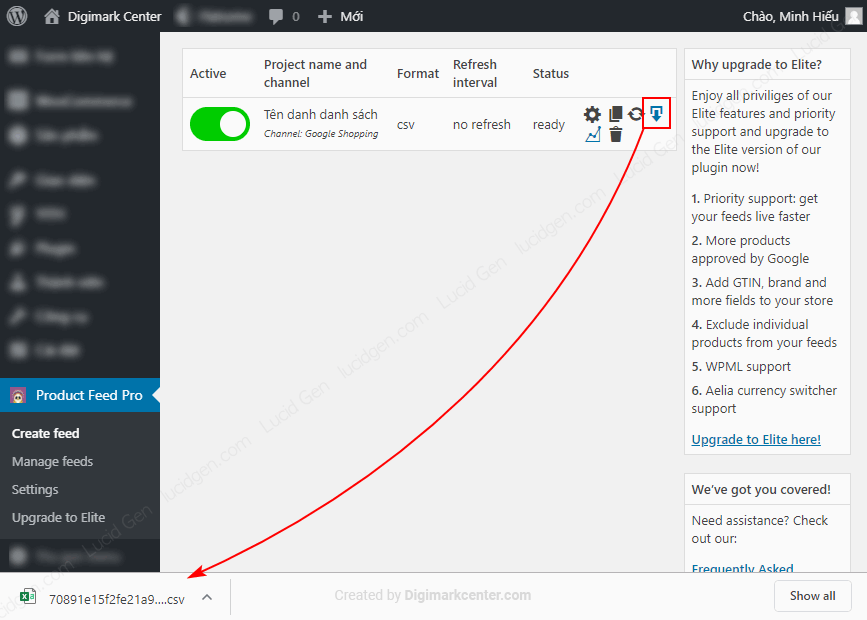
At this point, if you’ve hired an agency, you can simply send them the CSV file to handle the rest.
Convert CSV file to Excel (Google Sheets)
Click the button below to open the CSV to Excel converter.
Click the Browse button to upload the CSV file, set Select CSV file delimiter to Tabulation, then click Run Conversion. When the conversion is complete, a Download File button will appear so you can download the Excel file.

If the tool above doesn’t work for some reason, use the backup tool below. It works the same way: upload the CSV file, click convert, then download.
Conclusion
This is the best way I know to export products from WordPress to Excel for Merchant Center. It can feel a bit tricky the first time because there are quite a few steps. If you need help, don’t hesitate to leave a comment below.


