
Delete & disable generating unused thumbnails in WordPress will save you a lot of hosting space. Imagine you upload a 50 KB image to WordPress and it gives you about 10 child thumbnails of various sizes, some of which are larger than the original image. On average, you can lose up to 500KB in hosting for an original image of only 50KB. And what if you have 1000 photos, about 488MB. So let’s see how to delete unused thumbnails and turn off the auto-generating feature in WordPress below to save space for you.
Delete unused thumbnails in WordPress
Go to Install New Plugin on your WordPress website. Find and install the Regenerate Thumbnails Advanced plugin. This plugin will help us clean up, wipe the baby will not use the thumbnail image on WordPress, and also recreates the thumbnail image for the image being used as an avatar Post (Featured image).

Remove all unused thumbnails in WordPress
Post to the Tools section, you will see the Regenerate Thumbnails section. Click and follow the instructions to delete child thumbnail images in WordPress.
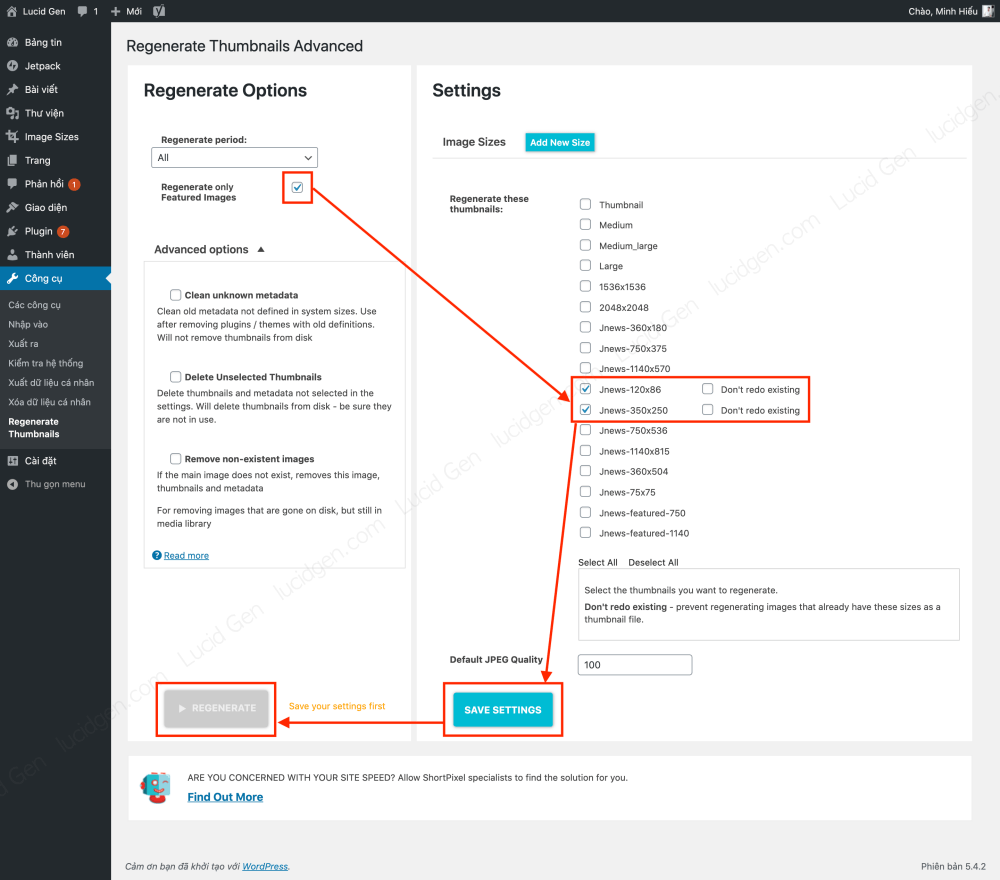
- Right: You click Advanced options , check the line Delete Unselected Thumbnails (Delete unselected thumbnails).
- Left: You uncheck all , so that we can delete all thumbnails of images that are not used as post avatars. Soon we will recreate the thumbnail for the images used as the avatar of the next article, don’t worry.
Below, if you use JPEG images, set the quality to 100, if you often use PNG, don’t care. Then click on SAVE SETTINGS and then click the REGENERATE button.

It takes about 5 minutes to finish, I find this plugin works quite quickly. After deleting all the thumbnail images in WordPress, now we will recreate the thumbnail images for the images that are selected as the article’s avatar.
Regenerate thumbnails only for images being used as Featured images
To recreate the thumbnail image for the images that are selected as the featured image, you reinstall the following.
- On the left: Check the Regenerate only Featured images section. The sections below you uncheck all.
- Right: You only tick the sizes that your website is using as the article’s avatar. If you don’t know what size is being used on your website, see the instructions below after this photo.
After the installation is complete, click on SAVE SETTINGS and then click the REGENERATE button.
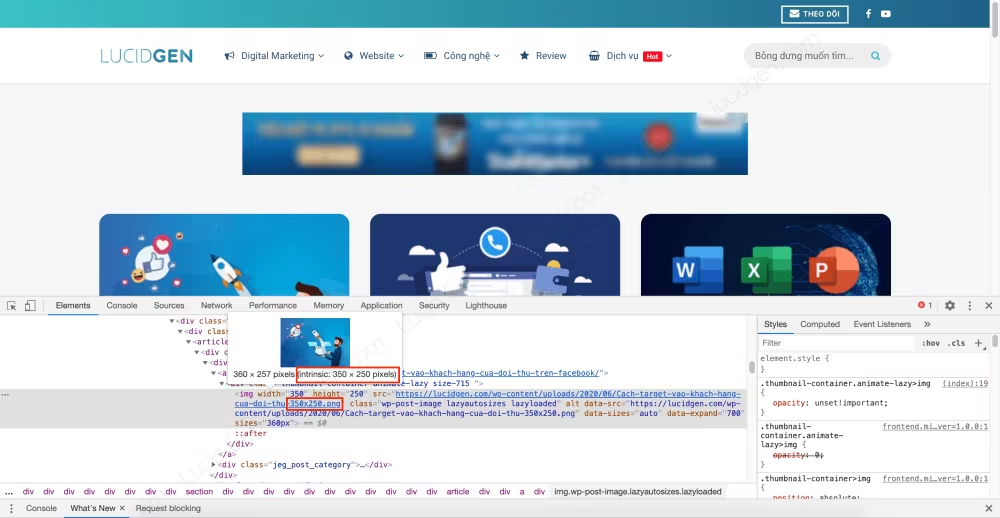
To see what thumbnail sizes your website is using, right-click on the thumbnail image of that article and select Check (applies to Chrome / Coc Coc, other browsers like Firefox may be similar). You look until the <img> element and see what size the tail of the image link image is. For example, in the image below, the end of the image link contains “350×250”, so you will select the size 350×250 in Regenerate Thumbnails.
If the article widget website has an avatar on the sidebar, you should also check what thumbnail size they are using to select in Regenerate Thumbnails.
Disable generating unused thumbnails in WordPress
We’ve just cleaned up, deleted the thumbnails that are not currently in use. So what about the future? We can prevent self-generating child images in WordPress in 2 ways below.
Disable WordPress default child image sizes
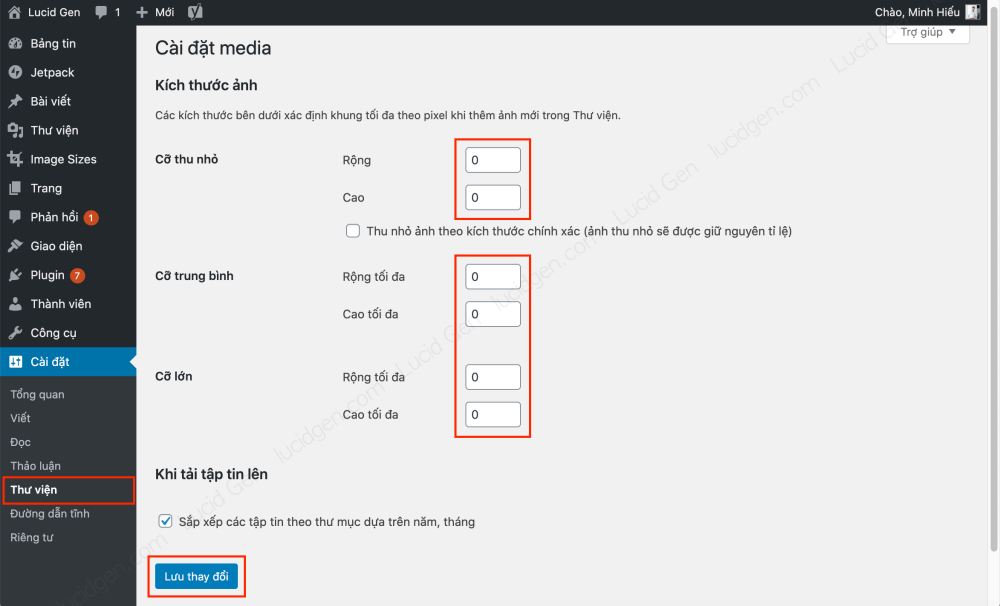
By default, WordPress will automatically create for you 4 more sub-image sizes: Thumbnail, Medium, Medium_Large, and Large. Indeed, we rarely use these dimensions.
Go to Settings, select Library. Then you change the size to zero and then click Save Changes and you‘re done. In the future when you upload new images, WordPress will no longer create these child images.
But this is just disabling child image creation for WordPress default sizes. It is your interface that needs to use the thumbnail image to display the article. The WordPress theme generates a lot of different sub-image sizes. Please follow the instructions below to turn them off.
Turn off multiple self-created child image sizes in WordPress
Go to the new plugin settings on your website, find and install the Stop Generating Unnecessary Thumbnails plugin. This plugin will help disable auto-generating child thumbnails on your entire website (WordPress default and theme).

After installing the plugin, on your admin menu, you will see the Image Sizes item. Click that and use like this, pretty simple too.
- Checked: That size will be turned off, preventing creating a child image when uploading a new image.
- Unchecked: That size will be automatically generated when you post a new image to WordPress.
There is a little trick I want to share with you to use it effectively. That is, before you upload the normal images (images not used as Featured images), please check All and then click the Save Settings button below.

Before you upload an image to use as a Featured image, go to Image Sizes and uncheck the sizes that your website is using as thumbnails, then click Save settings. Let WordPress create child thumbnail images for the sizes to use with this image.

Epilogue
Also, note that you should not remove child thumbnails for images that are being used as post avatars. Because they will make pages with image thumbnails small, but use the original image file, many times larger. Make your website slower. So it’s best to be a little diligent, follow Lucid Gen’s instructions. Love forever!


Regenerate Thumbnails Advanced xóa lâu, mà lỡ pause rồi tạm dừng để qua hôm sau xóa tiếp thì nó lại chạy từ đầu, lâu vl