

Images are usually the heaviest part of a blog post. Some of the original screenshots for this very article weighed as much as 3.4 MB each, and uploading them as they were would make mobile readers wait quite a while. When I optimize images, I care about two things: helping Google understand what each image shows, and keeping the page fast. In this article, I’ll walk through Google’s official recommendations for image SEO, along with how Lucid Gen handles images on WordPress, so you can follow along on your own site.
What does image SEO actually do for you?
In short, image SEO means making the images in your posts easy for Google to find, easy to understand, and light enough not to slow the page down. Here is what you can realistically expect:
- An extra source of traffic: Your images can show up in Google Images or in search results that include pictures. For tutorials with lots of screenshots, this traffic adds up.
- Faster pages: Resized and compressed images cut page weight significantly, so readers on mobile data spend less time waiting.
- Better accessibility: Screen readers read alt text aloud for visually impaired users, and browsers show it when an image fails to load.
Note: Optimizing images won’t push a post to the top of Google on its own. Content still matters most. Good image practices simply make sure your post doesn’t lose out because of technical mistakes that are easy to avoid.
Choose images that match the content
Google recommends high-quality, sharp images that are relevant to the topic of the page. For a tutorial blog like Lucid Gen, real screenshots of each step are far more useful than generic stock illustrations, because readers can see exactly where to click.
When you do need illustrations, you can look in stock libraries such as Freepik, Unsplash, or Pexels. Read each library’s license before using an image. Free images on Freepik usually require you to credit the author, while Unsplash and Pexels don’t require attribution.

Give image files descriptive names
Google uses the file name as one of the signals for understanding an image. Google’s own example: my-new-black-kitten.jpg is much better than IMG00023.JPG. Before uploading, rename your files with a few simple rules:
- Describe the image: A few words saying what the image shows is enough. There’s no need to force your main keyword into every file name.
- Use lowercase words separated by hyphens: For example,
compress-image-with-squoosh.png. If your file name contains spaces, WordPress replaces them with hyphens on upload anyway. - Skip special characters and accents: Characters like !, @, #, % or accented letters get encoded in the URL and make it hard to read.

Looking back, the file names for this article are still fairly generic (just numbered 1, 2, 3…). If I were naming them today, I’d describe each image instead, like find-images-on-freepik.png or compress-image-with-squoosh.png. That’s easier to manage and more meaningful to Google.
Write alt text that describes the image, not a keyword list
Alt text (alternative text) is a short description of an image, stored in the alt attribute of the img tag. According to Google, alt text is the most important attribute for describing an image, together with the context around it on the page. Google gives a simple example:
- Bad: No alt at all, as in
<img src="puppy.jpg"/>. - Better:
alt="puppy", which describes the image but is too vague. - Best:
alt="Dalmatian puppy playing fetch", which says what kind of dog it is and what it’s doing. - Avoid: Alt text stuffed with keywords like “dog, puppy, dalmatian, cheap puppies for sale…”. Google says this creates a poor user experience and may cause your site to be seen as spam.
In the WordPress editor, select the image and fill in the Alt Text field in the right sidebar. If an image is purely decorative, you can leave it empty, as WordPress itself suggests right below the field.
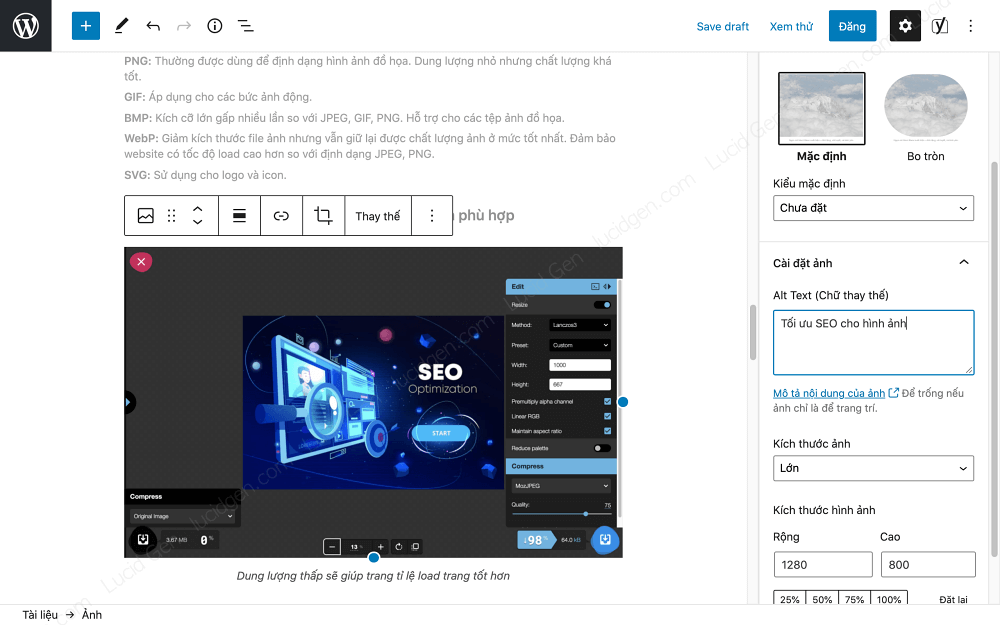
Notice that the alt in the screenshot above is a vague “SEO optimization for images”, exactly the kind of alt I’d recommend avoiding. A better alt for the Squoosh screenshot in it would be “Compressing an SEO illustration from 3.67 MB to 64 kB with Squoosh”. A simple trick: imagine describing the image to someone who can’t see it. Whatever you’d say is your alt text.
Pick the right image format
Google Search can index BMP, GIF, JPEG, PNG, WebP, SVG, and AVIF images. Being supported doesn’t mean every format is a good choice for the web, though. Here’s how I choose:
- JPEG: Best for colorful photos taken with a phone or camera.
- PNG: Best for screenshots, graphics with text, or images that need a transparent background. Text stays crisp, but files are usually larger than JPEG.
- WebP and AVIF: Newer formats that produce smaller files than JPEG or PNG at similar quality. AVIF is often a bit smaller than WebP. All major browsers support both (as of October 2026).
- SVG: For logos and icons, since it stays sharp at any size.
- GIF: Only for short animations, because the files are huge. For longer clips, a video is much lighter.
As for BMP, just skip it. It’s uncompressed, so files are very large and not suitable for the web.
Resize and compress images before uploading
This step saves the most bytes. You don’t need a 3000px-wide image when your blog’s content area only displays about 1000px. All images in this article were resized to 1000px wide before uploading.
The tool I use is Google’s Squoosh, which runs right in your browser with nothing to install. In the example below, the original illustration was 3.67 MB. After resizing it to 1000 x 667 and compressing it with MozJPEG at quality 75, it dropped to just 64 kB, a 98% reduction with almost no visible difference.
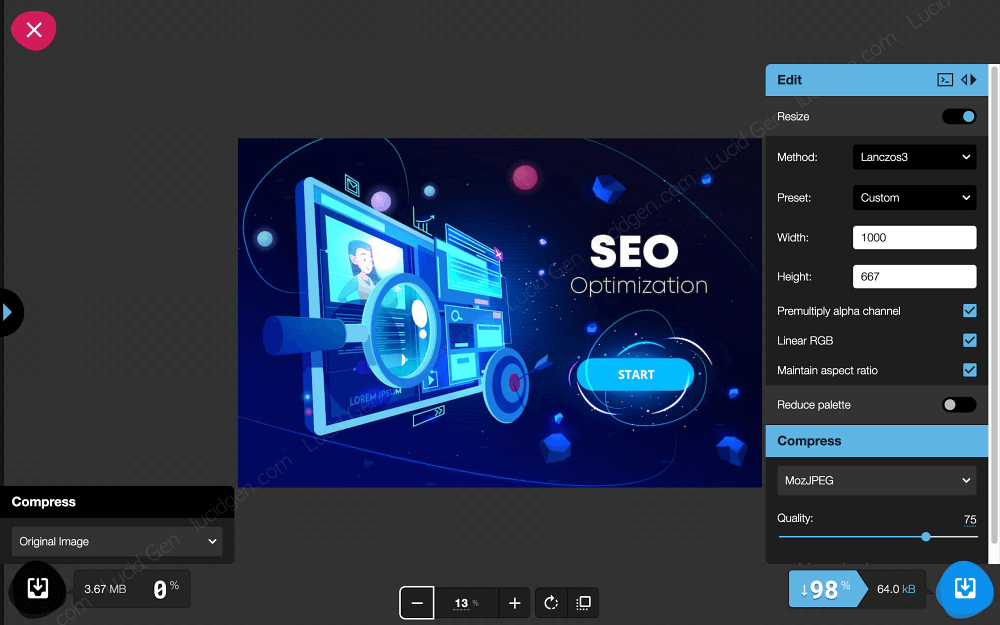
If you have many images to resize at once, you can use PhotoScape X to resize images in bulk. After publishing, check your page with PageSpeed Insights. It points out images that are still too heavy or much larger than their display size.
Convert images to WebP and AVIF automatically in WordPress
Converting images one by one is tedious, especially on a blog with thousands of old images. Lucid Gen uses the CompressX plugin to convert JPG and PNG images to WebP and AVIF automatically. The conversion runs on your own server, nothing is sent to a third party, and the plugin discards a converted file if it turns out larger than the original.
The nice part is that image URLs in your posts keep their original .png extension. When a browser says it supports AVIF or WebP, the server returns that format, while older browsers still get the PNG. Here are the actual file sizes of the five images in this article (measured October 2026):
| Image | PNG | WebP | AVIF |
|---|---|---|---|
| Image 1 (Freepik) | 143 KB | 92 KB | 81 KB |
| Image 2 (Finder) | 59 KB | 22 KB | 19 KB |
| Image 3 (Squoosh) | 78 KB | 38 KB | 31 KB |
| Image 4 (Alt Text) | 62 KB | 40 KB | 33 KB |
| Image 5 (image placement) | 76 KB | 40 KB | 33 KB |
| Total | 417 KB | 233 KB | 197 KB |
Even though these PNGs had already been resized and compressed, the AVIF versions are about 53% smaller and the WebP versions about 44% smaller. You can check this on your own site: open Chrome DevTools, go to the Network tab, filter by Img, and look at the Type column to see whether images are served as avif, webp, or png.
Note: WordPress has supported uploading AVIF images since version 6.5, but your hosting’s image library also needs AVIF support. If CompressX says it can’t convert to AVIF, ask your hosting provider first.
Lazy-load images the right way
Lazy loading means images only load when they’re about to appear on screen, so the top of the page shows up faster. WordPress has added loading="lazy" to images automatically since version 5.5. On Lucid Gen, I use the image lazy-load feature of the LiteSpeed Cache plugin, which also adds a placeholder so the layout doesn’t jump when images finish loading.
Google points out two things to keep in mind with lazy loading:
- Images must load when they enter the viewport: Googlebot doesn’t scroll or click. If an image only loads after the user scrolls or presses a button, Google may never see it.
- Don’t lazy-load images at the top of the page: If an image that is visible right away (usually the featured image or the first image) is lazy-loaded, it actually loads later. LiteSpeed Cache has a field for excluding images from lazy loading, so you can add your above-the-fold images there.
After enabling lazy loading, use the URL Inspection tool in Google Search Console and look at the rendered HTML to make sure your img tags still contain the real image URLs.
Responsive images and proper img tags
Responsive images let the browser pick the version that fits the screen: phones download a smaller file, desktops a larger one. Google recommends the srcset attribute, or the picture element with a fallback img that has a src attribute.
On WordPress, you barely have to do anything. When you upload an image, WordPress generates smaller sizes, and when you insert it with the Image block, it adds srcset, width, and height to the img tag. The width and height attributes let the browser reserve space for the image, so text doesn’t get pushed down when it loads.
Note: Google doesn’t index images added through CSS (background-image). If you want an image to appear in Google Images, insert it with an img tag, which is what the regular Image block does.
Image sitemaps
An image sitemap helps Google discover images it might otherwise miss while crawling. Popular SEO plugins such as Rank Math and Yoast SEO automatically include post images in the post sitemap. Lucid Gen’s sitemap is currently generated by Rank Math, and each post entry lists its images in image:loc tags.
Just open your post sitemap (for example, post-sitemap.xml) to confirm the images are there, then submit the sitemap in Google Search Console. If your images are hosted on a CDN with a different domain, you can still list them, as Google allows this.
Place images near related text and add captions
Google also learns about an image from the content around it, including captions and nearby headings. So place each image right next to the text it illustrates. In Lucid Gen tutorials, each screenshot sits directly below the step it belongs to, with a short caption describing it.
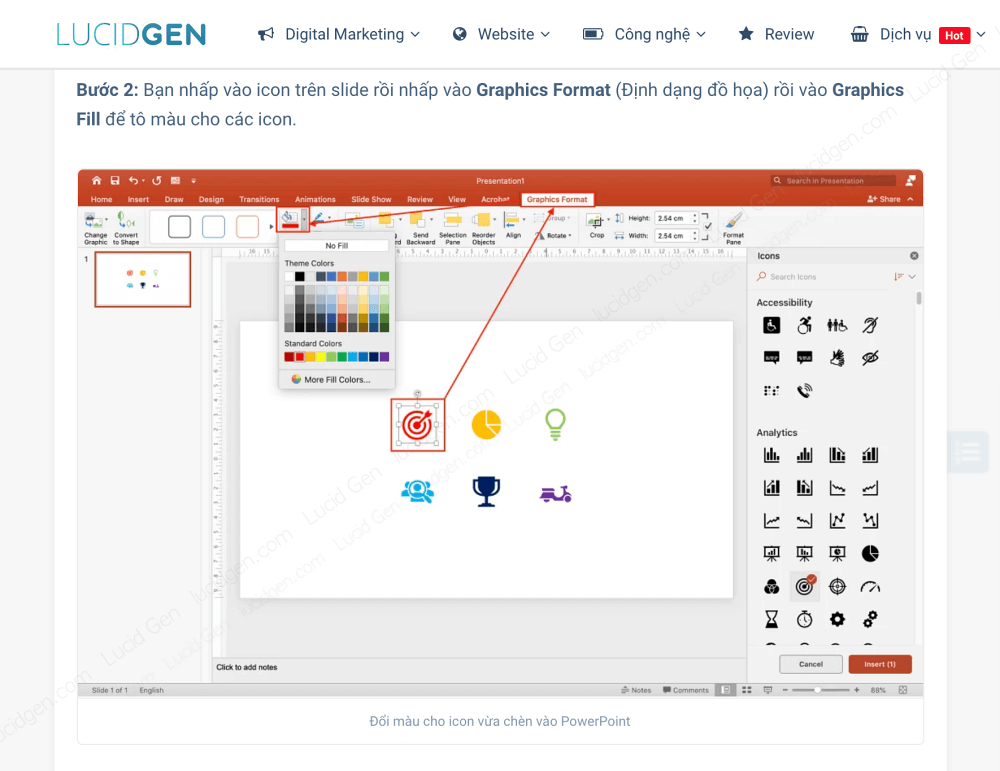
There’s no rule that every heading needs an image. Add images when they help readers understand faster. Adding them just to hit a number only makes the page heavier. As for the Title and Description fields in the Media Library, they usually don’t appear in the post itself, so focus on alt text and captions first.
Conclusion
If you’re short on time, start with two things: resize and compress images before uploading, and write alt text that actually describes each image. They take a few minutes per post but make pages noticeably lighter and help Google understand your images. WebP/AVIF conversion, lazy loading, and sitemaps only need a plugin and a one-time setup, and then they work across the whole site.
Which plugin do you use to compress images on WordPress? Leave a comment below and let me know. Good luck optimizing your images!


