Follow
Lucid Gen
  • Marketing
    • Facebook
    • Google
    • Zalo
    • Content marketing
    • Email Marketing
    • Marketing tools
    • SEO
  • Website
    • WordPress
  • Technology
    • Computer
    • Phone
  • Life
No Result
View All Result
Lucid Gen
  • Marketing
    • Facebook
    • Google
    • Zalo
    • Content marketing
    • Email Marketing
    • Marketing tools
    • SEO
  • Website
    • WordPress
  • Technology
    • Computer
    • Phone
  • Life
No Result
View All Result
No Result
View All Result
Lucid Gen

Lucid Gen › Technology › Computer › How to add watermark to photo in bulk

How to add watermark to photo in bulk

Đánh giá bài viết
23/11/2021
0
Cách resize và chèn logo vào ảnh hàng loạt - How to add watermark to photo in bulk

Cách resize và chèn logo vào ảnh hàng loạt - How to add watermark to photo in bulk

100
SHARES
10k
VIEWS
Share to Facebook

Lucid Gen has tried many ways and software on the net, have not seen any software to resize and add watermark to photo in bulk like PhotoScape. Save 90% time, effort, completely free. Currently, Lucid Gen has switched to using this method, and the admin has saved a lot of pain in editing photos or creating Shopee photo frames in bulk. Then follow it right away; what are you waiting for, guys. This is the article I guide for the computer. If using the phone, please see the article How to add logo to photo on the phone.

Related posts

  • How to increase mouse tracking speed Mac
  • How to download Power BI for Mac and Windows
  • How to uninstall apps on Mac completely
Table of contents
  1. Install PhotoScape
    1. Install PhotoScape for Windows
    2. Install PhotoScape for MacOS
  2. Instructions to resize and add watermark to photo in bulk
    1. How to batch resize photos?
    2. Cách add watermark to photo in bulk
    3. How to add a logo with text to a photo
    4. Save resized images and add logos in bulk
  3. Epilogue

Install PhotoScape

PhotoScape I know it has been around for a long time. Now to keep up with the times, PhotoScape X is available for Windows 8 and up and MacOS. I leave the link for reference, and you don’t need to download it from the link but download it in the Store according to the instructions below.

  • New version: x.photoscape.org
  • Old version: photoscape.org/ps/main/download.php

Install PhotoScape for Windows

On Windows, find the Microsoft Store app and find PhotoScape X, then click Get and install to download.
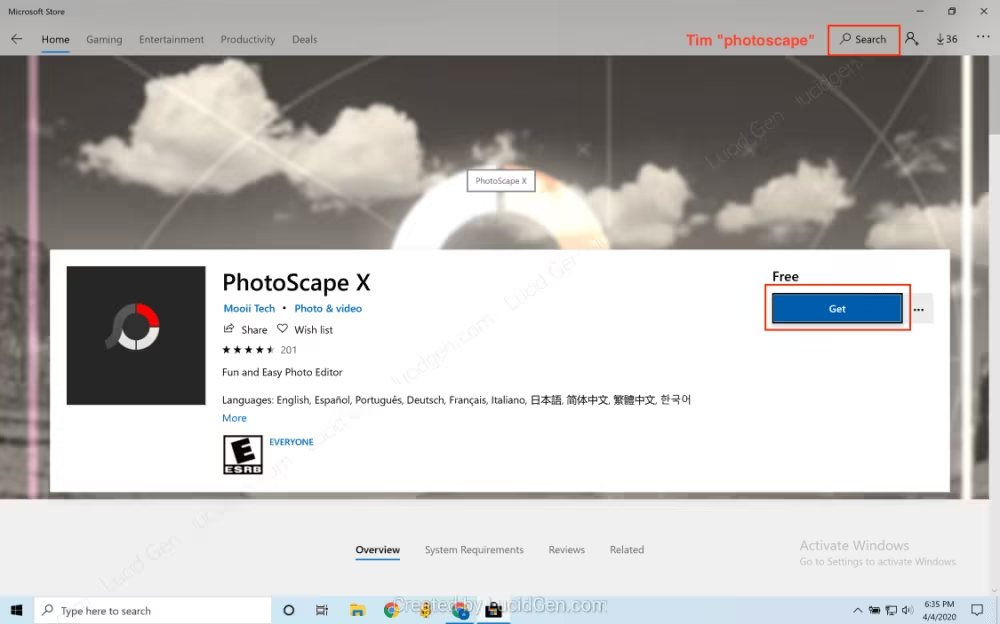
Install PhotoScape for Windows

Install PhotoScape for MacOS

On macOS (Macbook), you open the App Store app and find PhotoScape X , then click Get, and then fill in the login information if the App Store asks for it to download.
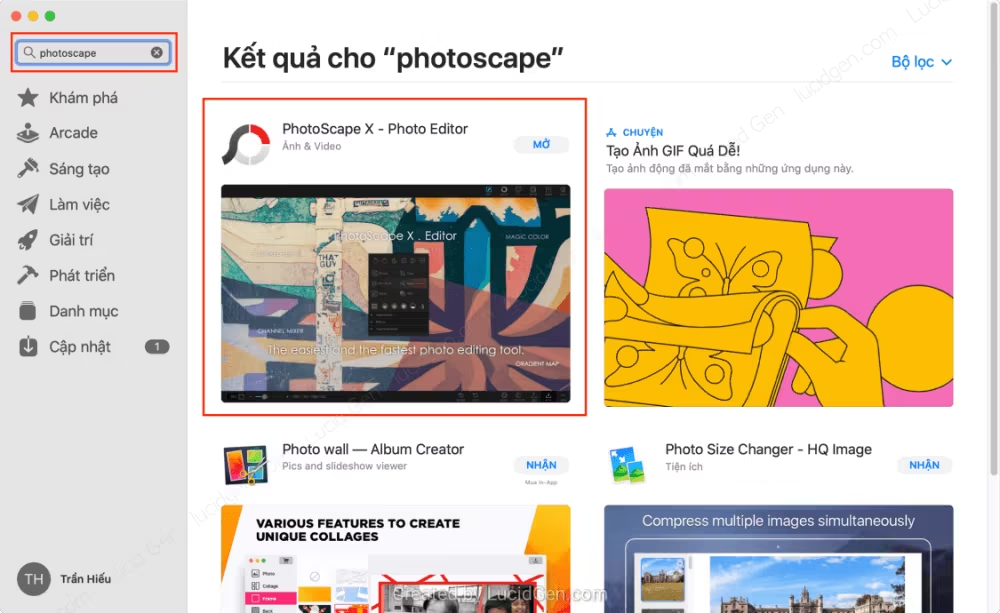
Install PhotoScape for MacOS

Instructions to resize and add watermark to photo in bulk

Open PhotoScape X, the interface in Windows or macOS is the same. The first thing you need to do is navigate to the folder you want to resize and add watermark to photo in bulk. Then switch to the Batch tab on the menu bar.
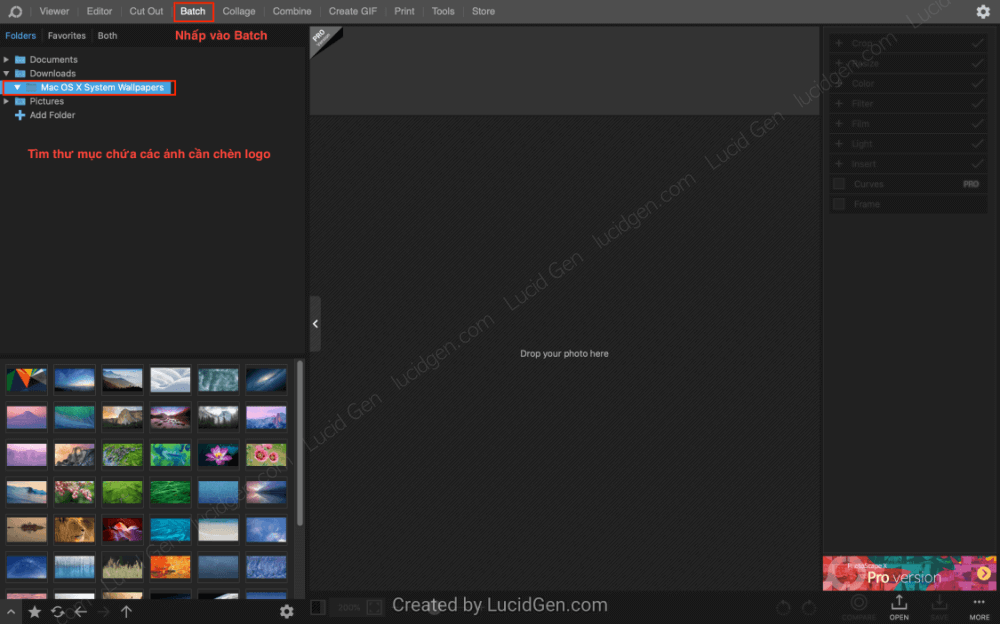
Find the folder you want to resize and add watermark to photo in bulk.  Then switch to the Batch tab
Find the folder you want to resize and add watermark to photo in bulk. Then switch to the Batch tab

Select all images in that folder and drag them onto the bar containing the images to be processed above, as shown below.

How to add watermark to photo in bulk - Select all images in that folder and drag and drop onto the bar containing the images to be processed
Select all images in that folder and drag and drop them onto the bar containing the images to be processed

How to batch resize photos?

To resize images in bulk, click and open Resize, then choose how to resize what you want.

  • Original Size: is the default image size.
  • Width (px): is to resize the image horizontally that you choose, the vertical will automatically scale.
  • Height (px): is to resize the image vertically that you choose, the horizontal will automatically scale.
  • Ratio (%): is to resize the image according to the percentage given to the original image.
  • Long Edge (px) and Short Edge (px): I find it the same, choose according to the standard sizes.
  • Finally: resize according to the size you choose
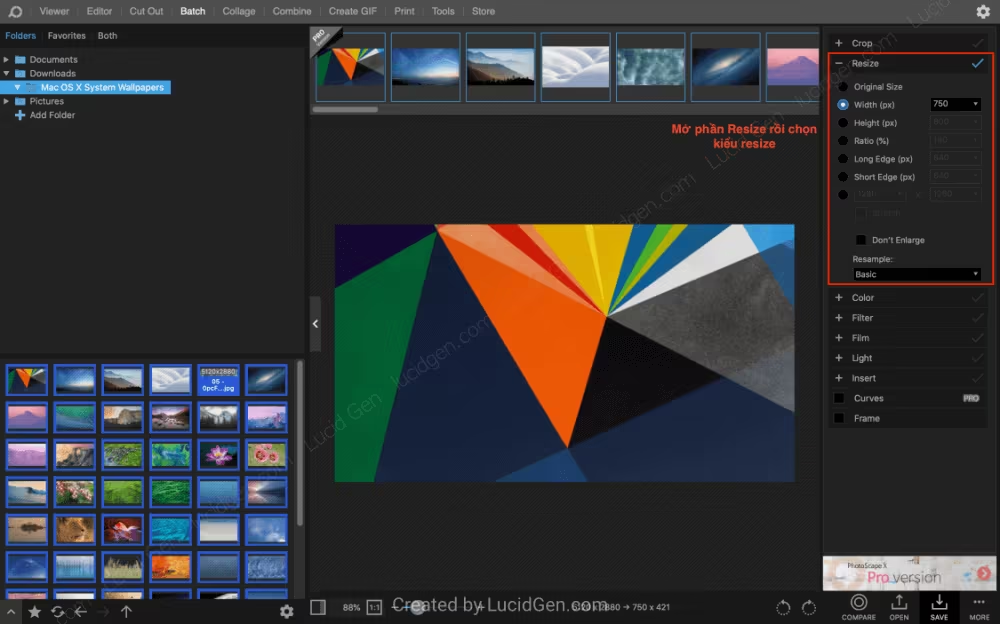
How to add watermark to photo in bulk - Choose how to resize you want
Choose how to resize you want

Cách add watermark to photo in bulk

To add watermark to photo, click Insert, click the plus button ( + ), and then select Image. Then, find your logo file and add it.
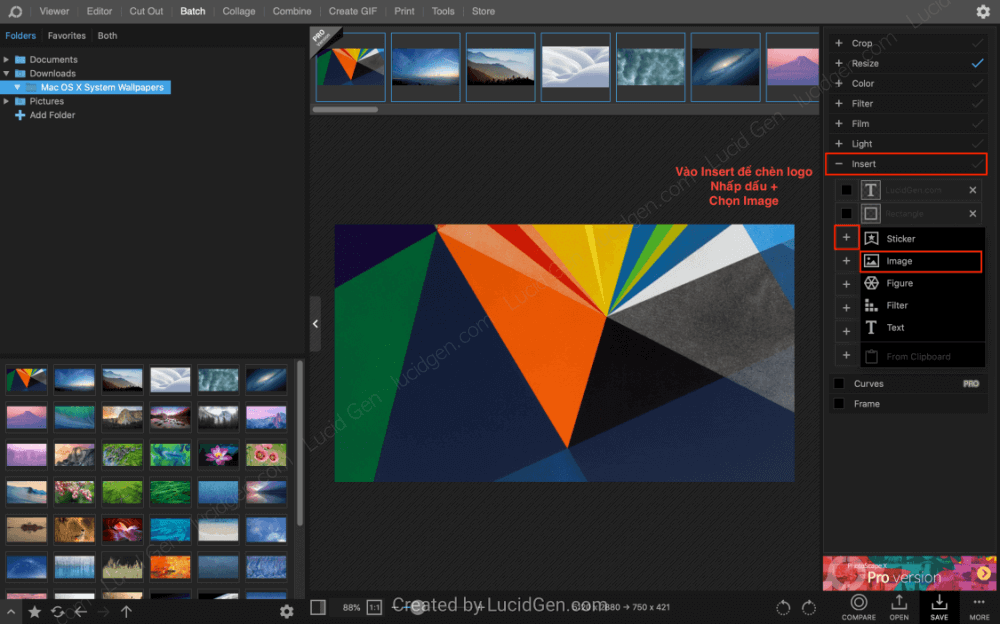
How to add watermark to photo in bulk - Open the Insert section, click the plus sign, select Image
Open the Insert section, click the plus sign, select Image

Clicking on the logo opens the customization window. Select the position of the logo pin so that the logo automatically aligns to that angle. Then you adjust the X and Y sides or use the mouse to move it to the beautiful place you want.

How to add watermark to photo in bulk - Choose where to pin the logo and customize the effect
Choose where to pin the logo and customize the effect

You can also click the circular buttons on the logo to stretch it as much as you like. If your logo is already well-prepared, it’s done; if you want to add a little effect, try tweaking it in the editing panel. It can cast shadows as well.

You have finished editing the image logo, then let’s go to the step of saving the image.

How to add a logo with text to a photo

And if you do not have a logo or have a logo but do not like to use it for your article, you can use the same word. (Revealing a bit the reason why I don’t use the photo logo because, in the future, the image logo may change, but the text will not affect anything, hehe) .

You click the plus sign ( + ) in the Insert section and then select Text to add the text logo to the image.

How to add watermark to photo in bulk - Click the plus sign in the Insert section and then select Text
Click the plus sign in the Insert section and then select Text

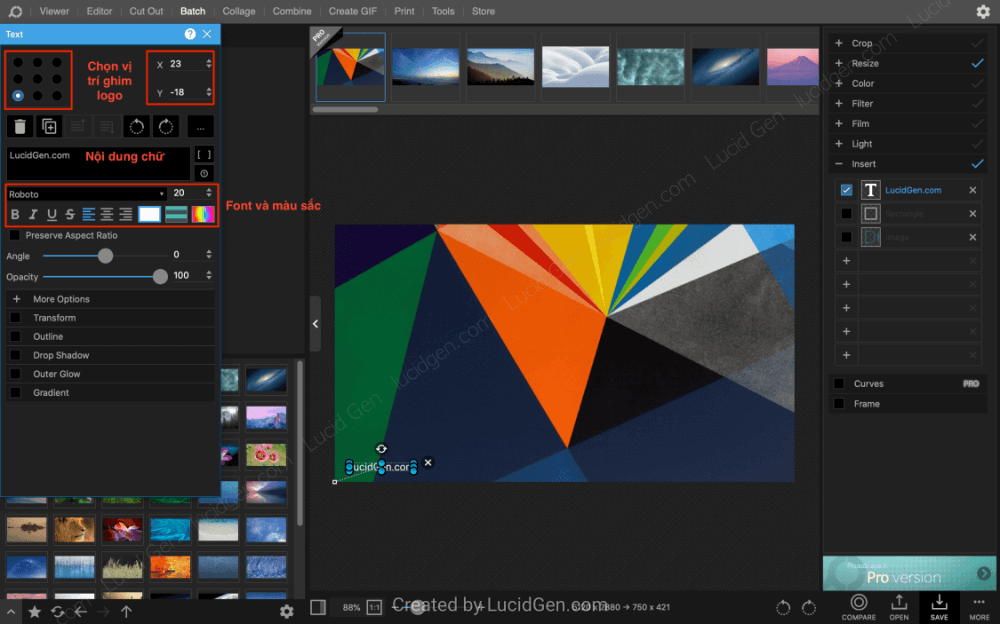
Write the text you like, then also adjust the position of the logo pin. But especially with text, you have more options to customize the effect. Customize the color and font in the red circled bar in the image.

Then add a little effect to it, and it’s beautiful. Take a look in the More Options section :

  • Transform: curved text effect.
  • Outline: text border.
  • Drop Shadow: drop an open shadow under the text.
  • Outer Glow: make text glow.
  • Gradient: variable text color.
How to add watermark to photo in bulk - Choose the location of the text pin, customize the effect for beauty
Choose the location of the text pin, customize the effect for beauty

You can add an element to decorate additionally to reduce monotony. Click the plus sign ( + ) and then select Figure .
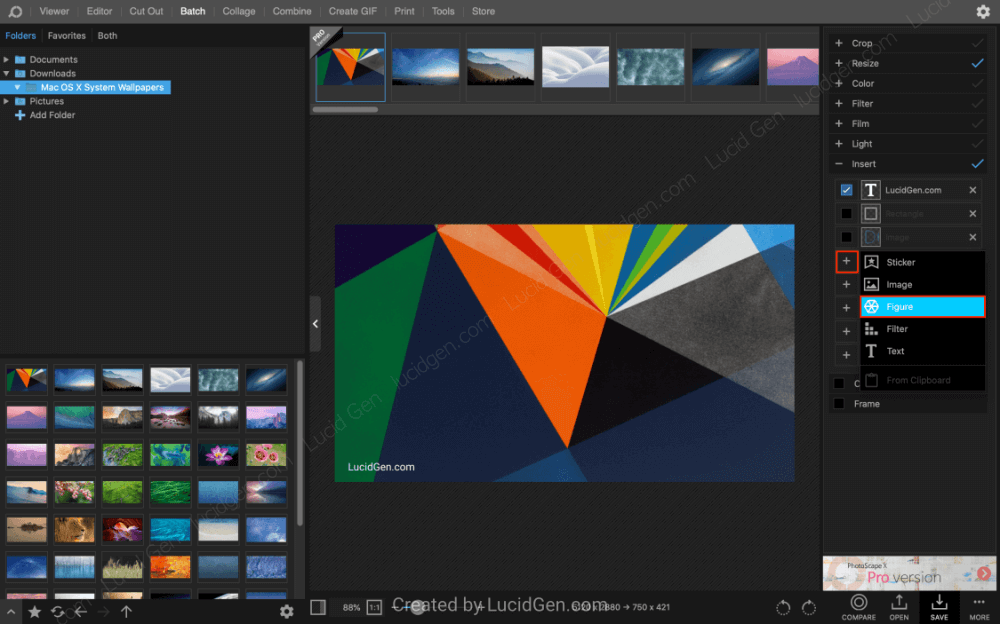
How to add watermark to photo in bulk - Click the plus sign and then select Figure
Click the plus sign and then select Figure

Select the element you want to add to decorate. For example, I will make the border around, then choose the square border.

How to add watermark to photo in bulk - Select the element you want to add
Select the element you want to add

Adjust it a bit, and the border is balanced.

How to add watermark to photo in bulk - Edit for element and text to balance each other
Edit for element and text to balance each other

After you have finished editing the logo, let’s go to the step of saving the image.

Save resized images and add logos in bulk

OK, for example, I have finished the logo, then click through the other photos above to see if it looks good.
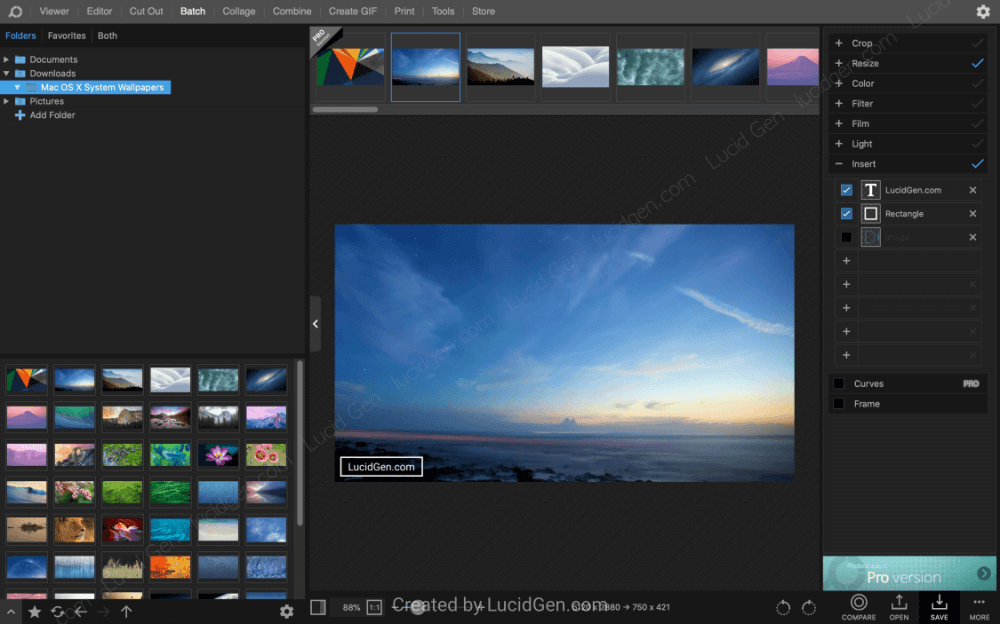
How to add watermark to photo in bulk - Click through other photos to review before saving
Click through other photos to review before saving

You click the Save button in the lower-left corner and then select as you to optimize, or choose your own if necessary.

  • Image Format: PNG should be adjusted for high quality.
  • JPEG Quality: you can always set it to 100 if you choose JPG or JPEG format.
  • Save Location: you choose Custom and then click the 3-dot button, navigate to the folder you want to save.
  • File Naming: you choose Save as the same name to save the same name as the original image.
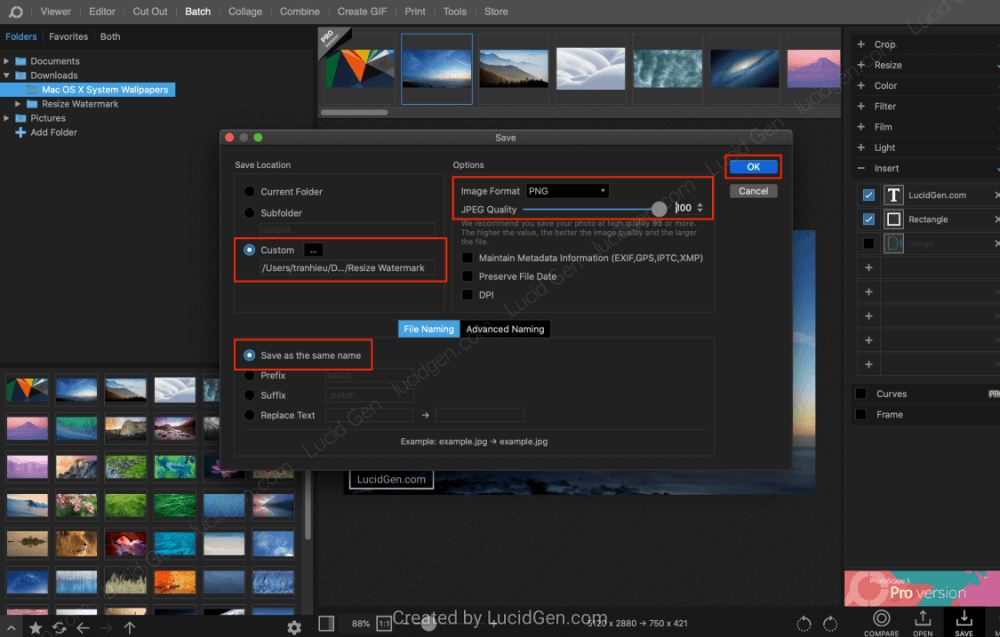
How to add watermark to photo in bulk - Click the Save button in the lower left corner
Click the Save button in the lower-left corner

The save speed is breakneck. In the blink of an eye, it’s 2-3 photos already.
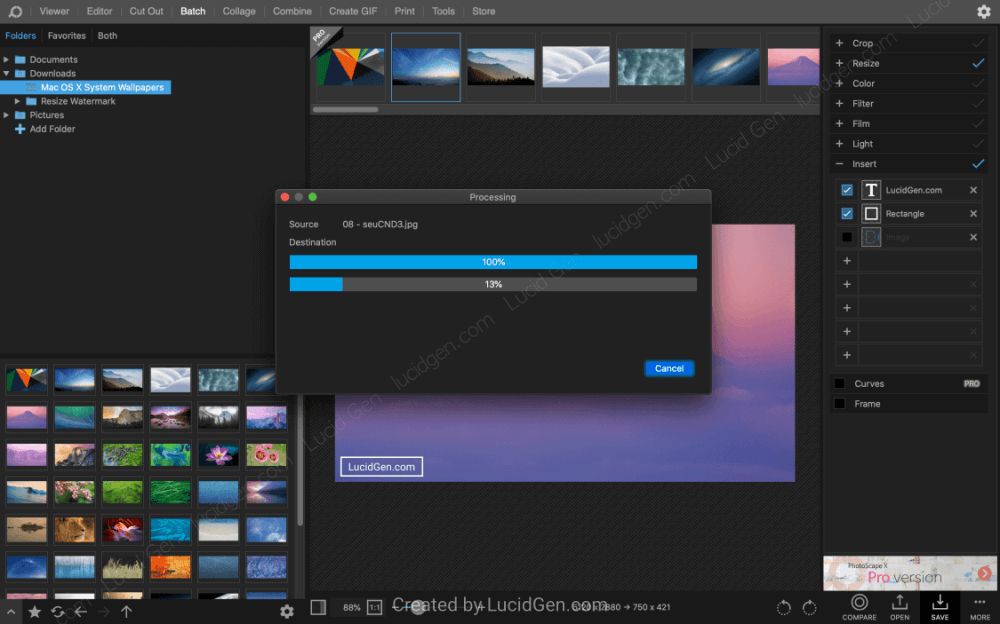
How to add watermark to photo in bulk - Super fast save speed
Superfast save speed

Now let’s open the saved folder and see our results. The image has been resized, and the logo added in bulk.

Results resize and add watermark to photo in bulk

Epilogue

It must be said that using PhotoScape X to resize and add watermark to photo in bulk is very nice. The first time you edit it, but the next time you open it, it will save the previous Batch; drag the image in and click save, and you’re done. And it’s fast and free. All the online tools now require an upgrade fee but are very slow. If you see this, please leave a comment below.

Đánh giá bài viết
Share40Pin9Share7
Next Post
Cách tạo và sử dụng tài khoản MCC Google Ads - How to create Google MCC account and use it

How to create Google MCC account and use it

Chống copy sao chép hình ảnh website bằng code đơn giản (How to prevent images from being copied on website)

How to prevent images from being copied on website

Leave a Reply Cancel reply

I will review and reply to all comments within the day. Please feel free to leave your comments on this article!

Your email address will not be published. Required fields are marked *

Recommend for you

  • Trending
  • Latest
Cách chèn Icon vào PowerPoint siêu đẹp - How to insert icons in PowerPoint beautifully

How to insert icons in PowerPoint beautifully

05/08/2021
0
Google Merchant Center

How to create Google Merchant Center multiple accounts

09/07/2021
0
Cách tạo khung ảnh Shopee hàng loạt cực nhanh - How to add Shopee photo frames in bulk

How to add Shopee photo frames in bulk

06/08/2021
0
Giả lập Windows trên Macbook - How to run Windows on Mac with the emulator

How to run Windows on Mac with the emulator

11/10/2021
0
Cách chỉnh tốc độ chuột MacBook, Magic Mouse, Logitech trên MacBook

How to increase mouse tracking speed Mac

14/05/2022
0
Cách cài đặt Power BI trên Mac và Windows | How to download Power BI for Mac and Windows

How to download Power BI for Mac and Windows

15/10/2021
0
Cài đặt tracking chuyển đổi Contact Form 7 How to set up Contact Form 7 tracking

How to set up Contact Form 7 tracking

08/10/2021
0
Cách gỡ ứng dụng trên Mac và dọn dẹp sạch sẽ - How to uninstall apps on Mac completely

How to uninstall apps on Mac completely

08/10/2021
0

Lucid Gen

A blog sharing about digital marketing, miscellaneous about technology and what you might need that the author knows.

Developed by blogger
Minh Khue › Donate

228 Posts and 4146 Comments

Disclosure: This website has advertisements. If you don’t have money, how can you write?

 Google Play  Microsoft Store

Recent Comments

  • Minh Khuê on How to download Adobe on Mac for free for life
  • mm on How to download Adobe on Mac for free for life
  • Minh Khuê on How to download Adobe on Mac for free for life
  • danny on How to download Adobe on Mac for free for life
  • Elle Ambrose on How to uninstall Microsoft AutoUpdate on Mac

Image sources

Lucid Gen edits images from the following sources: Freepik, Unsplash & Pixabay.

Subscribe to Blog via Email

Enter your email address to subscribe to this blog and receive notifications of new posts by email.

  • About
  • Contact
  • Terms and policies

© 2019 Lucid Gen with by Minh Khue DMCAProtected

No Result
View All Result
  • Marketing
    • Facebook
    • Google
    • Zalo
    • Content marketing
    • Email Marketing
    • Marketing tools
    • SEO
  • Website
    • WordPress
  • Technology
    • Computer
    • Phone
  • Life

© 2019 Lucid Gen with by Minh Khue DMCAProtected