Follow
Lucid Gen
  • Marketing
    • Facebook
    • Google
    • Zalo
    • Content marketing
    • Email Marketing
    • Marketing tools
    • SEO
  • Website
    • WordPress
  • Technology
    • Computer
    • Phone
  • Life
No Result
View All Result
Lucid Gen
  • Marketing
    • Facebook
    • Google
    • Zalo
    • Content marketing
    • Email Marketing
    • Marketing tools
    • SEO
  • Website
    • WordPress
  • Technology
    • Computer
    • Phone
  • Life
No Result
View All Result
No Result
View All Result
Lucid Gen

Lucid Gen › Technology › Computer › How to add Shopee photo frames in bulk

How to add Shopee photo frames in bulk

5/5 - (1 vote)
06/08/2021
0
Cách tạo khung ảnh Shopee hàng loạt cực nhanh - How to add Shopee photo frames in bulk

Cách tạo khung ảnh Shopee hàng loạt cực nhanh - How to add Shopee photo frames in bulk

289
SHARES
28.8k
VIEWS
Share to Facebook

When you have Shopee product photo frames, you will get more attention from customers and increase the click-to-view rate (CTR). Then we must take advantage of this right, let’s make our product stand out among all the other products. Read this article carefully, and Lucid Gen will show you tips when taking product photos and how to add Shopee photo frames in bulk.

Product photos when creating Shopee photo frames

Related posts

  • How to increase mouse tracking speed Mac
  • How to download Power BI for Mac and Windows
  • How to uninstall apps on Mac completely
Table of contents
  1. Tips to keep in mind when taking product photos
  2. Regulations on product images on Shopee
  3. Download the super beautiful Shopee photo frames
  4. How to add Shopee photo frames in bulk
  5. Epilogue

Tips to keep in mind when taking product photos

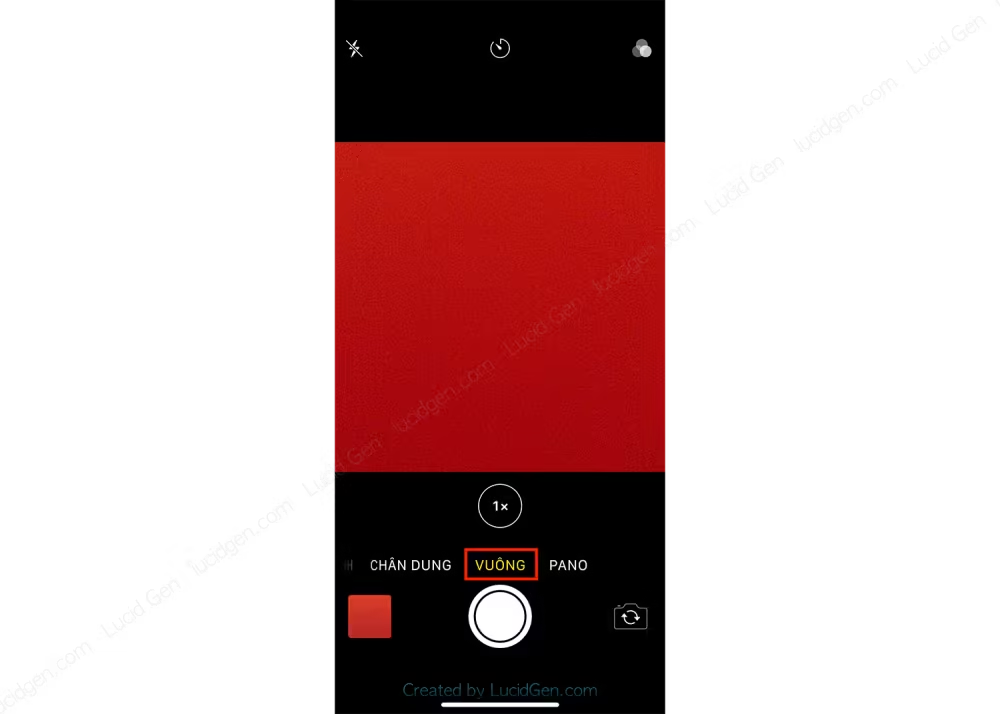
You already know Shopee product photos are mostly square, but you don’t remember this every time you take a product photo. You should set the SQUARE mode on the camera when shooting so that you can easily align the product in the center of the square.

And when the photo you take is already squared, you will save time on cropping, saving you from having to look up and down for fear of cropping the product. Come on, right now, open up your phone’s camera and flip through the SQUARE mode to get used to it.

Let's put the SQUARE mode on the camera
Let’s put the SQUARE mode on the camera

Even using a camera, you should interlace the square version. If you have an Android phone, this feature may not be available, but try installing some camera apps; they might.

Regulations on product images on Shopee

Some regulations on product images on Shopee are summarized for your reference, and you can see details here.

  • Shopee allows you to post  up to 9 product images  (including cover photos) for each product.
  • The image is at least 500×500 pixels.
  • Product images must be clear, detailed pictures of the product’s condition. Do not leave images or information unrelated to this product such as shop introduction information, contact information or payment information.
  • There must be at least one real picture of the product taken by the Seller himself. In this photo, the actual product area should cover at least 40% of the full image area.
  • Absolutely do not post nude, provocative, offensive images that are not suitable for fine customs.
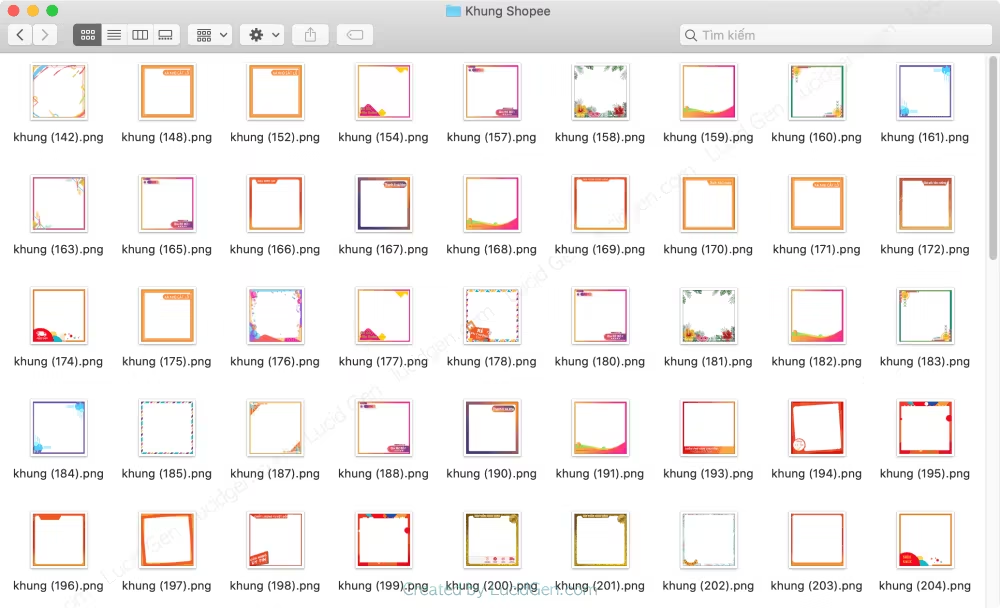
Download the super beautiful Shopee photo frames

More than 100 Shopee photo frames Lucid Gen has collected and gathered for you. Surely there will be many models that you will like. Click the button below to download.

Download now

Download more than 100 super beautiful Shopee product frames

How to add Shopee photo frames in bulk

Steps to add Shopee photo frames in bulk:

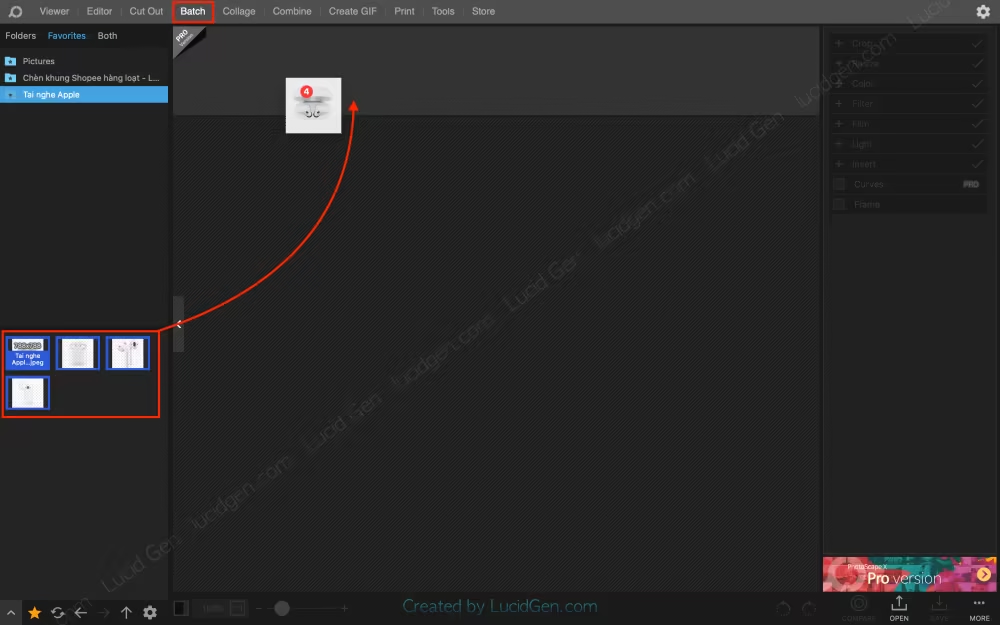
Step 1: Download the PhotoScape X application on App Store with macOS or Microsoft Store on Windows.

Install PhotoScape for MacOS
Install PhotoScape for Windows

Step 2: Open PhotoScape X; on the menu bar, you click through Batch. You find the folder containing the product images you want to insert Shopee photo frames in the left column. You select the image and drag and drop it on the work bar, as shown below.

Select the image and drag and drop it on the work bar
Please select the image and drag and drop it on the work bar

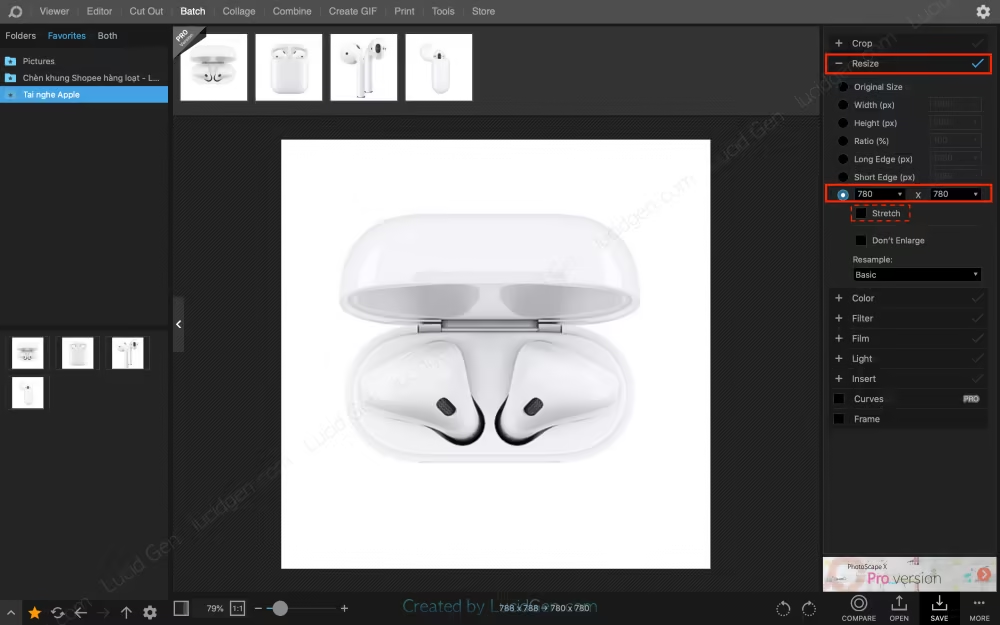
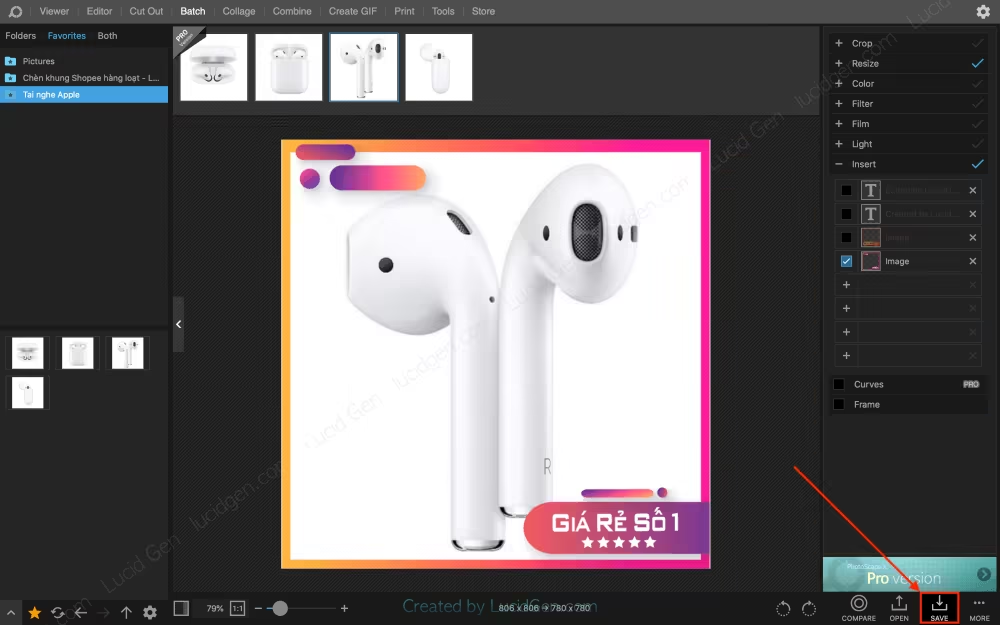
Step 3: In the right column, you open Resize, then choose the size to enter automatically to synchronize the size for all images, insert the frame without any deviation. The Stretch you try to check to see if it is suitable for your photo, then choose.

Open Resize, then choose an auto-entered size to synchronize the size for all images

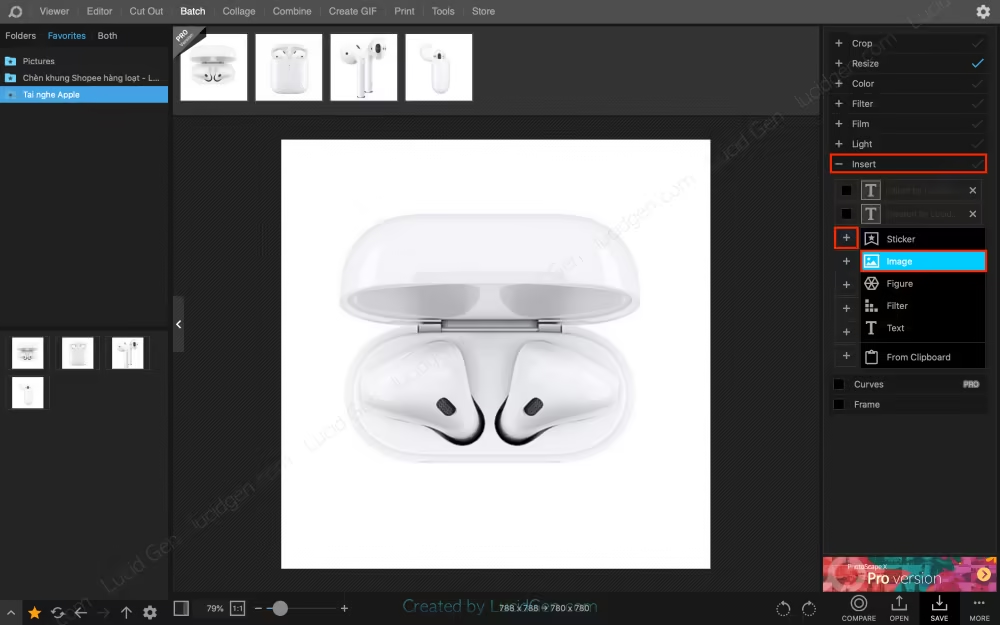
Step 4: Continue below, open Insert, and then click the plus sign and select Image to insert Shopee photo frames.

Open Insert then click the plus sign and select Image
Open Insert, then click the plus sign and select Image

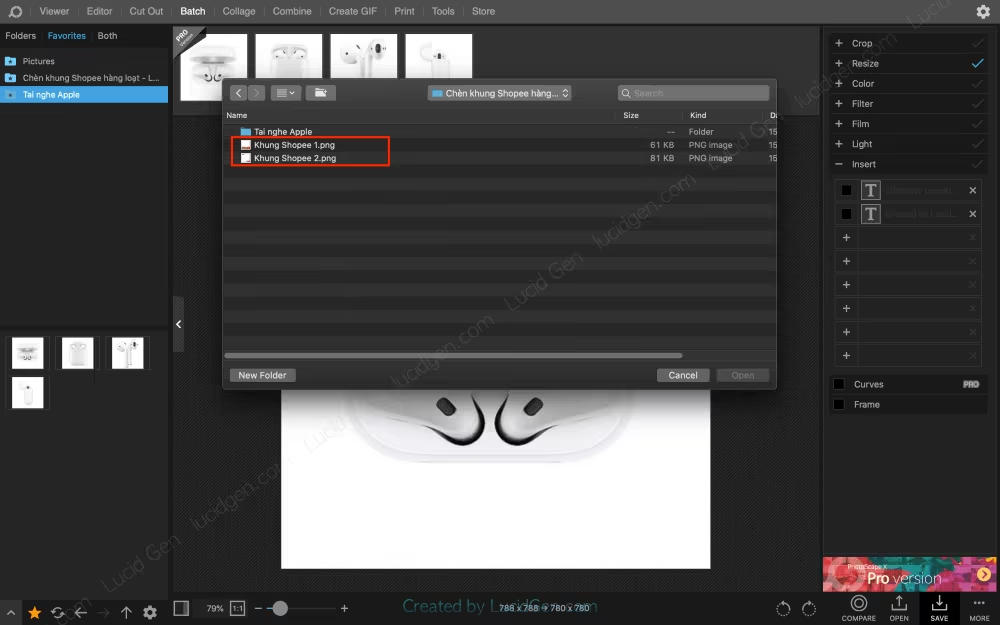
Go to the folder containing the Shopee product photo frame you want to create, choose a frame you like.

Choose a frame that you like

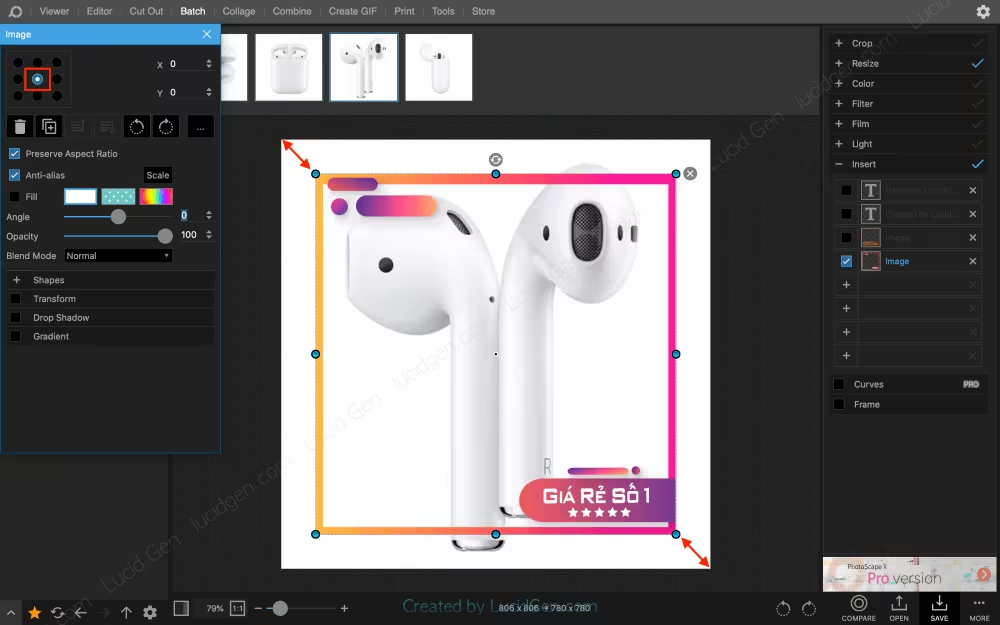
The customization window will appear on the left if you click on the newly inserted Shopee photo frames. You leave the default for the frame to be in the center. Let’s pull the corners of the photo frames let Shopee Prosecutor product image.

Drag the corners of Shopee photo frames to make them close to the product photo border viền

Step 5: After aligning the Shopee product photo frame, click through the other photos to see if all is ok. Then click save in the bottom corner.

Click save in the bottom corner

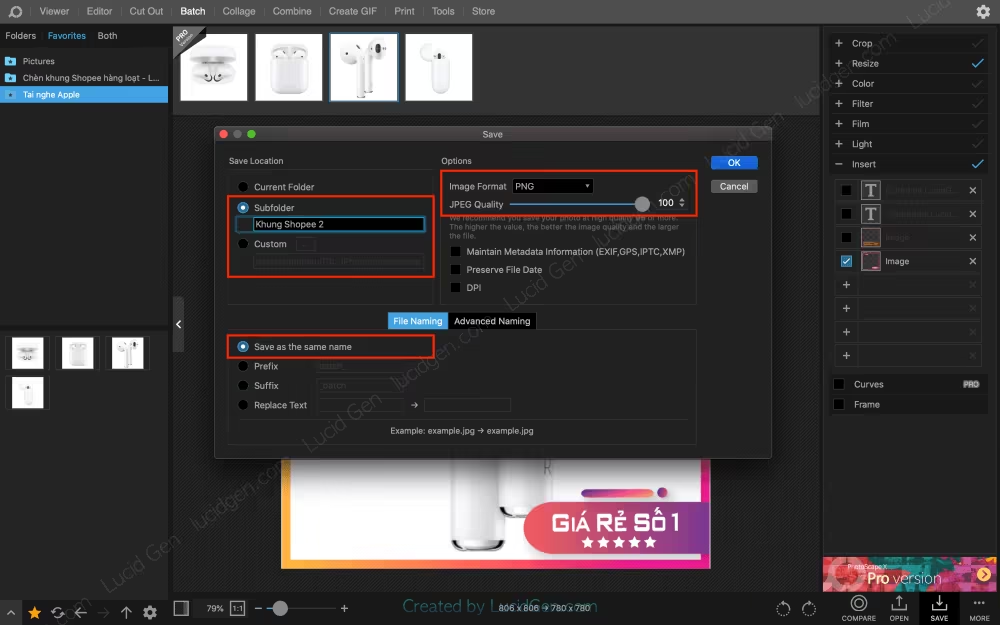
In the save option, I recommend saving as follows:

  • Save Location: You should choose Subfolder (subfolder inside the original product image folder) or Custom to choose where you want. Do not save in the same folder because you will be confused when choosing photos to post on Shopee.
  • File Naming (Output file name): You choose Save as the same name (save as the original file name).
  • Options (optional): You choose Image Format as PNG and you’re done, if you choose another format, remember to set JPEG Quality to 100 to export high quality images.
It is recommended to install save as directed by Lucid Gen

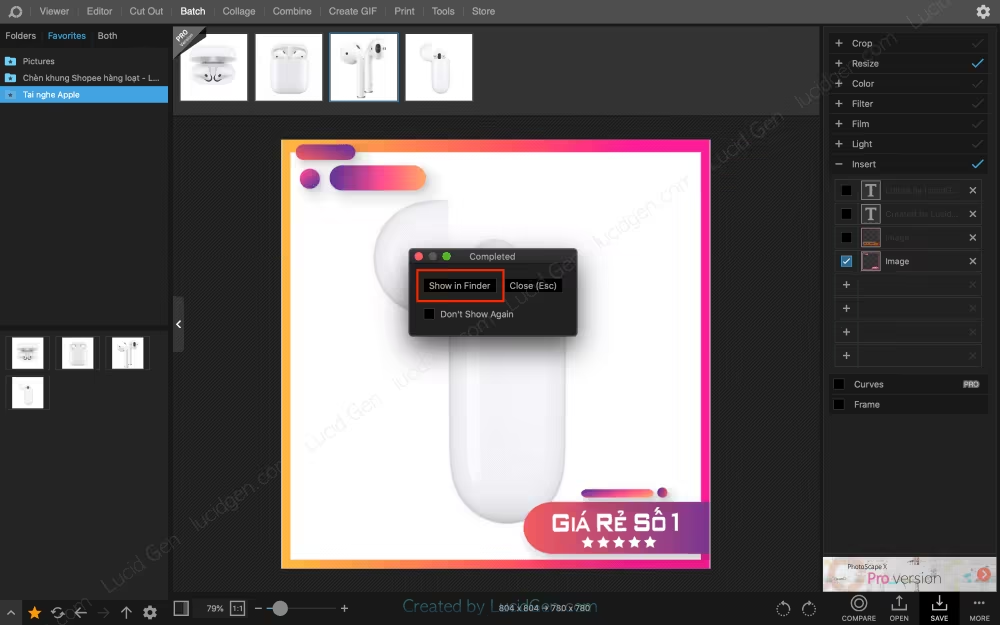
In just a split second, the application has created a series of product photo frames on Shopee. After exporting, click the Show in Finder option to open the folder containing the created Shopee photo frames.

Click Show in Finder to open the folder containing the Shopee frame inserted photo

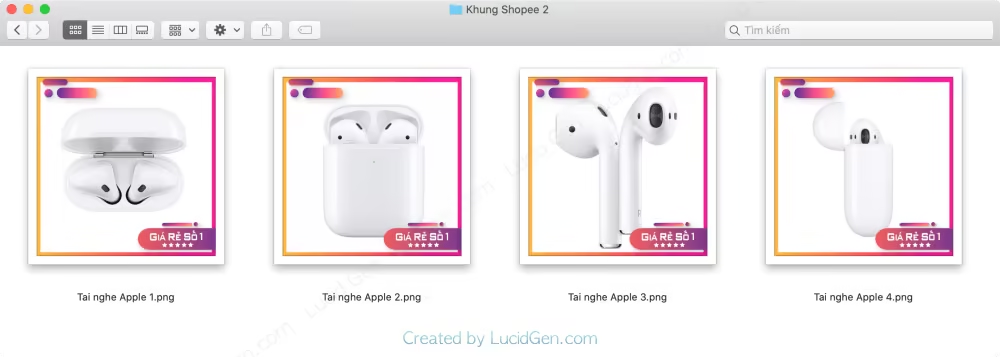
And here are the results. They look a lot more prominent, right (the outer white border is the image viewing feature of my device). Posting on Shopee is good.

Product photos when Shopee photo frames are inserted

Note: PhotoScape X will save the settings the last time you used them. So the next time, you drag and drop the product image in. It will resize itself to the previous size and insert the frame itself the last time you did. It’s really convenient!

Epilogue

Shopee product photo frames; you can find many places to find them. But how to insert it quickly, save time, only Lucid Gen is the first instructions page. You can also add watermark to photo in bulk with Photoscape X. To support us in writing more such unique and useful articles, please comment below and share this article.

Reveal to you how to increase Shopee rating safely. Good luck with your sale!

5/5 - (1 vote)
Share115Pin27Share20
Next Post
Cách tắt thông báo quảng cáo Facebook đơn giản - How to turn off Facebook ads notifications

How to turn off Facebook ads notifications

Cách gộp nhiều file Excel & CSV thành 1 sheet

How to merge multiple Excel CSV files into one

Leave a Reply Cancel reply

I will review and reply to all comments within the day. Please feel free to leave your comments on this article!

Your email address will not be published. Required fields are marked *

Recommend for you

  • Trending
  • Latest
Tối ưu hình ảnh chuẩn SEO - How to optimize images for SEO in WordPress

How to optimize images for SEO in WordPress

28/07/2021
0
Cách xem những người đã thích trang Facebook của bạn - How to see who liked your Facebook page

How to see who liked your Facebook page

05/08/2021
0

How to target competitors audience on Facebook

06/08/2021
0
Cách thêm CSS vào AMP trong WordPress - How to add custom CSS to AMP in WordPress

How to add custom CSS to AMP in WordPress

18/08/2021
0
Cách chỉnh tốc độ chuột MacBook, Magic Mouse, Logitech trên MacBook

How to increase mouse tracking speed Mac

14/05/2022
0
Cách cài đặt Power BI trên Mac và Windows | How to download Power BI for Mac and Windows

How to download Power BI for Mac and Windows

15/10/2021
0
Cài đặt tracking chuyển đổi Contact Form 7 How to set up Contact Form 7 tracking

How to set up Contact Form 7 tracking

08/10/2021
0
Cách gỡ ứng dụng trên Mac và dọn dẹp sạch sẽ - How to uninstall apps on Mac completely

How to uninstall apps on Mac completely

08/10/2021
0

Lucid Gen

A blog sharing about digital marketing, miscellaneous about technology and what you might need that the author knows.

Developed by blogger
Minh Khue › Donate

228 Posts and 4146 Comments

Disclosure: This website has advertisements. If you don’t have money, how can you write?

 Google Play  Microsoft Store

Recent Comments

  • Minh Khuê on How to download Adobe on Mac for free for life
  • mm on How to download Adobe on Mac for free for life
  • Minh Khuê on How to download Adobe on Mac for free for life
  • danny on How to download Adobe on Mac for free for life
  • Elle Ambrose on How to uninstall Microsoft AutoUpdate on Mac

Image sources

Lucid Gen edits images from the following sources: Freepik, Unsplash & Pixabay.

Subscribe to Blog via Email

Enter your email address to subscribe to this blog and receive notifications of new posts by email.

  • About
  • Contact
  • Terms and policies

© 2019 Lucid Gen with by Minh Khue DMCAProtected

No Result
View All Result
  • Marketing
    • Facebook
    • Google
    • Zalo
    • Content marketing
    • Email Marketing
    • Marketing tools
    • SEO
  • Website
    • WordPress
  • Technology
    • Computer
    • Phone
  • Life

© 2019 Lucid Gen with by Minh Khue DMCAProtected