

Buying apps in the App Store is something Apple fans ask about a lot. As a leading app store with a strict review process, the App Store has plenty of great apps. And as the saying goes, “you get what you pay for”, so apps with standout features usually cost money. You might buy an app outright, pay for a monthly subscription, or simply top up to buy in-game items. So how do you pay in the App Store with MoMo or Visa quickly and easily? You will find the answer in this post.
Payment methods on the App Store
You can pay in the App Store using these 2 methods:
- Pay in the App Store with MoMo.
- Pay in the App Store with a Visa card.
As long as you have one of these two, you can easily buy apps in the App Store or top up your games.
Which payment method should you use?
In my opinion, if you have a MoMo wallet, use it. For the same amount, paying in the App Store with MoMo earns you reward points, and during promotions you may even get a little cashback. If you don’t have MoMo, use a Visa card.
Also, we usually keep less money in a MoMo wallet than on a Visa card (usually, anyway), so paying with MoMo means less worry about accidentally approving a large purchase.
Add MoMo as a payment method
First, I will show you how to add MoMo as an App Store payment method. Open the Settings app and tap your Apple ID at the top, as shown below.
Note: install the MoMo app on your phone and sign in first, so linking it later is easier. If you don’t have it yet, tap here to download it.

Next, tap Payment & Shipping.

Then tap Add Payment Method.

Now choose MoMo E-Wallet and make sure the information below is complete. Then tap Sign in to MoMo E-Wallet.
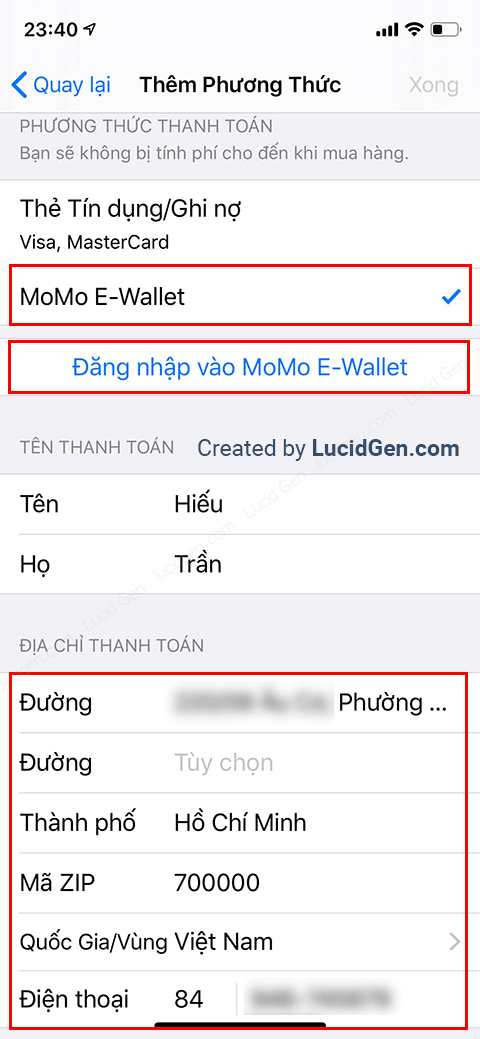
A window appears. Select Continue with MoMo app.

When the MoMo app opens to confirm the link, tap the Confirm button at the bottom. Be quick, before the request times out.

And here is the result: your MoMo wallet is now one of your payment methods. You can go ahead and buy the apps you like.

Add a Visa card as a payment method
The next method is a Visa card. Again, open the Settings app and tap your Apple ID at the top.
Next, choose Payment & Shipping again.
Then tap Add Payment Method.
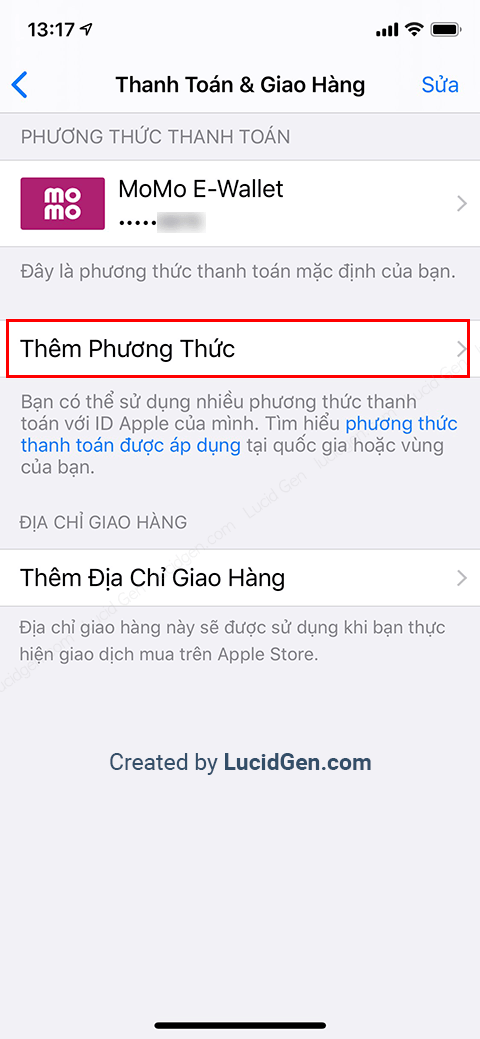
Now choose Credit/Debit Card. Enter your card number and the expiration date from the front of your Visa card, plus the CVV number on the back. Check that everything is correct, then tap the Done button at the top.

Here is where to find this information on a Visa card.

And this is the result. But… now there are 2 payment methods, the MoMo wallet and the Visa card. So how do you know, or choose, which one is charged first? Read on below.

Choose your main App Store payment method
The App Store charges whichever method is at the top of the list. In the picture, that is the Visa card. To switch to a different method, tap the Edit button.

Press and hold the three-line handle, then drag it up or down to reorder the payment methods. Once they are in the order you want, tap the Done button at the top.

Buy an app in the App Store
To make this guide more practical, let’s buy an app in the App Store together and see how the process works. I picked the cheapest one I could find, and a Vietnamese app to support local developers: WiFi Chùa VIP.
Tap the button showing the price, which here is 5,000 VND.

A prompt asks you to confirm the purchase. Tap Buy.

The App Store asks for your Apple ID password. Enter it, then tap the Sign In button.

As soon as you sign in, the payment goes through. You will see a check mark and the word Done below.

The app has been purchased and downloaded. I find buying apps in the App Store pretty simple these days.

Since I paid with my MoMo wallet, I opened the MoMo app and saw the account link notification along with an Apple Services payment successful message. I earned reward points too.

Conclusion
To sum up, there are 2 payment methods in the App Store: the MoMo e-wallet and a Visa card. I recommend using MoMo if you have it. Remember to check your main payment method before buying apps, and if you are about to buy ringtones, check out how to set iPhone ringtones for free first. Did you find this article useful? Share your thoughts in the comments below. Have fun!


