

Adding Google Tag Manager code to a website is something every digital marketer has to do sooner or later, and now it’s your turn. Google Tag Manager is one of the most useful tools for website measurement because it works with almost every tracking and advertising platform. In this article, I have put together how to add Google Tag Manager to WordPress and other popular website platforms. I hope it helps.
A quick introduction to Google Tag Manager
What is Google Tag Manager?
Think of Google Tag Manager as a container. It holds the tracking codes of different platforms such as Google Analytics, Google Ads, and Facebook Pixel. Instead of editing your website’s source code for each platform, you only need to add Google Tag Manager once. After that, you can add and edit other tracking codes right in the Google Tag Manager interface, so you don’t have to touch the source code and risk breaking your website.
Does Google Tag Manager make your website slow?
Not noticeably. In fact, when you use Google Tag Manager to hold other Google codes such as Google Analytics and Google Ads, it is even lighter than adding each code directly to your website’s source code.
Is it okay to add a tracking code to the website and also add it to Tag Manager?
No, the tracking will be duplicated, and your reports may show double the numbers. So any tracking code already in your website’s source code doesn’t need to be added to Google Tag Manager. Alternatively, you can remove all tracking codes from the source code and add them back in Google Tag Manager for easier management.
How to create and get the Google Tag Manager code
If you have never used Google Tag Manager before, here is how to create an account and get its code.
Create a Google Tag Manager container
Step 1: Go to tagmanager.google.com and click the Create Account button.

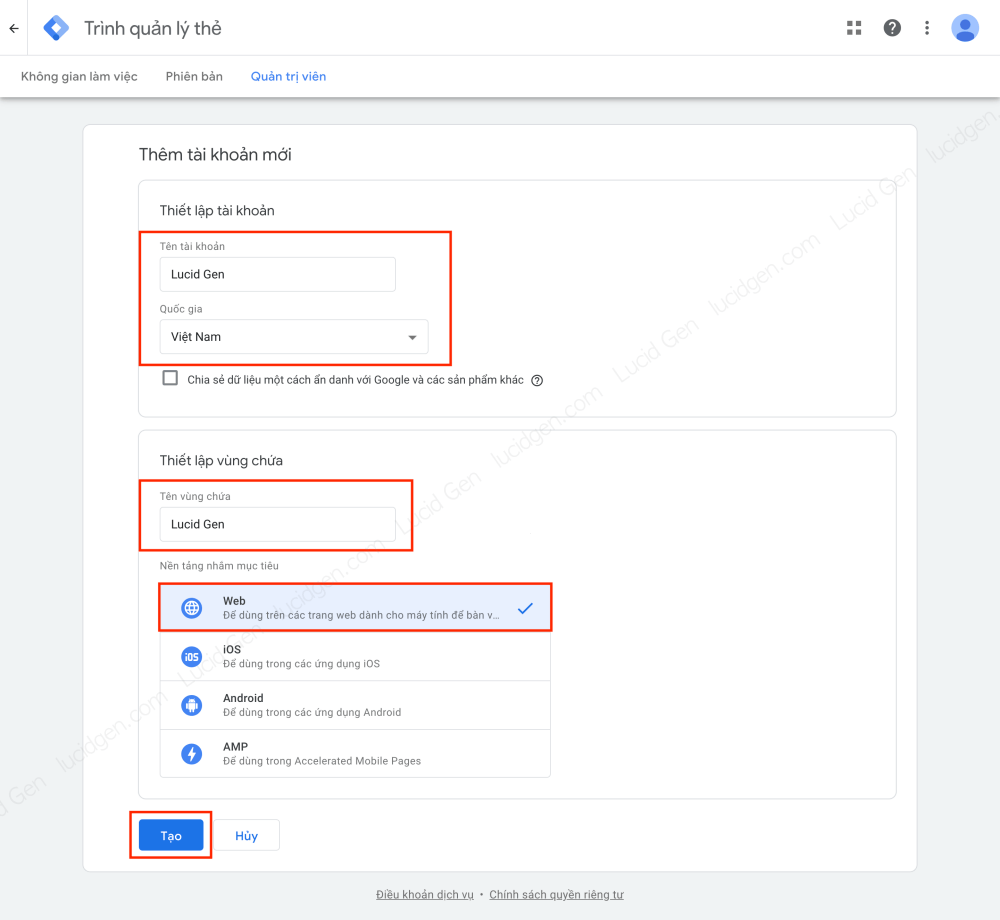
Step 2: Fill in all the information below, then click the Create button.
- Account Name: the name of your brand or website.
- Country: your country (Vietnam in my case).
- Container Name: the name of your brand or website.
- Targeting Platform: Web.
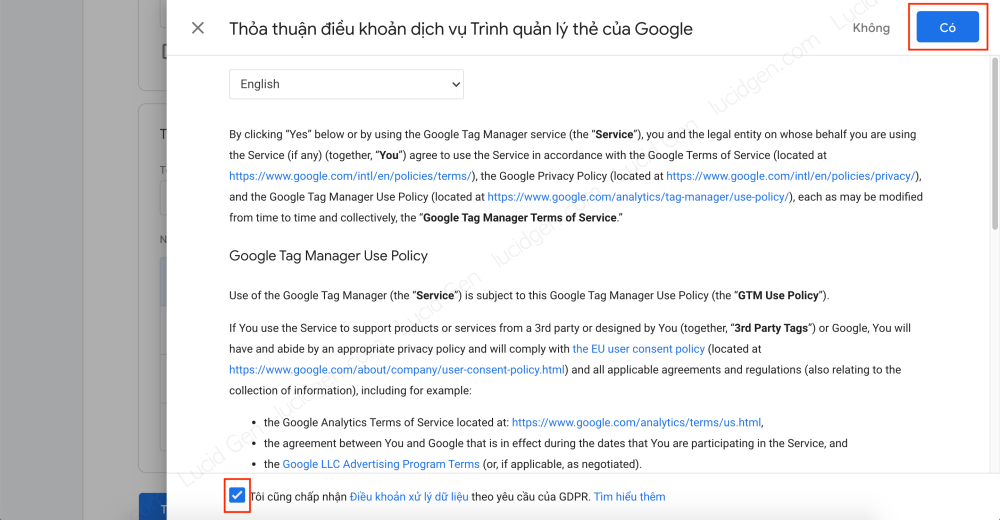
Step 3: Tick I also accept the Data Processing Terms as required by GDPR, then click the Yes button at the top.
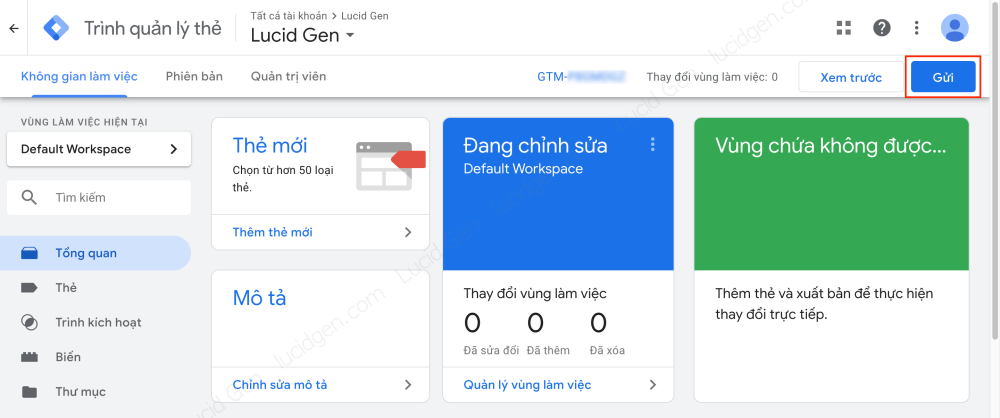
Step 4: After creating the container, click Submit so that it starts working.
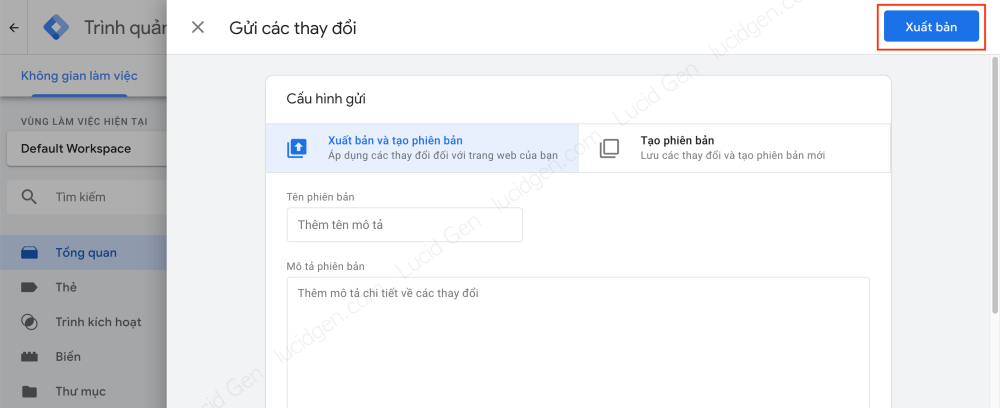
Step 5: You don’t need to fill in anything. Just click Publish at the top.
Step 6: Again, no need to fill in anything. Just click Continue at the bottom.

Wait a few seconds for Google Tag Manager to finish publishing. Then click the Workspace tab (just below the Tag Manager logo) to get the code.
Get the Google Tag Manager code
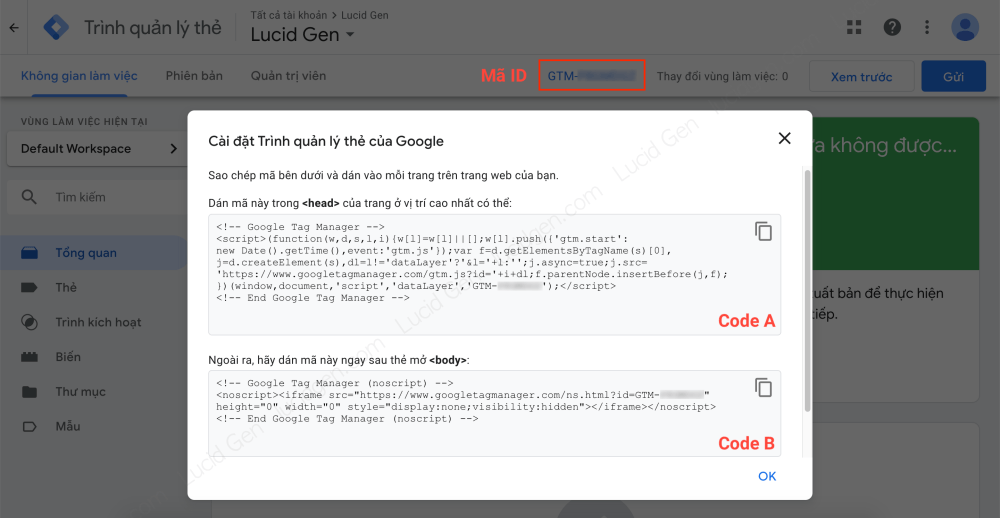
In the Workspace tab, click your container ID and you will get 2 code snippets. To keep things easy to follow, I will call them:
- Code A: the code that goes between <head> and </head> on your website.
- Code B: the code that goes between <body> and </body> on your website.
How to Add Google Tag Manager to WordPress
WordPress is one of the most popular open website platforms today, and adding Tag Manager to it only takes 2 steps.
Step 1: To add the Google Tag Manager code to your WordPress site safely, install the WPCode plugin (formerly Insert Headers and Footers; the plugin was renamed but kept the same page on WordPress.org).
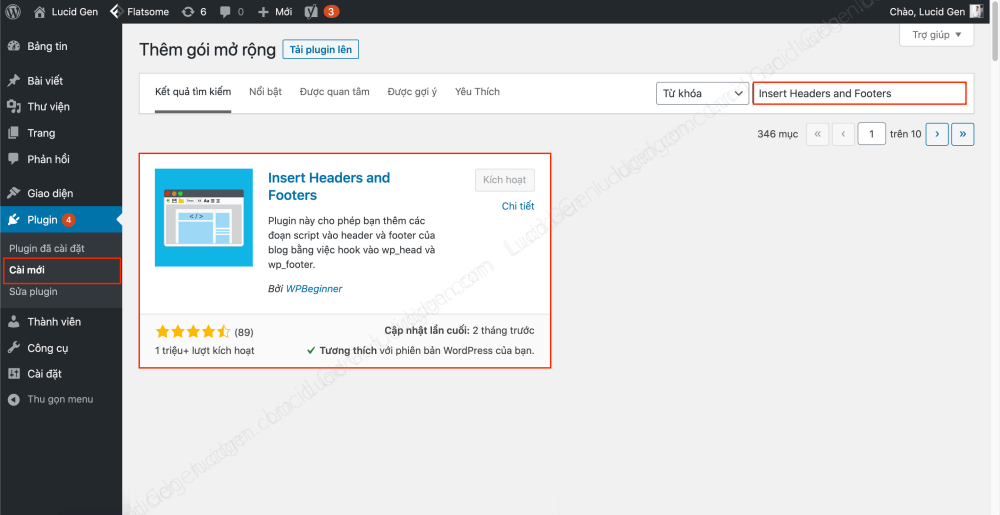
Step 2: Go to Code Snippets > Header & Footer in the left menu (10/2026). Then add the Tag Manager code as follows.
- Header: paste code A.
- Body: paste code B.
When you’re done, remember to click Save Changes. The screenshot below shows the old 2020 interface, when the plugin was still called Insert Headers and Footers; the Header and Body boxes still work the same way today. Note: If you use a caching plugin, clear the cache.

How to add Google Tag Manager to a LadiPage website
Add Google Tag Manager to LadiPage with the container ID: Go to Settings > Conversion code, then paste your container ID into the Google Tag Manager ID field. The example below shows how it looks.

Add Google Tag Manager to LadiPage with the code: Go to Settings > Javascript/CSS Code, then paste the Google Tag Manager code as follows.
- Before the </head> tag: paste code A.
- Before the </body> tag: paste code B.
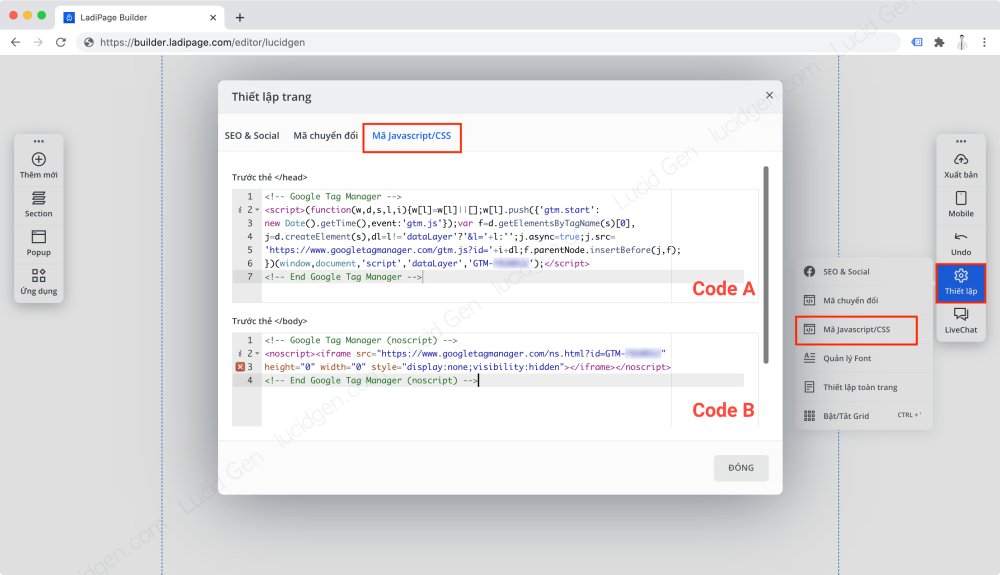
After adding the Tag Manager code, remember to click Publish in LadiPage.
How to add Google Tag Manager to a Haravan website
Haravan is also very popular in Vietnam, and adding Tag Manager to it takes just 2 surprisingly easy steps.
Step 1: Log in to the Haravan admin page, then go to Website and Themes. On the theme you are using, click the 3-dot button and select Edit code.

Step 2: In the Layouts folder, click theme.liquid to edit it. Add code A before </head> and code B right after <body>, as shown below. When you’re done, remember to click Save.

Note: This method doesn’t cover Haravan’s checkout pages. For those, you have to send your Tag Manager code to Haravan’s technical staff and ask them to add it. Keep these two things in mind:
1. It can definitely be done. If they say otherwise, you’ve probably met a “lazy” support agent. (I’ve done this a few times and it worked, but I had to be quite firm with them.)
2. Use the tool described later in this article to make sure they actually added it.
How to add Google Tag Manager to a hand-coded website
Affiliate marketers often use static websites (plain HTML files). Just open the HTML file of your landing page and add the Google Tag Manager code following this rule.
<head>
Code A
</head>
<body>
Code B
</body>How to check if Google Tag Manager is working
You’ve added Tag Manager to your website, but how do you know it’s actually working? I’ve seen many cases where an agency asks the client to have their web developer add the code, and in the end one side says it’s done while the other says it isn’t there.
So here is how to check whether Google Tag Manager has been added, and added correctly.
Step 1: Install the Tag Assistant extension in Chrome. Click the link below to open the extension page.

Step 2: Click the Extensions button, then click the pin icon next to Tag Assistant so it stays on your toolbar.
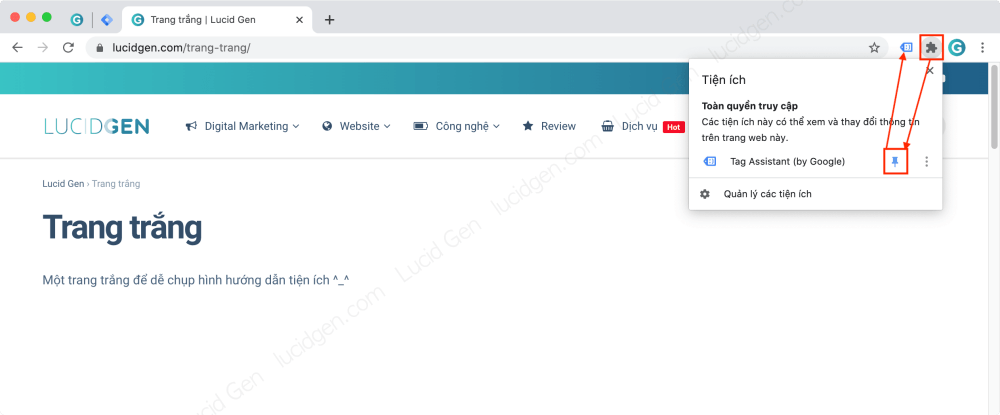
Step 3: Open the website where you added Google Tag Manager and click the Tag Assistant icon. A side panel will show the Google tags found on the page. If you see your container ID in the form GTM-XXXXXXX in the list, the code is on your site (10/2026).
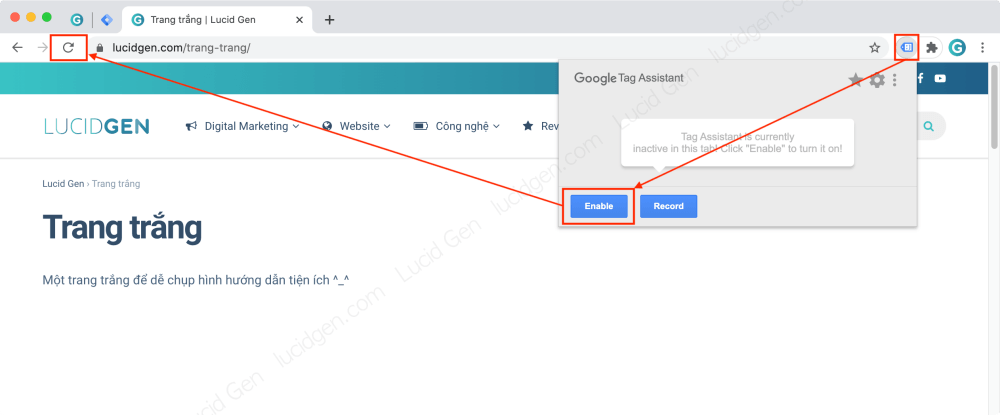
Step 4: Check more thoroughly with Tag Manager’s Preview mode. In your container’s workspace, click Preview in the top right, enter your website’s address, then click Connect. Your site opens in a new window; go back to the Tag Assistant tab and click Continue.
If Tag Assistant manages to connect to your site, the Tag Manager code is installed correctly. In the Tags section, you can see which tags have fired (Tags Fired) and which haven’t (Tags Not Fired), so you know whether the tracking codes inside are running. If it can’t connect, try turning off your ad blocker, because it may block Tag Manager.
Note: The old Tag Assistant (Tag Assistant Legacy) used colors to show results, as in the screenshot below: blue and green meant correct, yellow and red meant errors. Google has replaced it with the new Tag Assistant, so you won’t see those colors anymore.

Some common errors when adding Tag Manager to the website
If this is your first time, you may run into some errors when adding Tag Manager to your website. Here are the most common ones and how to fix them. The error messages below come from the old Tag Assistant; the new version may word things differently, but the causes and fixes are the same.
- I added the code correctly, so why does Tag Assistant still show a problem? There are 2 possible reasons. First, you haven’t clicked Submit as described in the step for creating the container. Second, code A and code B are in the wrong places, so reread the article and double-check where you put them.
- Code found outside of <body> tag: check that code B is placed between <body> and </body>.
- Invalid or missing account ID: check that your Google Tag Manager container ID is correct.
- Tag is included in an iframe: your Tag Manager code must be placed directly on your website, not inside an iframe.
The errors below happen when code B is placed inside an HTML element other than <body>. Code B must go right after the opening <body> tag, so check where you added it.
- <script> tag must not be included in a <span>
- <script> tag must not be included in a <section>
- <script> tag must not be included in a <p>
- <script> tag must not be included in a <i>
- <script> tag must not be included in a <header>
- <script> tag must not be included in a <form>
- <script> tag must not be included in a <footer>
- <script> tag must not be included in a <dl>
- <script> tag must not be included in a <center>
- <script> tag must not be included in a <ns:robots>
- <script> tag must not be included in a <flow:ifenabled>
- <script> tag must not be included in a <div>
- <script> tag must not be included in a <div>
How to use Google Tag Manager for tracking
This article focuses only on getting Tag Manager onto your website. As for using it to track different things, I will cover that in other articles and add the links here, or you can browse the Google Tag Manager category.
- How to track MGID conversions with Tag Manager.
- Tracking Tawk.to conversions with Google Tag Manager.
Conclusion
Whatever platform your website runs on, the rule for adding Tag Manager is the same: code A goes before </head>, and code B goes right after <body>. If there is a popular platform you haven’t managed to add it to, leave a comment below and I will help you and update the article. You should also check out how to add users to Google Tag Manager to share access with your staff or agency.


