

If you are a publisher, after setting up AMP for your WordPress website, the first thing on your mind is probably adding Adsense ads to AMP. Making money matters, and that goes for Lucid Gen too. In this article, Lucid Gen shows you how to add Adsense ad units, Auto Ads, and Sticky Ads to AMP, so your AMP pages can show every type of Adsense ad.
Update (October 2026): This article was first written in August 2021, and a few things have changed since then that you should know before following it:
- Auto ads for AMP now include anchor ads: since April 2022, Adsense Auto ads for AMP supports anchor ads, which are basically Sticky Ads. If you have added the Auto Ads code to AMP and turned on anchor ads in your Auto Ads settings, you no longer need to insert Sticky Ads manually. Pick only one of the two so that two sticky ads don’t cover your content at the same time.
- The Sticky Ads code has changed: the
<amp-ad>component now has a built-instickyattribute, so you no longer need to wrap it in<amp-sticky-ad>(version 0.1 ofamp-sticky-adhas been marked as deprecated by AMP). The code snippets below have been updated accordingly. - AMP is no longer an SEO advantage: since June 2021, Google no longer requires AMP for the Top Stories carousel, and many websites have dropped AMP. See the article on setting up AMP in WordPress before deciding whether to keep using AMP.
How to get Adsense ad code for AMP
First, you need the Adsense ad code for AMP. You get the ad unit code from Adsense, while for Auto Ads and Sticky Ads you can use the code provided in this article.
Adsense ad unit code for AMP
Go to Google Adsense > Ads, then select the By ad unit tab (the Adsense interface changes quite often; the screenshot below is from August 2021). Ad types that work in AMP have an AMP icon in the upper right corner.
I suggest choosing Display ads because it is the most common type of Adsense ad. You can reuse a Display ads unit you created before instead of making a new one.

Click to get the code of any Display ads unit, then open the AMP tab to get the Adsense code for AMP.
You only need to copy the bottom code snippet. With this method, you don’t need the snippet above it.
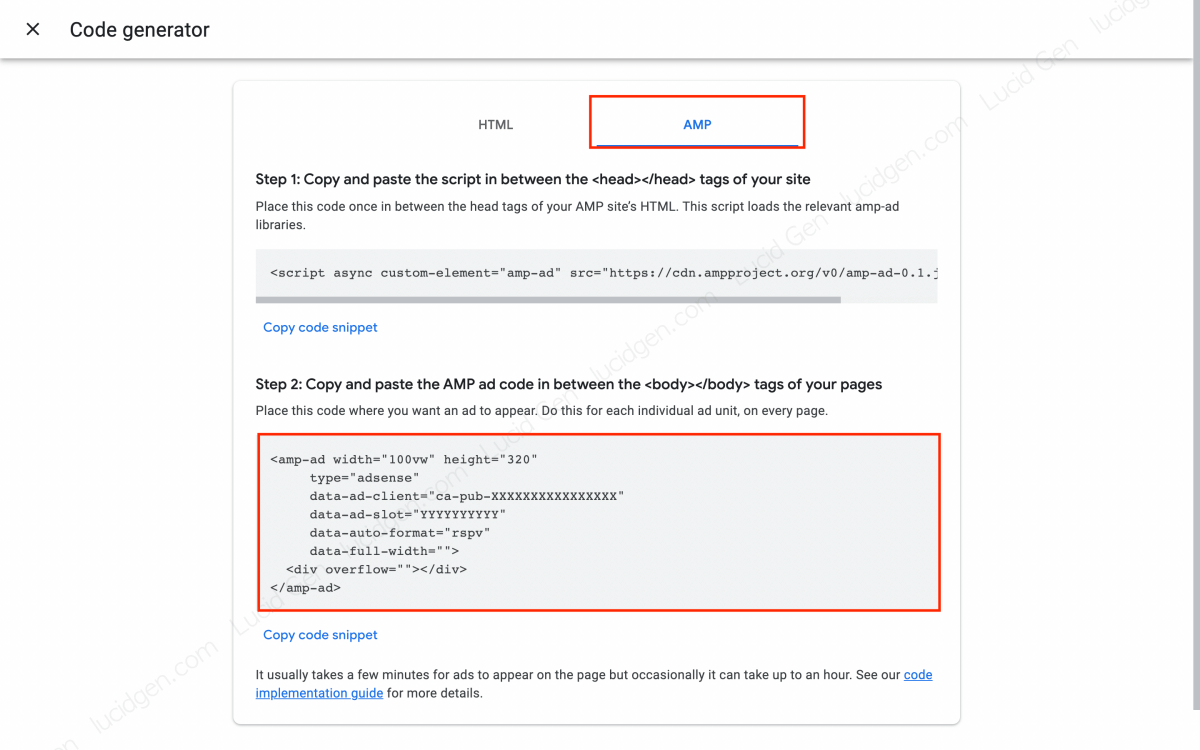
<amp-ad width="100vw" height="320"
type="adsense"
data-ad-client="ca-pub-XXXXXXXXXXXXXXXX"
data-ad-slot="YYYYYYYYYY"
data-auto-format="rspv"
data-full-width="">
<div overflow=""></div>
</amp-ad>Adsense Auto Ads code for AMP
Adsense Auto Ads automatically places ads in suitable positions on your website, using Google’s AI. Fortunately, AMP supports Auto Ads too.
<amp-auto-ads type="adsense" data-ad-client="ca-pub-XXXXXXXXXXXXXXXX"></amp-auto-ads>Adsense Sticky Ads code for AMP
Sticky Ads stay fixed at the bottom of the phone’s screen, just like Anchor Ads in the non-AMP version. As mentioned in the update above, if your Auto ads for AMP already show anchor ads, you can skip this code. If you want to place Sticky Ads yourself, use the code below, where YYYYYYYYYY is the Slot code of a Display ads unit.
<amp-ad width="320" height="50" sticky="bottom" type="adsense" data-ad-client="ca-pub-XXXXXXXXXXXXXXXX" data-ad-slot="YYYYYYYYYY"></amp-ad>Note: Remember to change ca-pub-XXXXXXXXXXXXXXXX and YYYYYYYYYY to your Client and Slot code. Keep the values right next to the quotation marks with no extra spaces (such as " ca-pub-..."), because a single space can stop the ad from showing.
How to add Adsense ads to AMP in WordPress
Before adding Adsense ads to AMP, plan where you want them to appear. For example: before the content, after the content, after the 1st paragraph, after the Nth paragraph, and so on. Then follow the instructions below.
Add Adsense to AMP with Ad Inserter
Ad Inserter is a plugin I recommend, and I use it on Lucid Gen too. News themes usually let you insert ads into the content, but I find Ad Inserter smarter because it won’t insert an ad when the condition isn’t met. The comparison table below shows what I mean.
| Ads on a page with 3 paragraphs | Other themes or plugins | Ad Inserter |
|---|---|---|
| After paragraph 1 | Ad inserted | Ad inserted |
| After paragraph 5 | Ad inserted | No ad |
| After paragraph 15 | Ad inserted | No ad |
| Result | 1 ad after paragraph 1 and 2 ads back to back after paragraph 3 | Only 1 ad after paragraph 1 |
Step 1: Go to Plugins > Add New to install the Ad Inserter plugin.

Step 2: Go to Settings > Ad Inserter to add a new ad. The tabs 1 to 16 are the ad blocks Ad Inserter supports, and you can start with any of them. Paste the Adsense code from the previous step into the block.
Step 3: Choose where to insert the ad in the Insertion section. Here are the most common positions:
- Before post: Before the post title.
- Before content: Before the first paragraph of the article.
- Before paragraph: Before X paragraphs.
- After paragraph: After X paragraphs.
- After content: After the content of the article.
- After post: After the post comments (at the bottom of the post area).
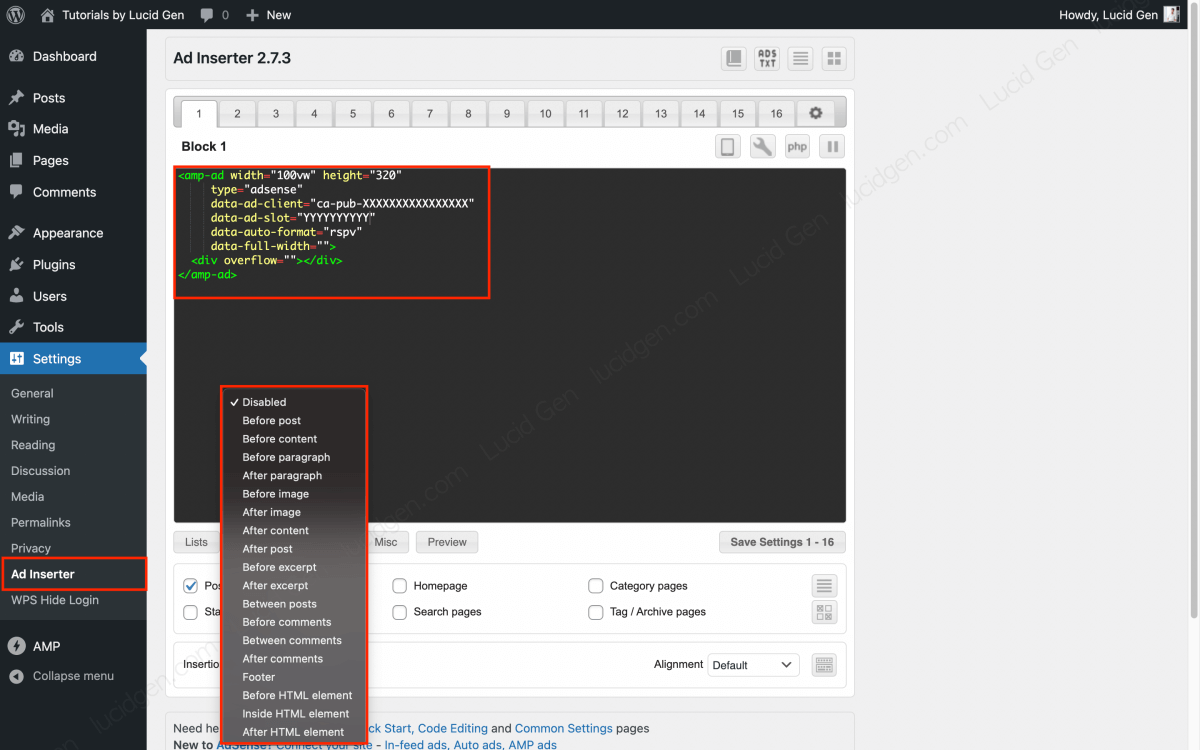
Step 4: Click the Misc button > turn on AMP pages > click Save Settings. That’s one Adsense ad added to AMP.

Repeat these steps to add more ad units in different places in your AMP content.
Add Adsense to AMP for WP
If you are using the AMP for WP plugin, still use Ad Inserter to insert ads in the middle of your AMP content as shown above. AMP for WP can only add ads above or below the article. It doesn’t support the Before paragraph and After paragraph positions like Ad Inserter does.
To add Adsense ads with AMP for WP, go to AMP > Settings > Advertisement. Turn on the ad placements you want, then paste in your Client and Slot codes.
Turn on Responsive Ad unit so full-width ads look better.

How to add Auto Ads and Sticky Ads to AMP in WordPress
Here are 3 ways to add Auto Ads and Sticky Ads to AMP in WordPress. Pick the one that suits you.
Add Auto Ads and Sticky Ads to AMP with Ad Inserter
If you already use the Ad Inserter plugin, this is the most convenient way. Go to Settings > Ad Inserter and paste the Auto Ads and Sticky Ads codes into a block.
Next, set the insertion position to Footer in the Insertion section. Then click the Misc button, enable AMP pages, and click Save Settings.

Add Auto Ads and Sticky Ads to AMP for WP
If you use the AMP for WP plugin, you can easily add Auto Ads and Sticky Ads to AMP without any other plugin. Go to AMP > Settings > Advance Settings and paste the Auto Ads and Sticky Ads code into the Enter HTML in Footer section.

Add Auto Ads and Sticky Ads to AMP with theme functions
Another way to add Auto Ads and Sticky Ads to AMP without a plugin is through your theme’s functions. Paste this code into your theme’s functions.php file.
//Adsense Auto Ads & Sticky Ads by LucidGen.com
//Remove the amp-ad sticky line if Auto Ads already shows anchor ads
add_action('amp_post_template_footer','adsense_amp_footer');
function adsense_amp_footer($amp_template) {
?>
<amp-auto-ads type="adsense" data-ad-client="ca-pub-XXXXXXXXXXXXXXXX"></amp-auto-ads>
<amp-ad width="320" height="50" sticky="bottom" type="adsense" data-ad-client="ca-pub-XXXXXXXXXXXXXXXX" data-ad-slot="YYYYYYYYYY"></amp-ad>
<?php
}- Method 1: Open the file manager on your hosting and go to
public_html/wp-content/themes/your-theme/functions.php. - Method 2: Go to Appearance > Theme Editor > select the
functions.phpfile.

The
amp_post_template_footerhook only runs on Reader mode AMP pages (AMP Legacy template). If you use Transitional or Standard mode, use the Ad Inserter method above instead. Also, use a child theme or a plugin like Code Snippets to add the ad code, so it isn’t lost when you update the parent theme.
Frequently asked questions
Why doesn’t this tutorial add scripts to <head></head>?
AMP plugins are smarter than they used to be, and they add the required script tags automatically based on the HTML in the AMP page. You can press F12 to check. If your AMP pages don’t add the script tags for some reason, add the following code to your theme’s functions.php file.
add_action('amp_post_template_head','adsense_amp_head');
function adsense_amp_head($amp_template) {
?>
<script async custom-element="amp-ad" src="https://cdn.ampproject.org/v0/amp-ad-0.1.js"></script>
<script async custom-element="amp-auto-ads" src="https://cdn.ampproject.org/v0/amp-auto-ads-0.1.js"></script>
<?php
}I added the Adsense code, but no ads appear. Why?
In my experience, Display ads show up right away (if they don’t, go back and check each step). When you add Auto Ads to AMP for the first time, they show up after a few days, and you will see them more easily on long articles. Sticky Ads show up right away, but not on every page view or every article. If you are still using the old amp-sticky-ad code, replace it with the amp-ad code with the sticky attribute above, because version 0.1 of amp-sticky-ad may be reported as an AMP error in Search Console.
Conclusion
We can use ad units, Auto Ads, and anchor ads (Sticky Ads) from Adsense on one AMP page. However, don’t overload the page with ads, because a page packed with ads annoys readers and may also violate Google’s ad experience policies. Whether this article helped you or not, leave a comment below so I can improve future articles.


Can you give me tutorials use AMP Official plugin to add auto ads?
You can add auto ads with functions.php file. More plugin is more slow website.
hi, I tried to put auto ads on the amp and it doesn’t work for me, but the fixed amp ads work perfectly
Hello, auto ads need 3-7 days to start working on the AMP.