Follow
Lucid Gen
  • Marketing
    • Facebook
    • Google
    • Zalo
    • Content marketing
    • Email Marketing
    • Marketing tools
    • SEO
  • Website
    • WordPress
  • Technology
    • Computer
    • Phone
  • Life
No Result
View All Result
Lucid Gen
  • Marketing
    • Facebook
    • Google
    • Zalo
    • Content marketing
    • Email Marketing
    • Marketing tools
    • SEO
  • Website
    • WordPress
  • Technology
    • Computer
    • Phone
  • Life
No Result
View All Result
No Result
View All Result
Lucid Gen

Lucid Gen › Technology › Computer › How to download Power BI for Mac and Windows

How to download Power BI for Mac and Windows

Đánh giá bài viết
15/10/2021
0
Cách cài đặt Power BI trên Mac và Windows | How to download Power BI for Mac and Windows

Cách cài đặt Power BI trên Mac và Windows | How to download Power BI for Mac and Windows

44
SHARES
4.3k
VIEWS
Share to Facebook

Power BI is the most popular data analysis and measurement application today. The advantage of Power BI is to create intuitive, vivid, and customizable report dashboards while viewing the report. Although Power Bi only supports Windows, Mac users can rest assured, Lucid Gen will guide you to install Power BI for Mac (Macbook) and Windows.

Related posts

  • How to increase mouse tracking speed Mac
  • How to uninstall apps on Mac completely
  • How to download Final Cut Pro for free
Table of contents
  1. Install Power BI for Windows
    1. Get Power BI Desktop using Microsoft Store
    2. Download Power BI Desktop with the installation file
  2. Install Power BI for Mac (Macbook)
    1. Preparation before installing Power BI
    2. Windows Emulator for Mac
    3. Install Power BI for Mac like Windows
  3. Conclusion

Install Power BI for Windows

Power BI and Windows are Microsoft products, so installing Power BI for Windows will be very easy. You can install Power BI Desktop through the Microsoft Store or download the installation file to install it yourself.

Get Power BI Desktop using Microsoft Store

You open the Microsoft Store application > find Power BI Desktop > click the Get button (Buy). Completely free.

Note: Power BI Desktop is for computers, and Power BI is for phones and tablets.

Tải Power BI Desktop bằng Microsoft Store
Get Power BI Desktop using Microsoft Store

Download Power BI Desktop with the installation file

If you cannot download Power BI Desktop using the Microsoft Store, please download the Microsoft direct installation file and follow the instructions below.

Step 1: Open the Power BI installation file > select the language > Next (Continue).

Cài đặt Power BI cho Windows: Chọn ngôn ngữ > Next
Install Power BI for Windows: Select language > Next

Step 2: You check the box to accept the terms > Next (Continue).

Cài đặt Power BI Desktop cho Windows: Chấp nhận điều khoản > Next
Install Power BI Desktop for Windows: Accept Terms > Next

Step 3: You click Install and Finish to complete the installation of the Power BI Desktop for Windows.

Cài đặt Power BI Desktop cho Windows: Install > Finish
Install Power BI Desktop for Windows: Install > Finish

Open Power BI and enjoy your work. This is the first welcome screen, and you can turn it off or click the Get started button to log in to your account.

Cài đặt Power BI Desktop cho Mac và Windows thành công
Install Power BI Desktop for Mac and Windows successfully

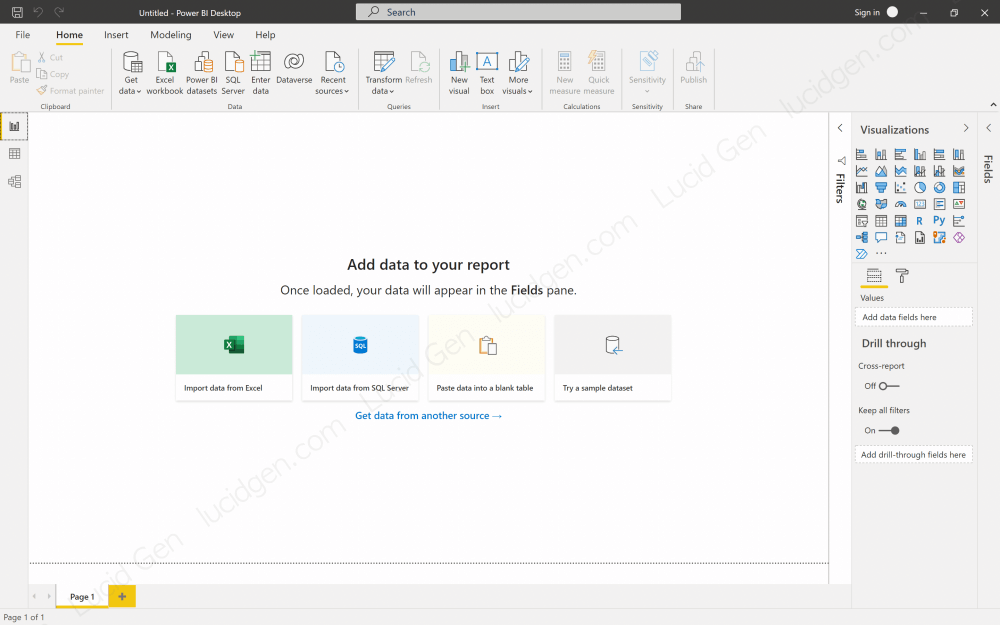
This is the familiar default interface of Power BI, and you can already use it.

Giao diện Power BI cho Mac và Windows giống nhau
Power BI interface for Mac and Windows is the same

Install Power BI for Mac (Macbook)

As you know, Power BI does not yet support applications for macOS, so to install Power BI for Mac (Macbook), you need to emulate Windows. You install Power BI like the way Windows does above.

Video tutorial to install Power BI on Mac

Preparation before installing Power BI

Disable Gatekeeper and SIP

To install applications outside the App Store, especially Windows emulators, you must first disable Gatekeeper and SIP for Mac.
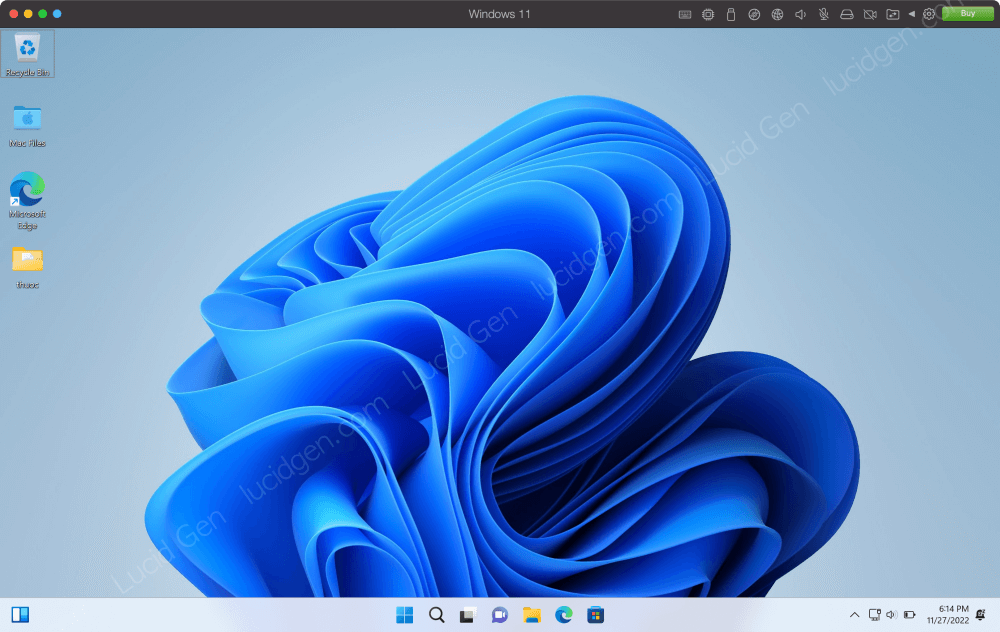
Download the installation files

We will use Parallels software to emulate Windows for Mac. Please download the installation files below; choose the version accordingly depending on whether your Mac is Intel or M1 (ARM).

ToolsM1 (ARM)Intel
Parallelsv17 (Good for BigSur)v17 same as M1
v16 (macOS ≥ 10.13.6)
v15
BypassWindows 10
Windows 11
Same as M1
Windows 1010 ARM Insider PreviewMicrosoft
Download at: Select edition
Windows 1111 ARM Insider Preview
Login > Register Insider > Download
Microsoft
Download at: Download Windows 11 Disk Image (ISO)

As for Power BI Desktop, you still download the installation file directly from Microsoft. Collected, we have all the files like this picture.

  • ParallelsDesktop
  • Windows 10/11
  • Bypass
  • PBIDesktopSetup
Tải đầy đủ các file để cài đặt Power BI cho Mac
Download the complete files to install Power BI for Mac

When you are ready, we will start to emulate Windows to install Power Bi for Mac (Macbook) according to the instructions below.

Windows Emulator for Mac

Step 1: Open the file ParallelsDesktop.dmg> double click Install> select Open when there is a popup.

Giả lập Windows cho Mac - Install và Open
Install and Open

Step 2: Click Accept terms> enter the password to open the device when there is a popup.

Giả lập Windows cho Mac - Accept và điền mật khẩu
Accept and enter the password

Step 3: You click Continue to skip the introduction.

Giả lập Windows cho Mac - Continue
tiếp tục

Step 4: Select Install Windows > click Continue.

Giả lập Windows cho Mac - Install Windows và Continue
Install Windows and Continue

Step 5: Parallels will automatically recognize the Windows files on your computer; if you see the correct Windows file, click Continue.

Giả lập Windows cho Mac - Chọn file Windows và Continue
Select Windows file and Continue

Step 6: You click Continue because other options are for PRO.

Giả lập Windows cho Mac - Continue
Continue

Step 7: You leave the name Windows 10 or Windows 11 depending on the version of Windows you have installed; everything else is left to default (no more ticking) > Create.

Để mặc dịnh và Create
Leave the default and Create

Step 8: You wait a few minutes for Parallels to install Windows on the virtual machine; after that, you can maximize the virtual machine window to use as a real Windows computer.

Giả lập Windows bằng Parallels thành công
Simulate Windows with Parallels successfully

Step 9: Parallels will ask you to log in to your account to use; you can log in with Google quickly or create an account to log in. You will get a 14-day trial (Trial).

Đăng nhập để bắt đầu dùng thử 14 ngày
Sign in to start your 14-day trial

Step 10: To continue using Parallels after the trial has expired, install Bypass. for your Mac, there will be an app called Windows 10/11. You need to open this application to use Windows; ignore the notifications of Parallels.

Cài đặt Bypass để tiếp tục sử dụng máy ảo Windows khi hết hạn dùng thử
Install Bypass to continue using the Windows virtual machine when the trial expires

Install Power BI for Mac like Windows

The whole process is hard. However, we only do it once. Now open the Microsoft Store in the virtual machine to download Power BI Desktop or use the installation file instructed in the Power BI for Windows installation section. Thus, you can use Power BI for Mac (Macbook).

Cài đặt Power BI cho Mac (Macbook) như Windows
Install Power BI for Mac (Macbook) like Windows

While using Power BI for Mac, you should not open many other applications. Only open the applications you really need because the virtual machine also consumes a lot of RAM.

Conclusion

Hopefully, Microsoft will support Power BI for Mac in the future to make macOS users less extreme. Power BI is often used with Excel, so download Office for Mac if you don’t have it yet. If you found this article useful or have questions, feel free to leave a comment below the article. Good luck with your Power BI installation!

Đánh giá bài viết
Share17Pin5Share3
Next Post
Cách chỉnh tốc độ chuột MacBook, Magic Mouse, Logitech trên MacBook

How to increase mouse tracking speed Mac

Leave a Reply Cancel reply

I will review and reply to all comments within the day. Please feel free to leave your comments on this article!

Your email address will not be published. Required fields are marked *

Recommend for you

  • Trending
  • Latest
Cách chèn logo vào ảnh trên điện thoại - How to add logo to photo on iPhone and Android

How to add logo to photo on iPhone and Android

13/07/2021
0
Cách xóa Microsoft AutoUpdate trên Macbook - How to uninstall Microsoft AutoUpdate on Mac

How to uninstall Microsoft AutoUpdate on Mac

06/08/2021
2
Cách cài đặt Camtasia trên Macbook vĩnh viễn - How to get Camtasia on Mac lifetime free

How to get Camtasia on Mac lifetime free

19/10/2021
0
Cách chèn Icon vào PowerPoint siêu đẹp - How to insert icons in PowerPoint beautifully

How to insert icons in PowerPoint beautifully

05/08/2021
0
Cách chỉnh tốc độ chuột MacBook, Magic Mouse, Logitech trên MacBook

How to increase mouse tracking speed Mac

14/05/2022
2
Cách cài đặt Power BI trên Mac và Windows | How to download Power BI for Mac and Windows

How to download Power BI for Mac and Windows

15/10/2021
0
Cài đặt tracking chuyển đổi Contact Form 7 How to set up Contact Form 7 tracking

How to set up Contact Form 7 tracking

08/10/2021
0
Cách gỡ ứng dụng trên Mac và dọn dẹp sạch sẽ - How to uninstall apps on Mac completely

How to uninstall apps on Mac completely

08/10/2021
0

Lucid Gen

A blog sharing about digital marketing, miscellaneous about technology and what you might need that the author knows.

Developed by blogger
Minh Khue › Donate

228 Posts and 4159 Comments

Disclosure: This website has advertisements. If you don’t have money, how can you write?

 Google Play  Microsoft Store

Recent Comments

  • Roos on How to uninstall Microsoft AutoUpdate on Mac
  • Minh Khuê on How to download Microsoft Office on Mac for free for life
  • Minh Khuê on How to increase mouse tracking speed Mac
  • Nguyen Le on How to increase mouse tracking speed Mac
  • Long on How to download Microsoft Office on Mac for free for life

Image sources

Lucid Gen edits images from the following sources: Freepik, Unsplash & Pixabay.

Subscribe to Blog via Email

Enter your email address to subscribe to this blog and receive notifications of new posts by email.

  • About
  • Contact
  • Terms and policies

© 2019 Lucid Gen with by Minh Khue DMCAProtected

No Result
View All Result
  • Marketing
    • Facebook
    • Google
    • Zalo
    • Content marketing
    • Email Marketing
    • Marketing tools
    • SEO
  • Website
    • WordPress
  • Technology
    • Computer
    • Phone
  • Life

© 2019 Lucid Gen with by Minh Khue DMCAProtected