
Adding a Conda environment to PyCharm or DataSpell is one of those things that sounds complicated but is actually pretty straightforward once you know where to look. If you have already set up a Conda environment with all the packages your project needs, the last thing you want to do is recreate it from scratch inside PyCharm. This guide will show you exactly how to connect your existing Conda environment to PyCharm or DataSpell, and a bunch of tips to manage your environments like a pro.
Why use Conda instead of a regular venv?
Before we dive in, let me explain why Conda is often a better choice than Python’s built-in venv, especially for data science and analytics work.
When you use python -m venv, you can only work with the Python version that is already installed on your machine. Want to test your code on Python 3.9? You need to install Python 3.9 separately first. With Conda, you just run conda create -n myenv python=3.9 and it handles everything for you.
Conda also manages non-Python dependencies. Some scientific packages like NumPy, SciPy, and TensorFlow depend on native C libraries. Conda bundles these together so everything just works out of the box, without you having to dig through error messages about missing system libraries.
And if you use Anaconda (not just Miniconda), your base environment already comes with over 500 pre-installed data science packages that are tested to work well together. That is a massive time saver.
Add Conda environment to PyCharm
To add a Conda environment to PyCharm or DataSpell, you need to follow these steps:
Step 1: Open the application’s Settings using the menu above.
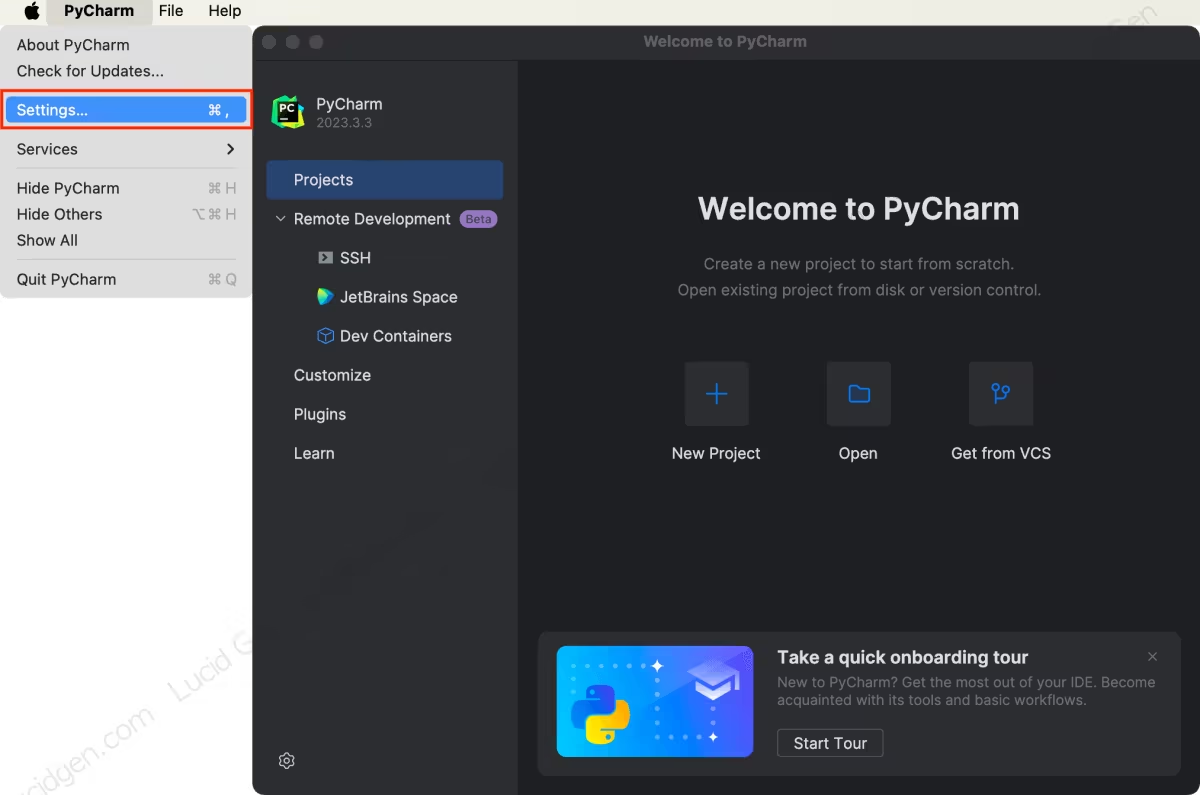
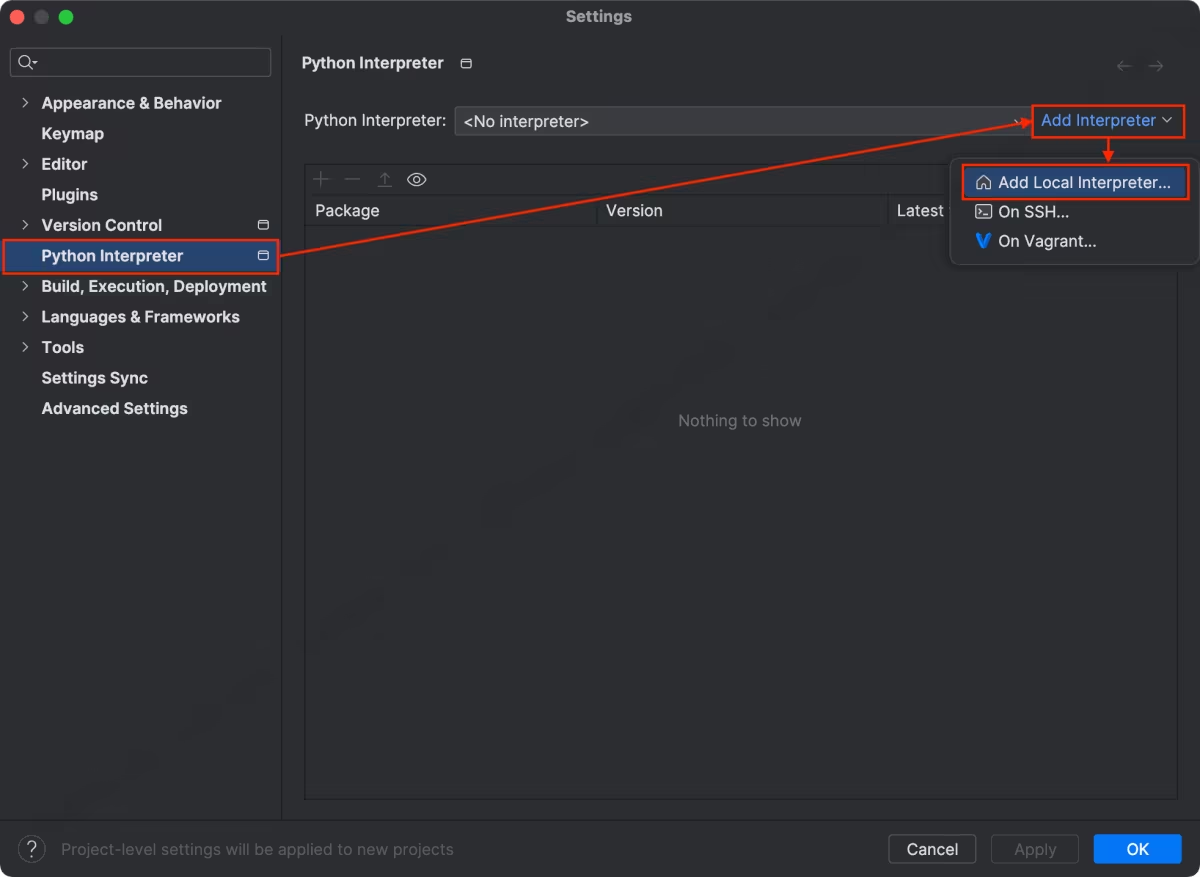
Step 2: Go to the Python Interpreter section, click the Add Interpreter button and choose Add Local Interpreter.
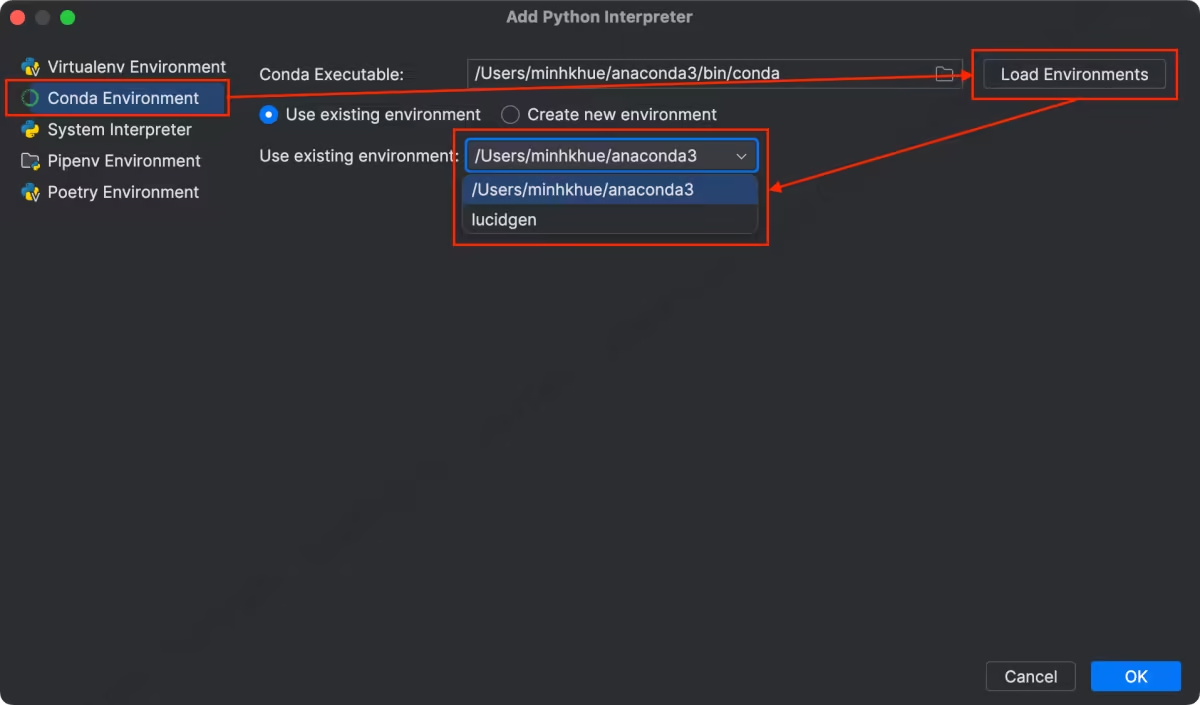
Step 3: Go to the Conda Environment section and choose the created Conda environment. If you don’t see your Conda environment, click the Load Environments button to update the Conda environment list.
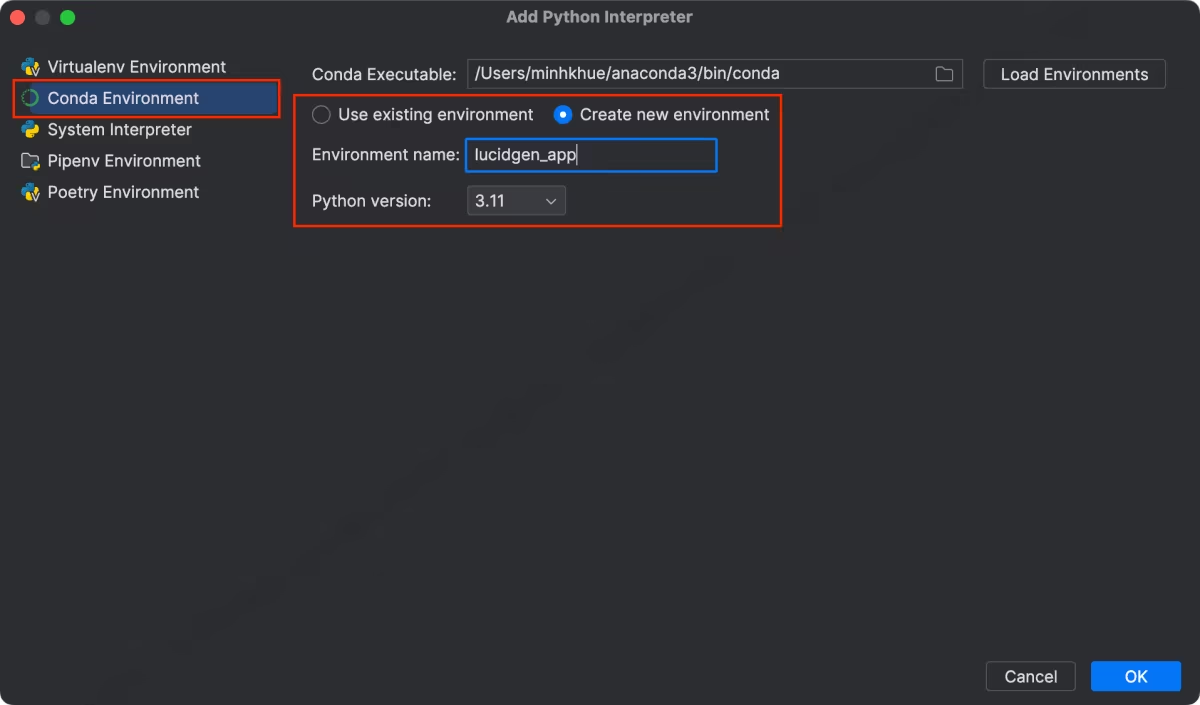
In addition, you can also create a Python virtual environment with Conda right in the PyCharm and DataSpell applications.
Step 4: Review the Conda environment added to PyCharm or DataSpell and click the OK button to complete.

Managing virtual environments in PyCharm
To see the list of Conda environments you have added to PyCharm, click Show All in the Python Interpreter section.
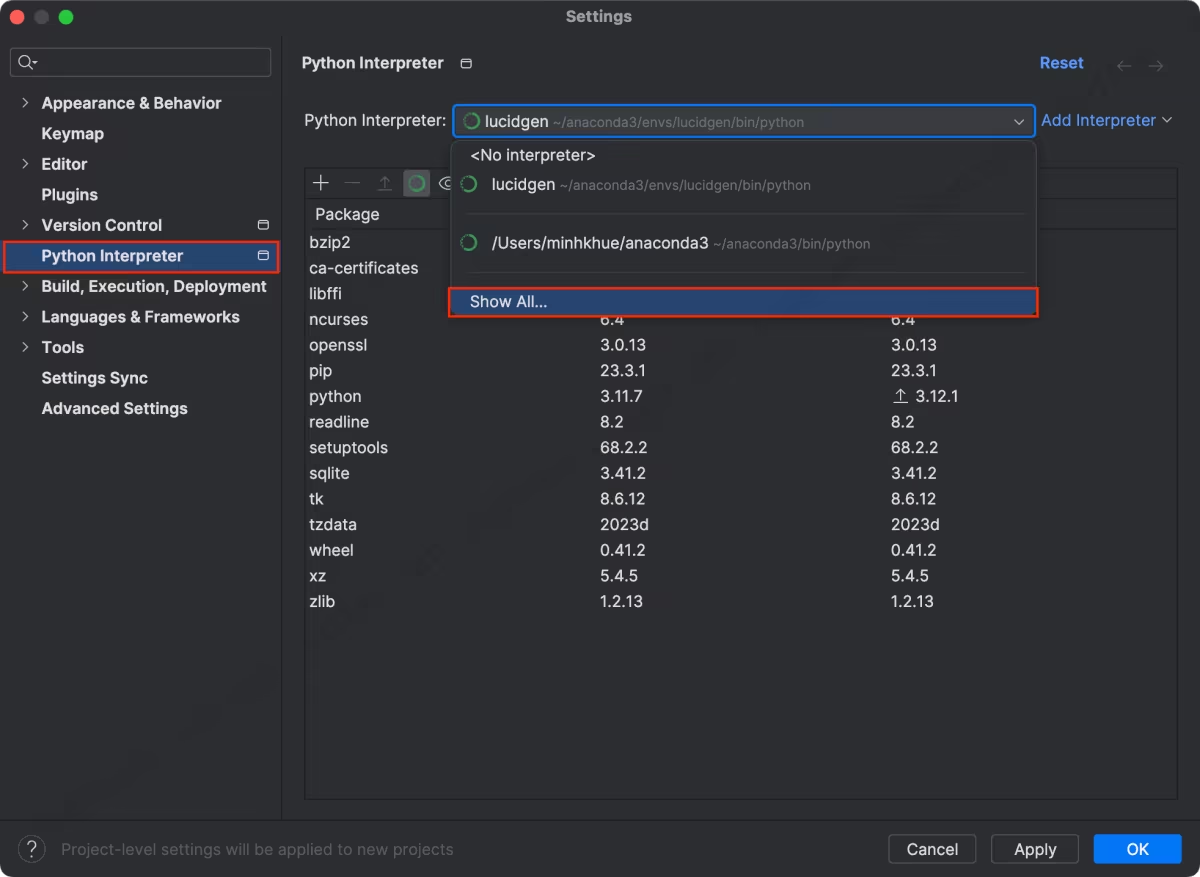
You can delete or edit Conda environments in the environment list window in PyCharm or DataSpell.

Choose the Conda environment when creating a new project
When creating a new project in PyCharm or DataSpell, you should choose the Base conda environment if it is a data science project. Because Anaconda’s Base conda environment already includes more than 500 premium packages for data science.

You can add another Conda environment to PyCharm or DataSpell by clicking Custom environment.

Change the Conda virtual environment for a project
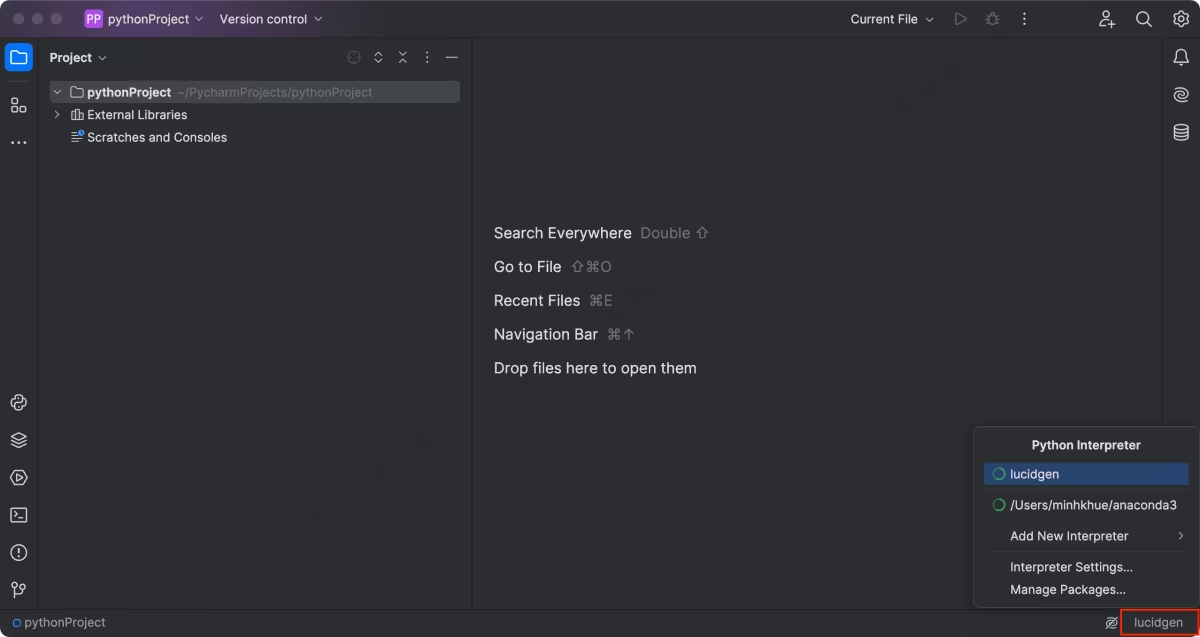
If you are working on a project and want to change its environment, click the current environment name in the lower right corner. You will see the Conda environments you added to PyCharm or DataSpell.
Install packages using the PyCharm Terminal
One of the handiest things about connecting your Conda environment to PyCharm is that the built-in Terminal automatically activates your project’s environment. So when you open the Terminal tab at the bottom of PyCharm, you can run conda or pip commands and the packages go directly into the right environment.
To install a package into your active Conda environment from the PyCharm Terminal, you have two options:
Using conda (recommended for scientific packages):
conda install pandasUsing pip (works for any PyPI package):
pip install requestsAs a general rule, if a package is available on the conda channel, use conda install because conda resolves dependency conflicts better. Use pip only for packages that are not available in the conda repository.
You can also install packages through PyCharm’s graphical interface. Go to Settings, then Python Interpreter, and click the plus icon to search and install packages without touching the Terminal at all. Personally, I still prefer the Terminal because it’s faster, but the GUI option is great if you’re just getting started.
What is different about DataSpell?
DataSpell is JetBrains’ dedicated tool for data scientists. It is built on the same foundation as PyCharm but has a few differences worth knowing about:
DataSpell opens in a workspace mode rather than a single-project mode. This means you can work on multiple notebooks and scripts across different folders without having to create a formal project for each one. When you set up a Conda environment in DataSpell, it applies to the entire workspace by default, not just one project.
DataSpell also has better native Jupyter Notebook support. The notebook cells run interactively and you can see variable values and data frames inline, which is much smoother than PyCharm’s notebook mode. If you do a lot of exploratory data analysis, DataSpell feels more natural.
The steps to add a Conda environment are the same in both tools. The interface looks almost identical, so everything in this guide applies to DataSpell as well.
Updates in PyCharm 2024 and 2025
If you are using PyCharm 2024 or newer, you might notice a slightly different look in the Settings menu. JetBrains has been gradually updating the UI as part of their “New UI” redesign that became the default in 2023. The core workflow for adding interpreters is the same, but the layout looks cleaner and some buttons have moved around.
One handy new feature in PyCharm 2024 is the improved interpreter detection. When you open a project that has a conda environment defined in an environment.yml file, PyCharm will often suggest setting up the right environment automatically. You still confirm the action, but it saves you from going through Settings manually.
In PyCharm 2025, JetBrains has also improved the AI-assisted coding features, but those work independently from your environment setup. Just make sure your Conda environment is set correctly first and everything else falls into place.
Common issues and how to fix them
Sometimes things don’t go as smoothly as expected. Here are a few issues people run into and how to solve them.
Conda environment not showing up in PyCharm. If you created a new Conda environment but it doesn’t appear in the list, click the Load Environments button. PyCharm caches the environment list and does not refresh it automatically. If it still doesn’t show up, make sure you actually created the environment by running conda env list in a terminal outside of PyCharm.
Conda executable not found. PyCharm needs to know where your conda binary is. If you see an error about the conda executable not being found, you need to set the path manually. On Mac, the conda binary is usually at /opt/anaconda3/bin/conda or /opt/miniconda3/bin/conda. On Windows, it is typically at C:\Users\YourName\anaconda3\Scripts\conda.exe. You can check by running which conda in your terminal (Mac/Linux) or where conda (Windows).
Packages installed but not recognized by PyCharm. Sometimes PyCharm shows an “unresolved import” error even after you installed the package. This usually means the project is pointing to a different interpreter than the one you installed the package into. Double-check the interpreter in the bottom right corner of PyCharm to confirm it shows the correct Conda environment name.
Terminal in PyCharm not activating the Conda environment. If your PyCharm Terminal opens but shows the base environment instead of your project’s environment, try closing and reopening the Terminal tab. If the problem persists, go to Settings, then Tools, then Terminal, and make sure the shell path is set correctly for your operating system.
Pro tips for managing multiple projects
After working with Conda and PyCharm for a while, here are a few habits that will save you a lot of headaches:
Create one Conda environment per major project, not per file. Sharing one environment across dozens of small scripts is fine, but if you have a serious project with specific package version requirements, give it its own environment. It avoids the classic “I updated package X for Project A and broke Project B” situation.
Keep an environment.yml file in your project root. You can export it by running conda env export > environment.yml. This makes it easy to recreate the same environment on another machine or share it with a teammate. PyCharm can read this file and set up the environment automatically in newer versions.
Use descriptive environment names. Instead of “env1” or “myproject”, use something like “analytics-py310” or “ml-pipeline-2025”. When you have ten environments listed in PyCharm and need to switch quickly, a clear name is worth a lot.
Conclusion
Adding a Conda environment to PyCharm or DataSpell is a one-time setup that makes your entire workflow smoother. You get the right Python version, the right packages, and a Terminal that just works without any extra configuration. For daily data science or programming work, the Base conda environment is usually all you need. For larger or more specialized projects, creating a dedicated Conda environment and linking it to PyCharm is the way to go. Once you get the hang of it, switching between environments for different projects takes about five seconds.


